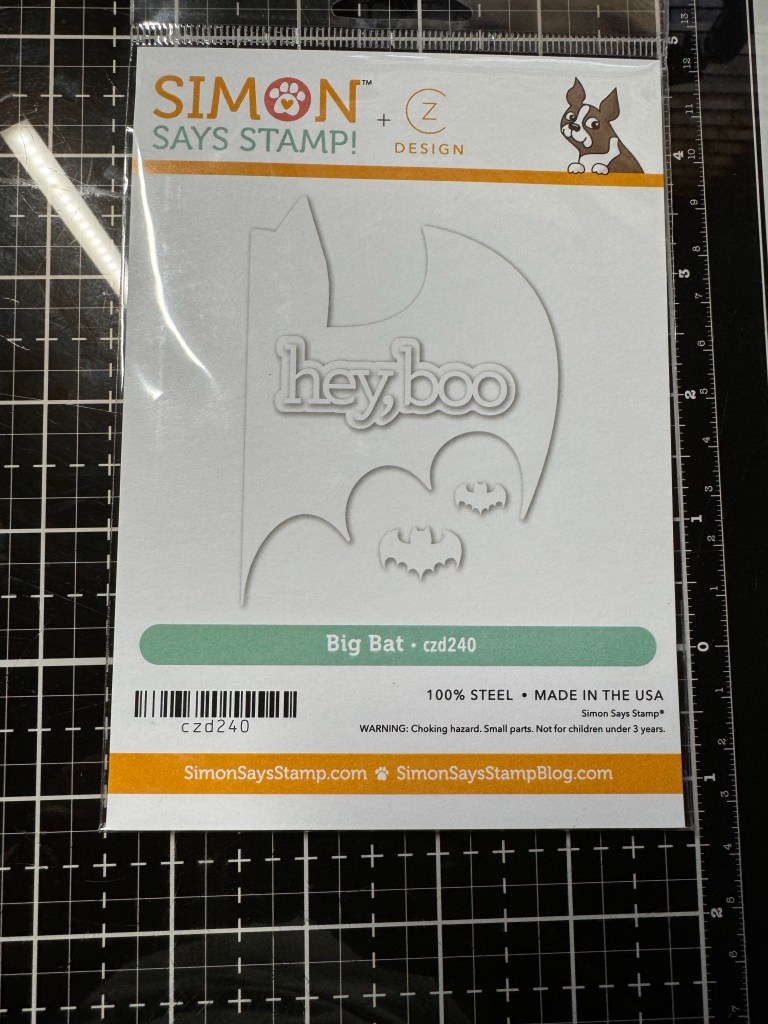
Hay my crafty friends! I just received Happy Mail from Simon Says Stamp. And I have to share and can’t wait to create some awesome things with all these goodie.
Happy Mail
This crafty lady is going to have fun today. I’ll share all my project when I’m done. Have a great day everyone.
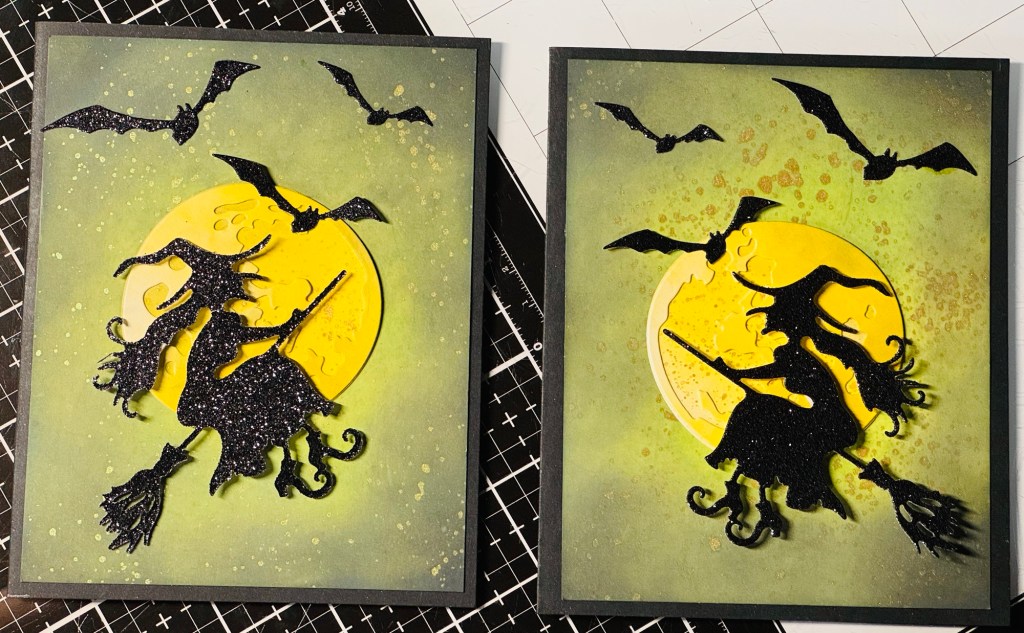
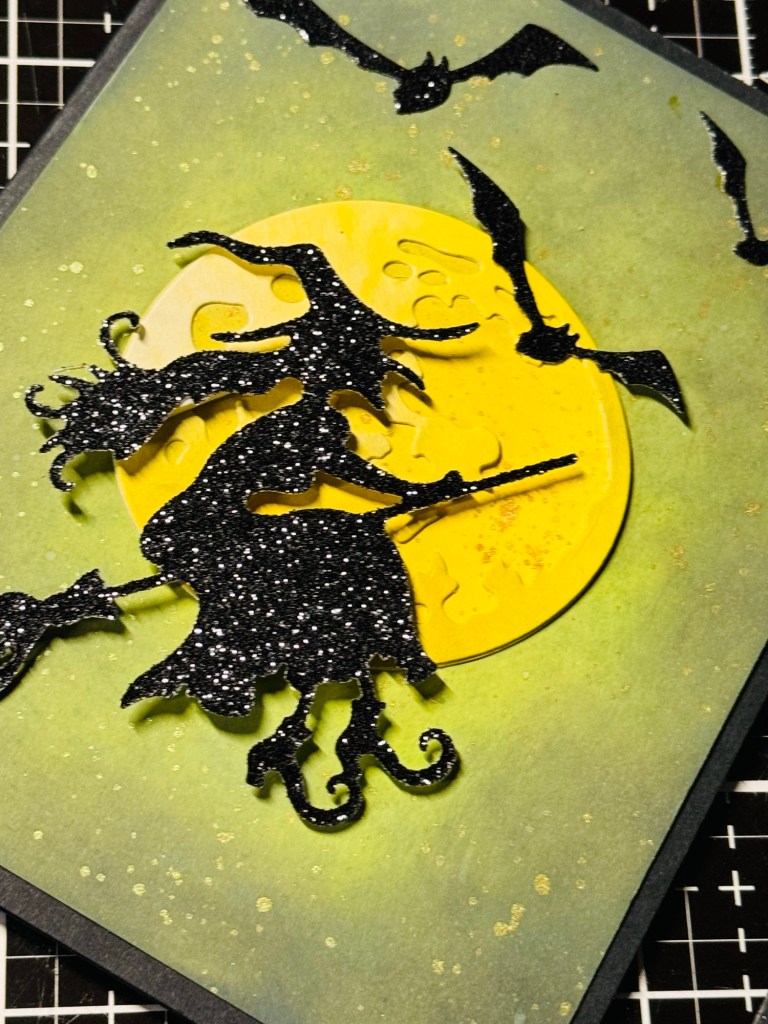
Hello my crafty friends! Hope all is well and had a great weekend. I wanted to share some more witch’s cards I finished this last weekend. This time I decided to make some witch’s flying by the moon.
Her eyes were dark.Watching And WaitingI love the way these two cards came out. The background was done with distress oxide twisted citron, mowed lawn and rustic wilderness. Moon was blended with squeezed lemonade and mustard seed. Plus I used distress spritz twisted citron and fossilized amber splashed it on the moon and the background .I used Tim Holtz thinlits called Moonliight #666386 and Spellbinders witch on broom die set. Cut her out with 110 black glitter card stock and bats.
Thank you for checking out more of my witch’s that I created. Hamlet me know what you think and please have a wonderful evening
Hello my crafty friends! I wanted to share with you all on some of the cards I have been creating this last weekend.
Once a month I meet with these incredible crafty lady’s. They all have different styles, techniques and they make beautiful cards. These group of ladies always inspire me to create more cards and use different techniques. I feel very lucky to hang out with all theses creative ladies.
I started my backgrounds about a week before I met with these ladies, then I was working on my witches and all my embellishments for the front of the cards. I was so happy that I got to them this last weekend. So now I want to share them with you guys.
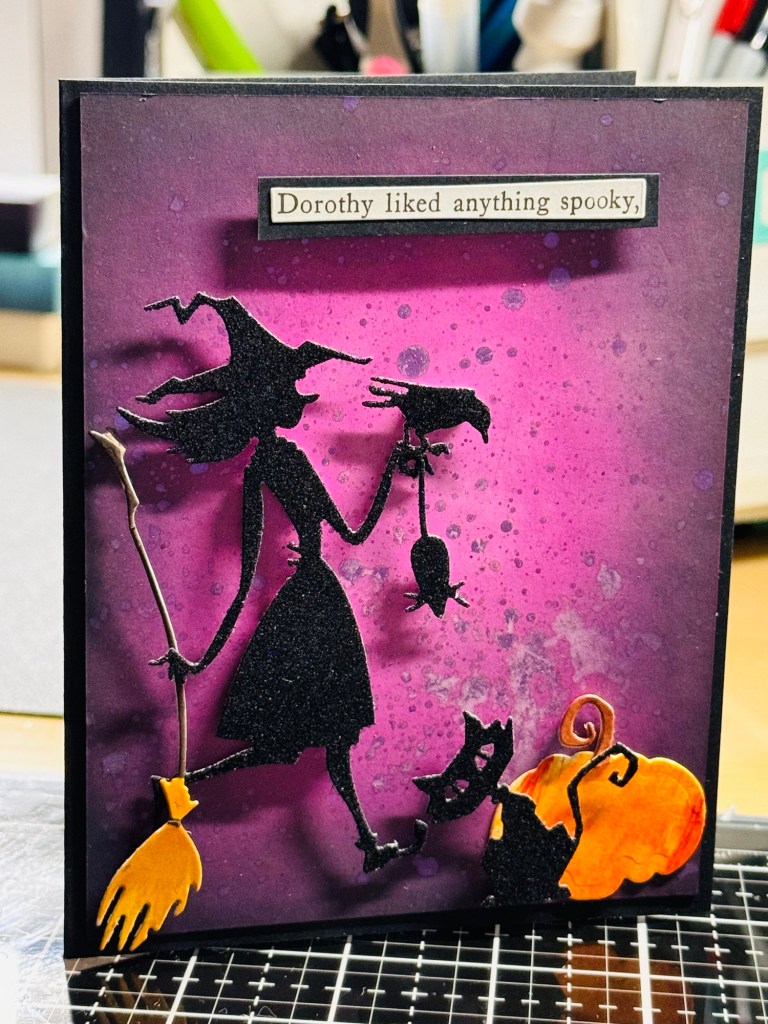
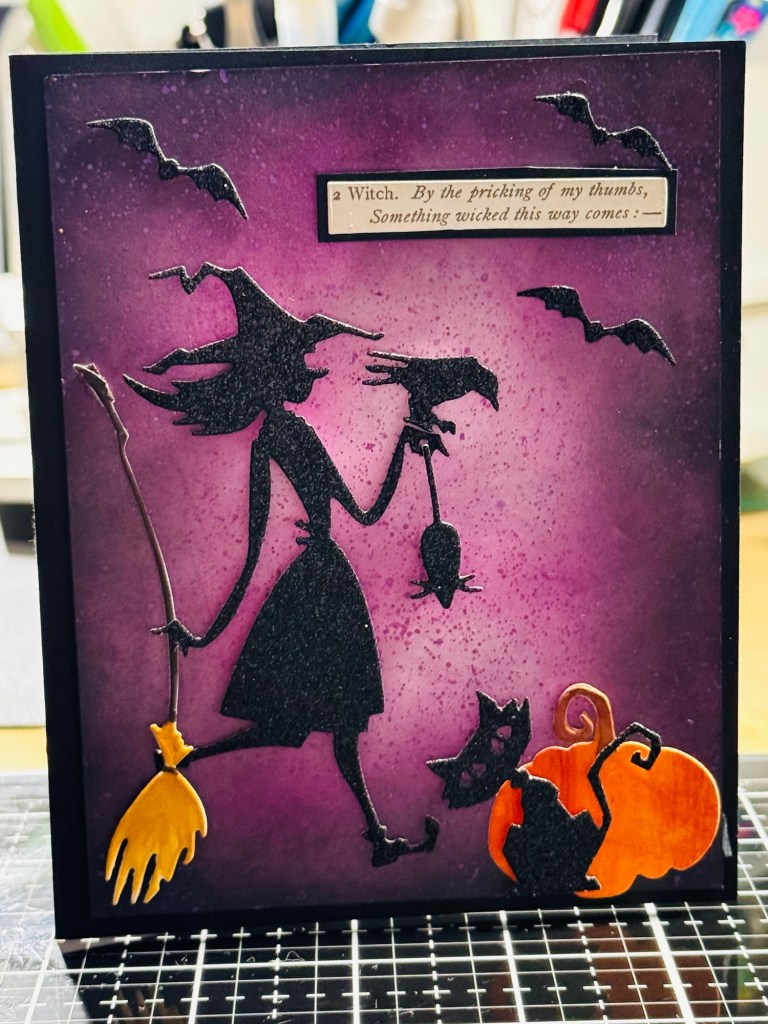
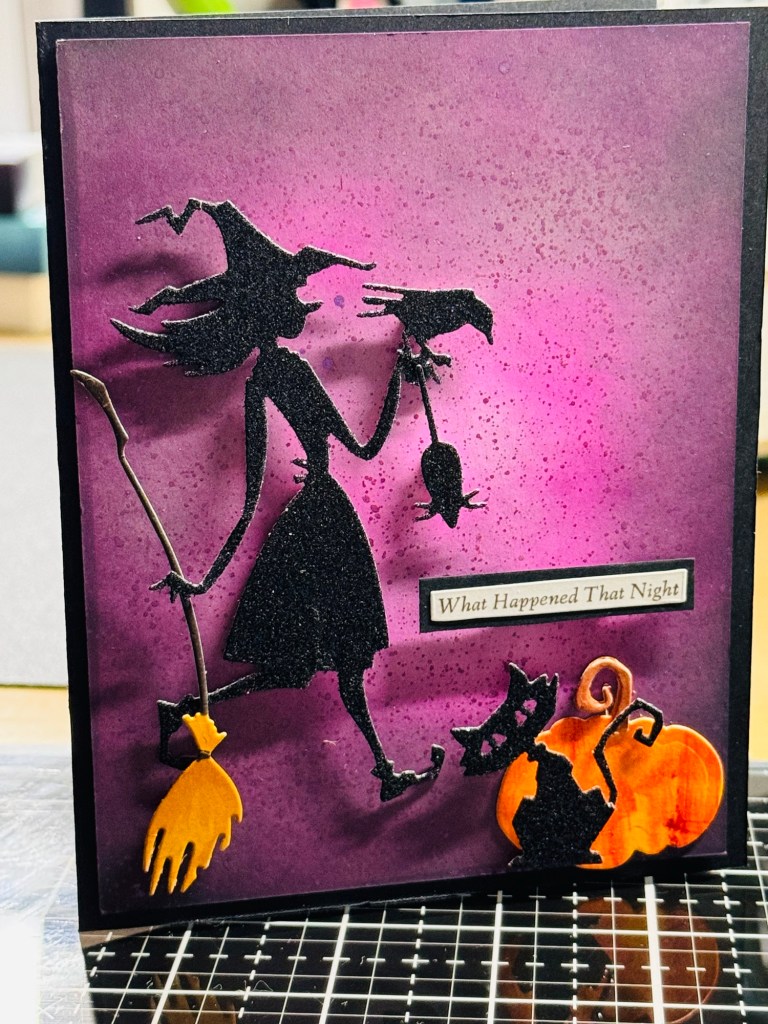
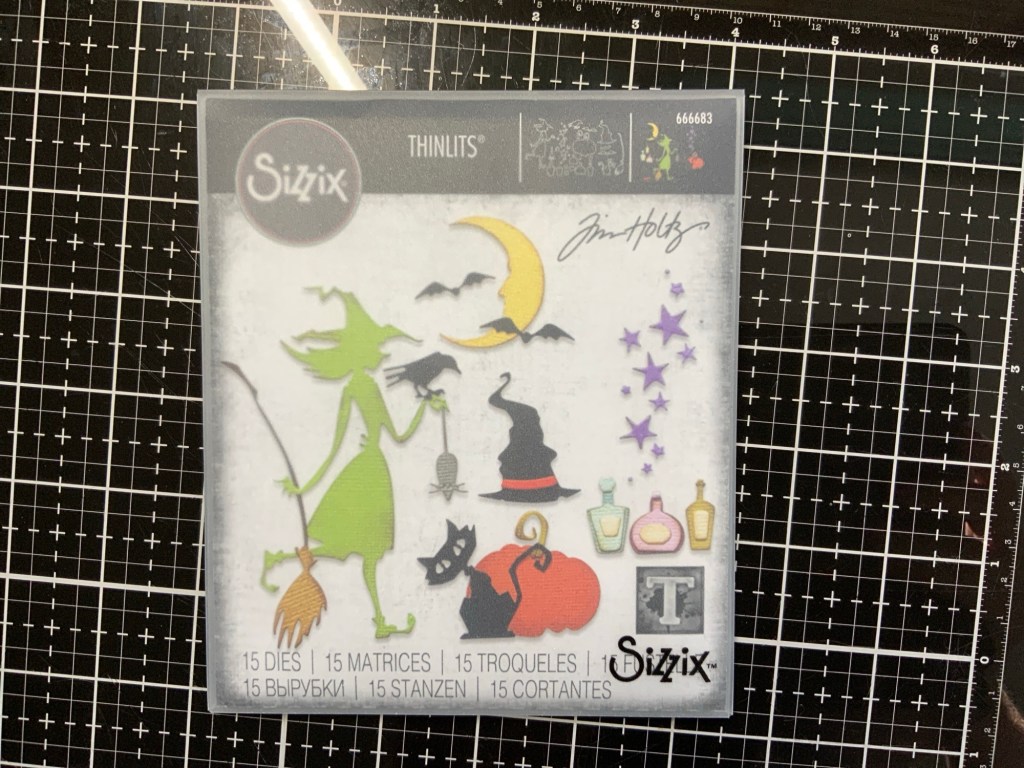
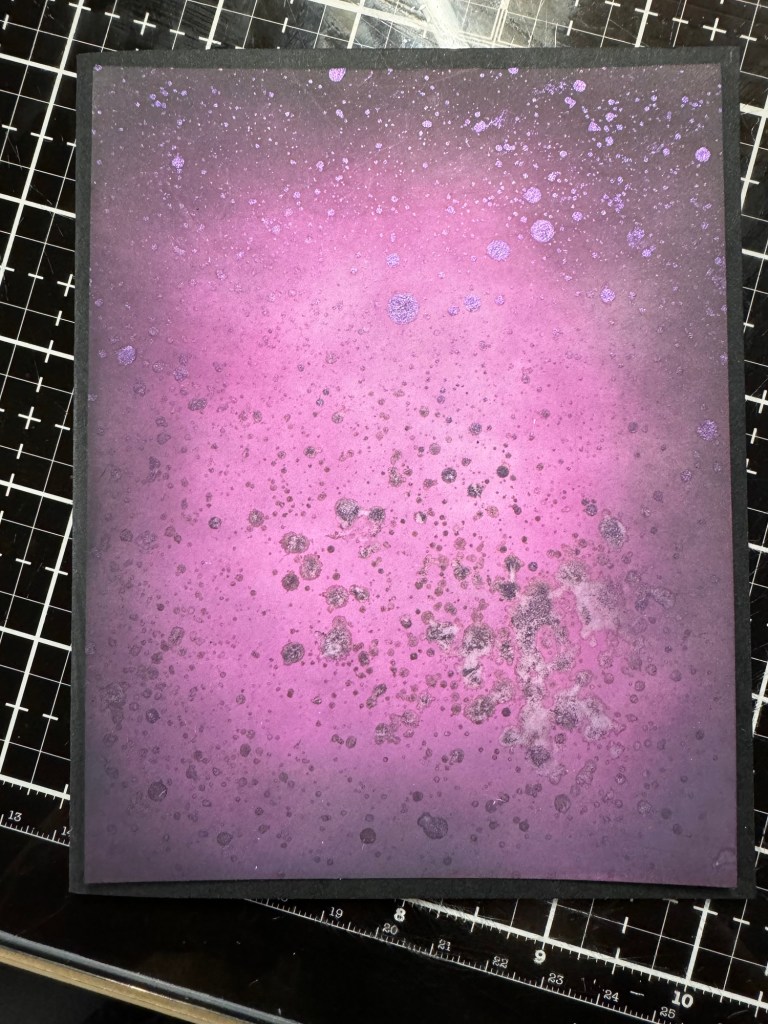
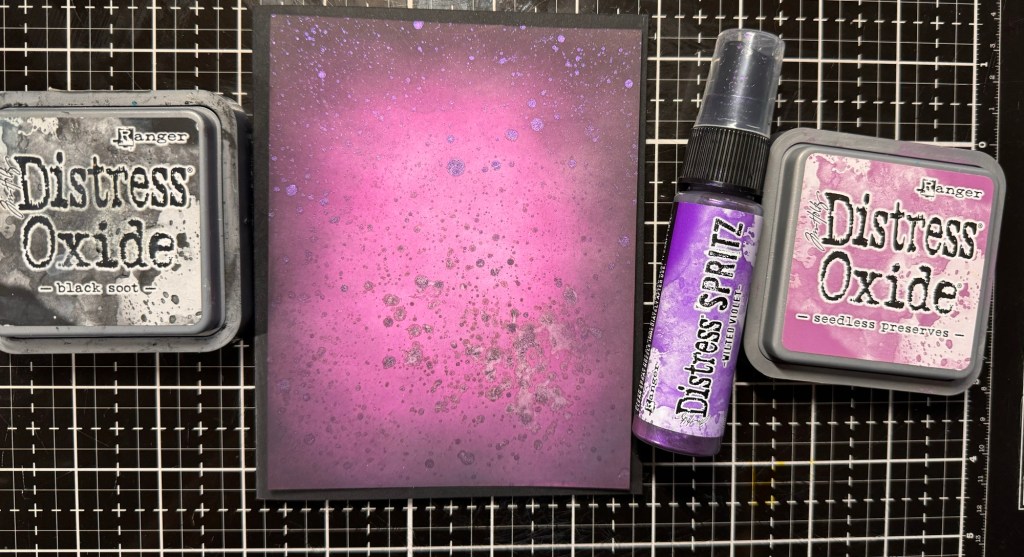
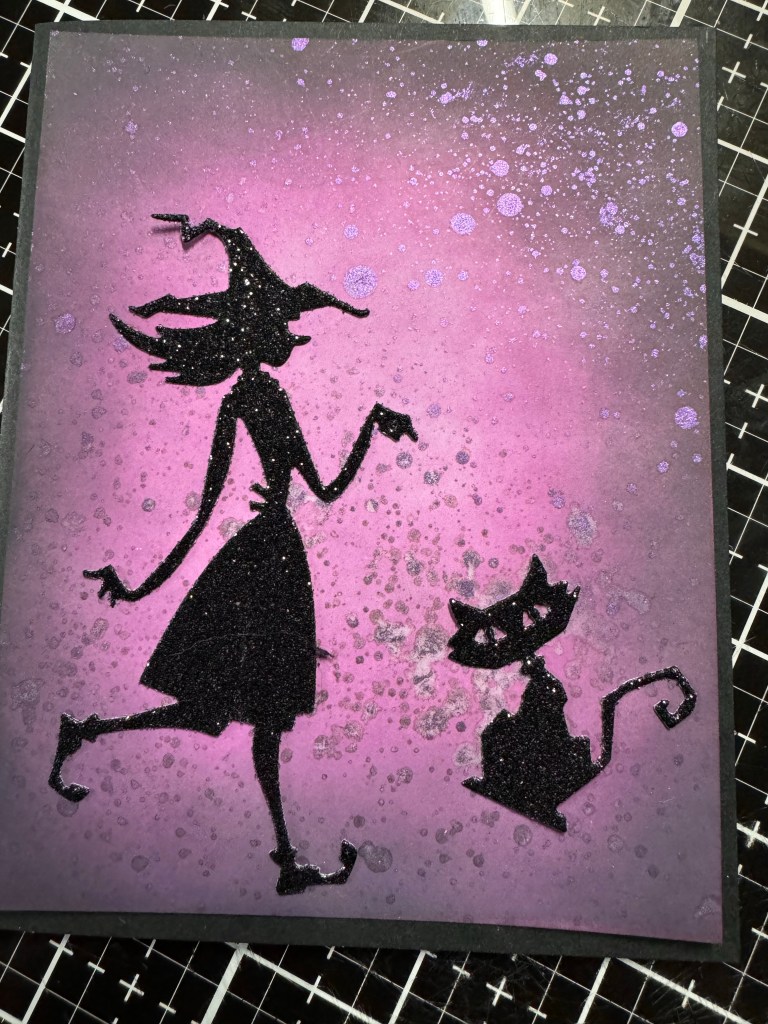
Halloween cards!Dorothy likes anything spookyWitch. By the pricking of my thumbs, something wicked this way comes:What Happened That Night I used Tim Holtz new Thinlits call Vault Wicked #666683. The witch’s, cats, rats, bats and birds were cut out of 110 black glitter card stock. The broom was cut out of 110 white card stock and color with Altenew Artist Marker’s Y823 paper bag, Y762 Expresso and y316 Honey Drizzie. The pumpkin was done with Copic markers YR04, YR68 and E99. Background I blended together are Tim Holtz distress Qxide seedless preserves, , villainous potion and black soot. Also took his new distress spritz wilted violet and splash it on my background and it gave a beautiful shimmer look.
Please let me know if you like my cards and a comment on what you think about the cards. I hope you try these techniques with what ever you have in your stash. Thank you for checking out my website. Have a great day everyone.
Hi crafty friends! Today I decided to work on some Halloween background for my cards. I think it’s important to see what you’re gonna use as your centerpiece on your card before creating your background. Later on as I put everything together later, I’ll show you the finished cards for Halloween. But for right now I’m only working on backgrounds for my Halloween cards.
The background in the middle I used Tim Holtz distress oxide seedless, preserve, and black soot. I blended the colors together but first I used Seedless preserves and cover 110 white card stock. And then took black soot and blend all around the edges and sides of my card stock. I took tim holtz new distress spritz and splatter the background. Once dry, it gave it a shimmery look.
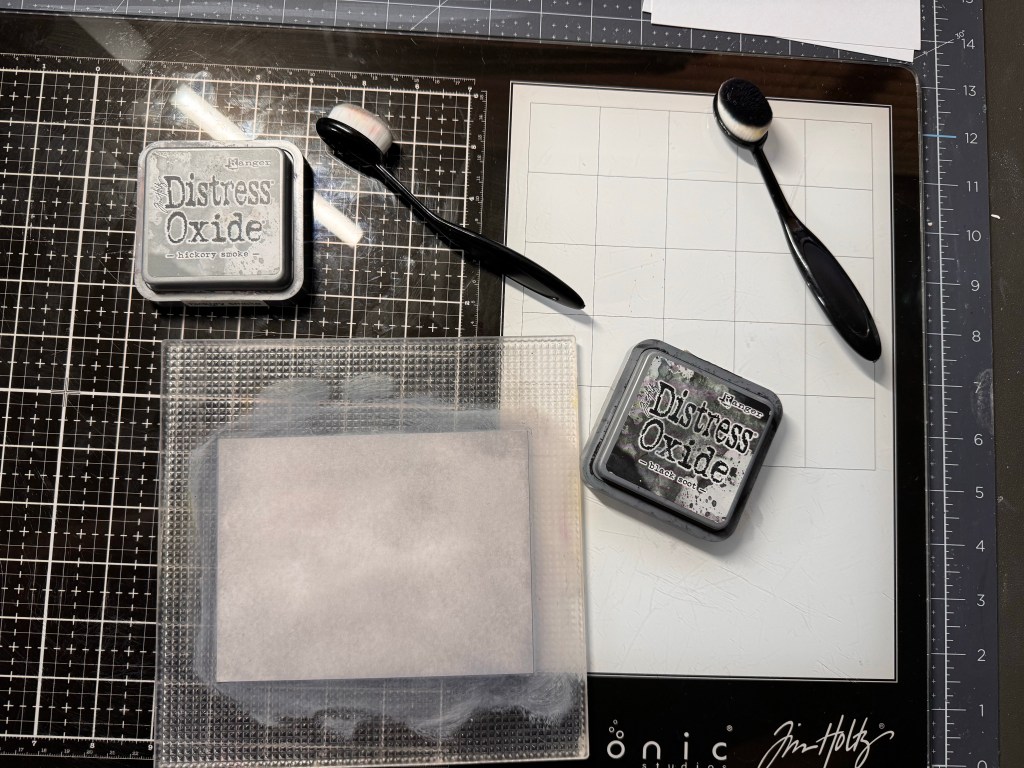
On the two at the end, I took distress oxide black soot and hickory smoke, which are also tim holtz products and covered a white card stock.
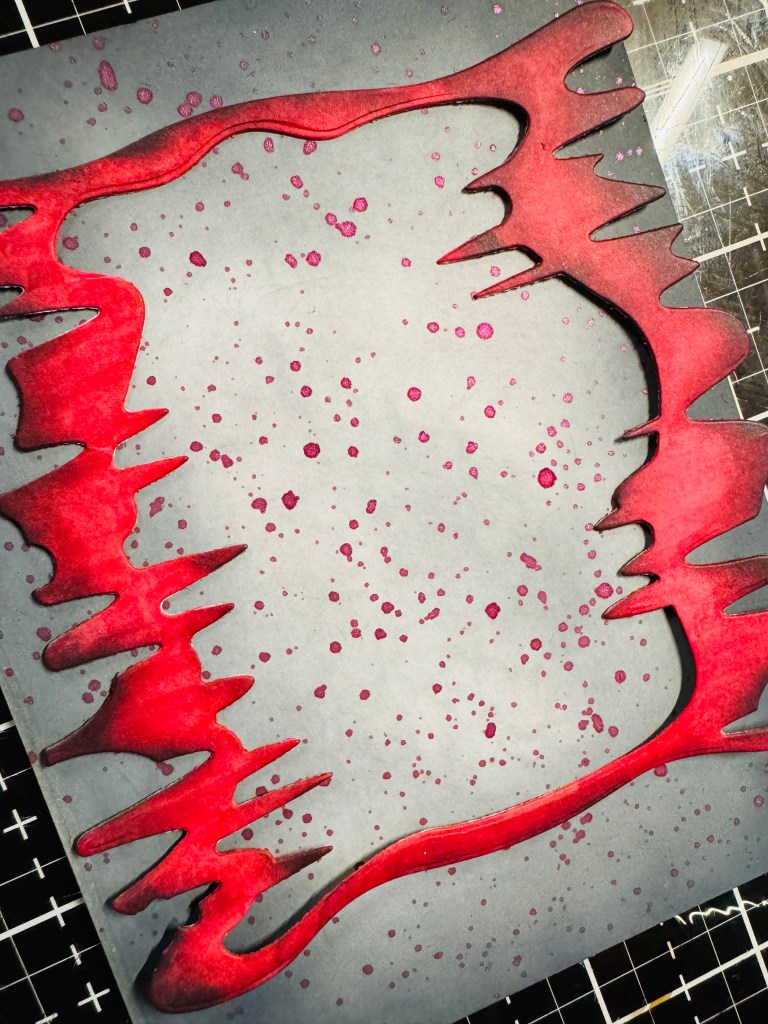
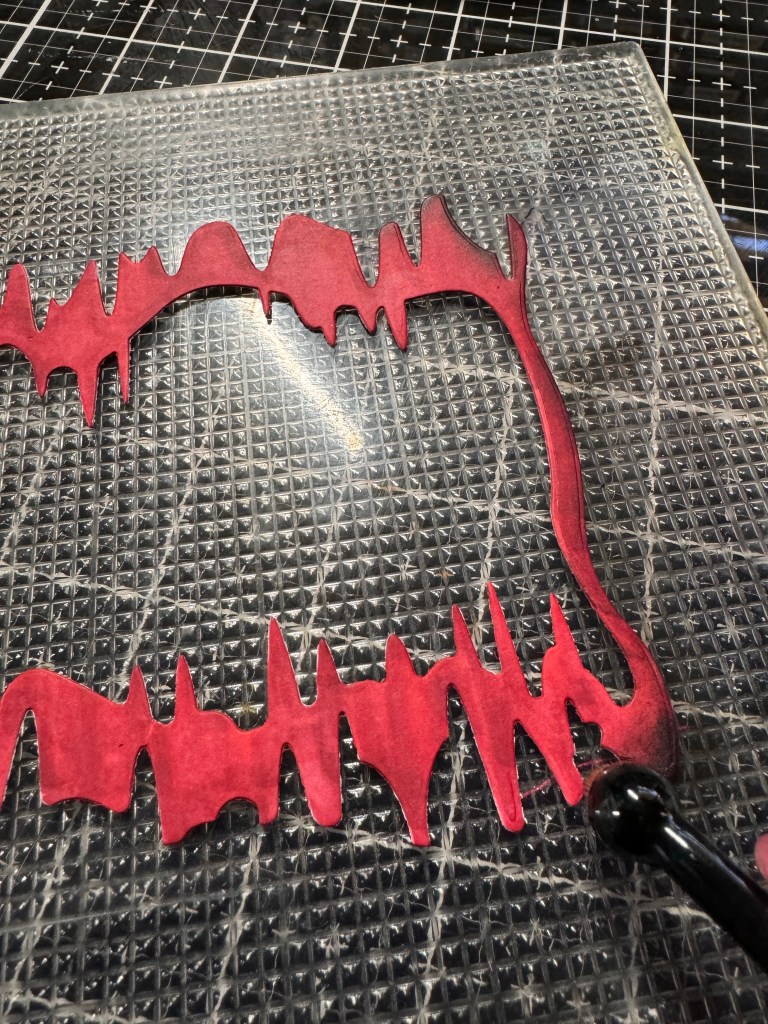
Here are just some of the pieces I’m using for these two cards. This is not all of them so when I was making my background, I was going by the witch and the frame die. I purchased from La-LaLand Crafts and cut it out with 110 white card stock, then color it with Altenew artist markers R206 crimson and R218 vineyard berry. Also took Tim Holtz distress oxide black soot and blended the outside of the frame. Here are the two products used. Once I’m done I will post the finished cards. Thank you for checking out my website and I hope you’ll try these background techniques yourself with anything you have in your stash. Have a wonderful day and stay tuned for the finished products.
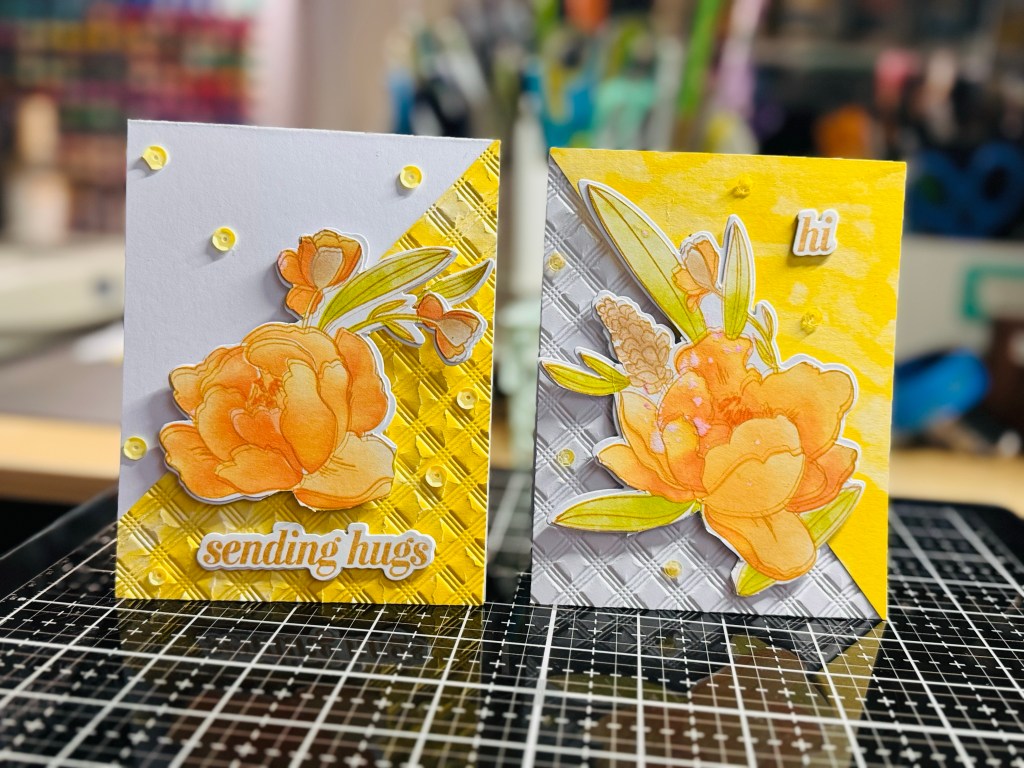
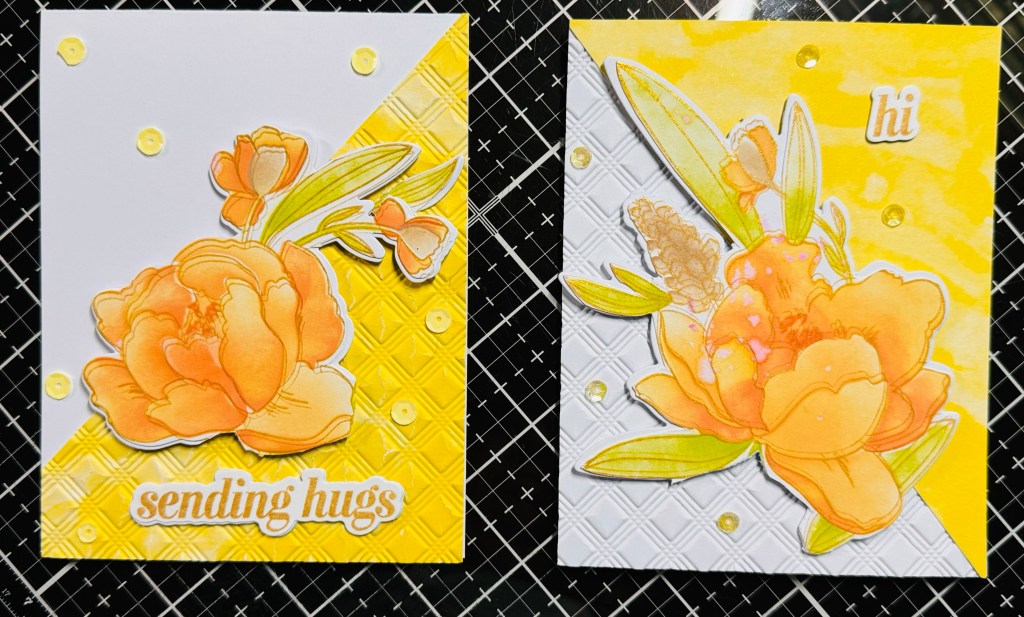
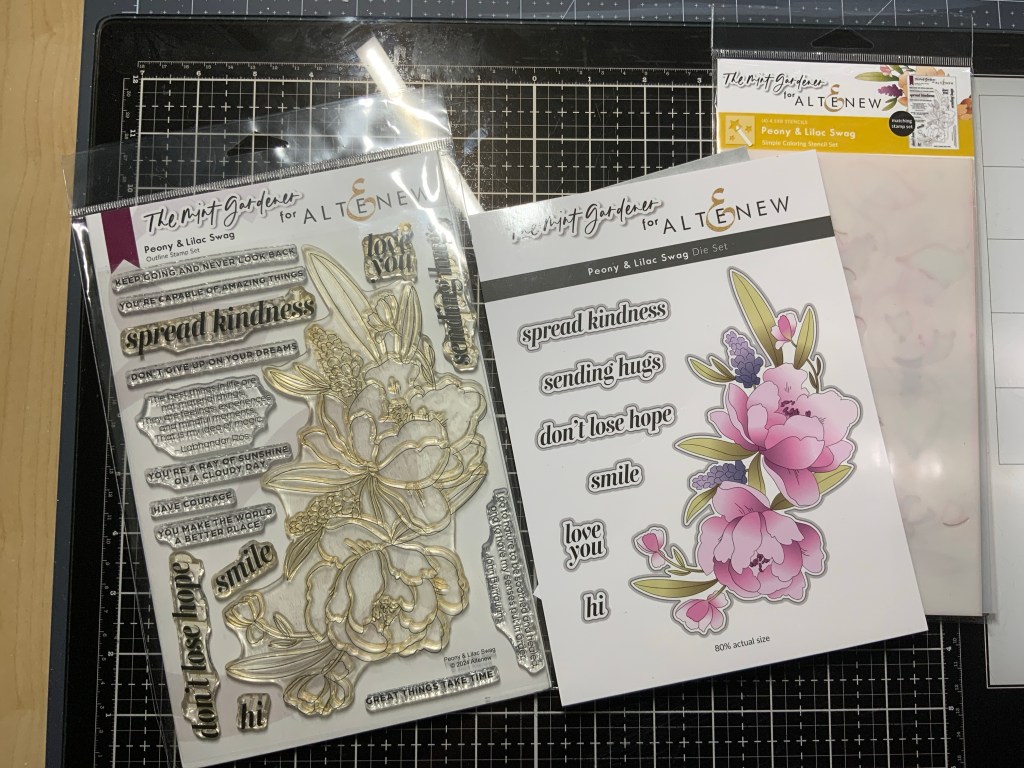
Hello crafty friends! Today I just finished up a few cards I been working on for the past week. I used Altenew Peony & Lilac Swag Outline Stamp Set, Stencil and Dies. I made five cards and each one came out different. I’m still working on two more card right now. But I wanted to share the one I just finished.
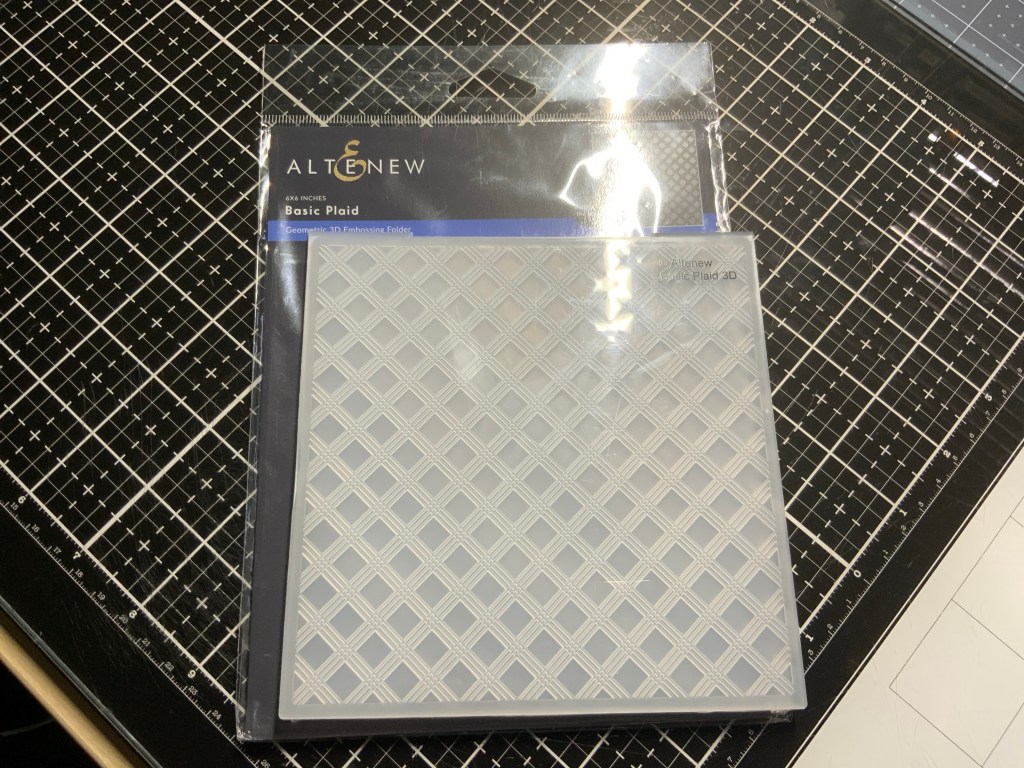
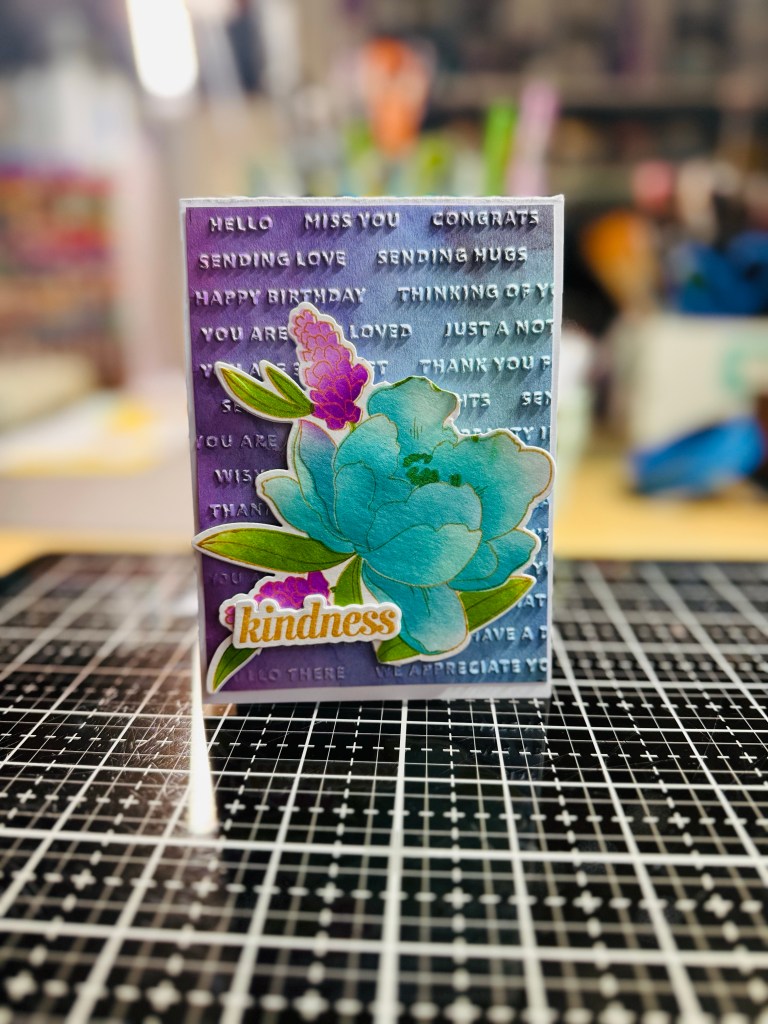
I stamp the Peony & Lilac Swag Outline Stamp set with Altenew Enchanted gold pigment ink. Which is reich and vibrant. Colors are also Altenew Fresh dye ink: Cherry sweet, Velvet, raspberry sunset, honey drizzle, misty sage and green opal.Here colors are: Dusty Rose, Rouge, Terracotta and Grass-field and Green Opal. Background is done with 110 yellow card stock also run through Sizzix using Altenew Basic Plaid 3D embossing folder. On theses two cards colors are also Altenew inks: Dew Drops, Easy Breezy, Teal Cave, Midnight Violet and Grass field. Background card sock is by Thhe Essential Crafty Paper called Watercolours. And Altenew 3D folder Raised Sentiments.Here’s a picture of the Altenew Peony & Lilas Swag Set
Thank you for checking out my blog. Let me know what you think or if you like. Have a great day.
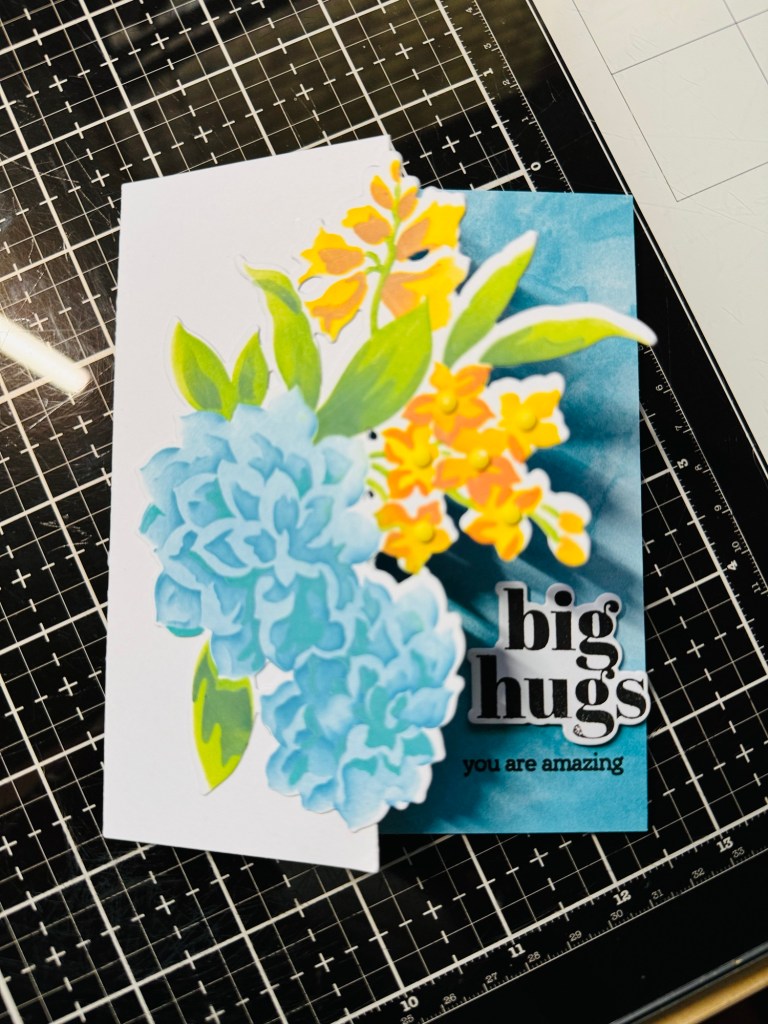
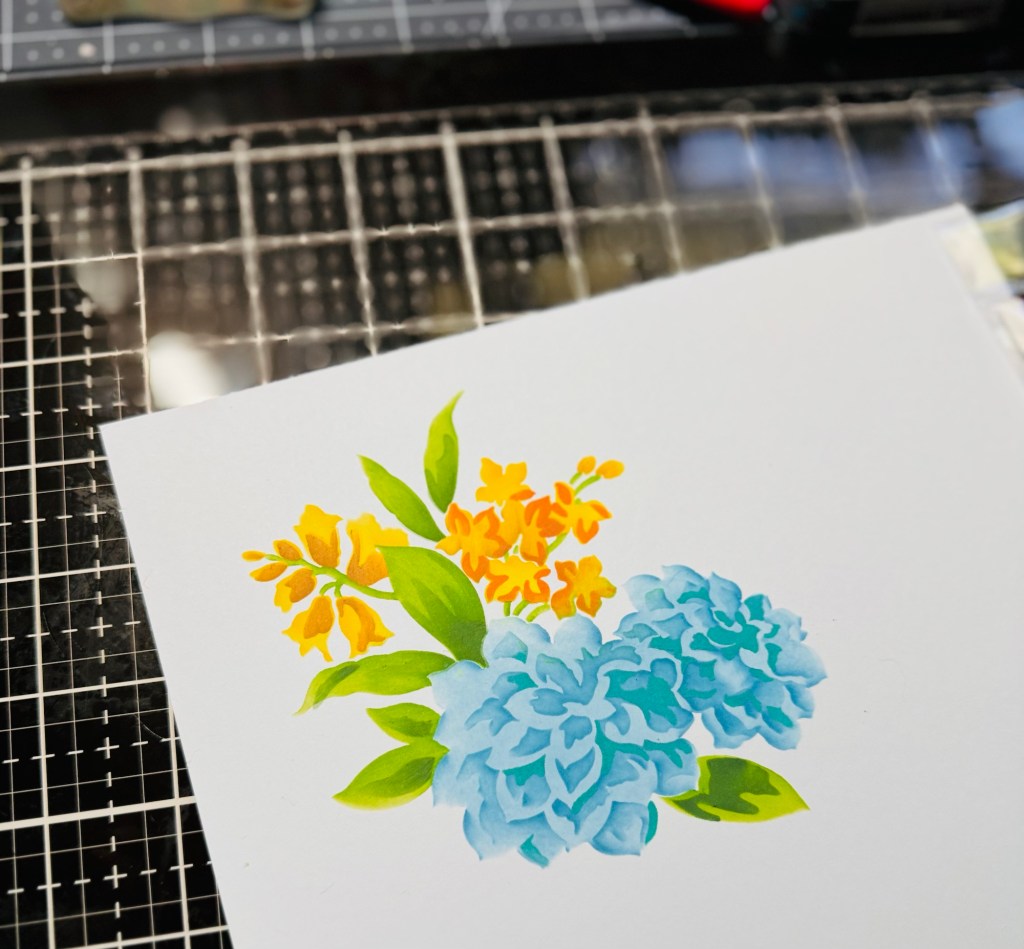
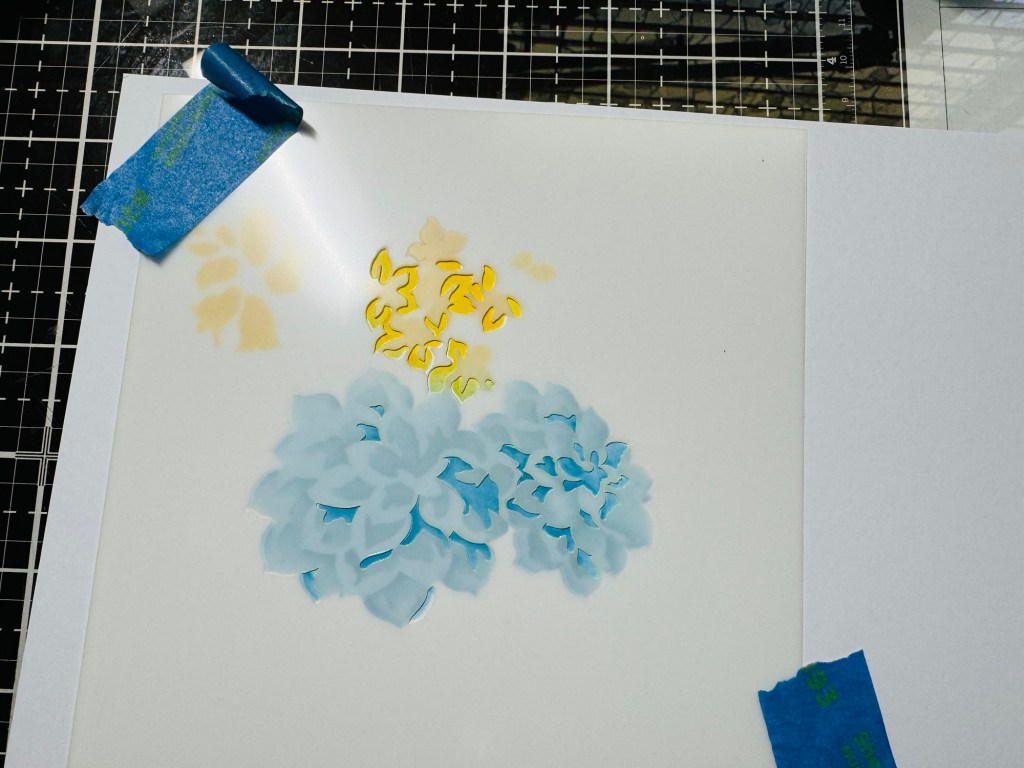
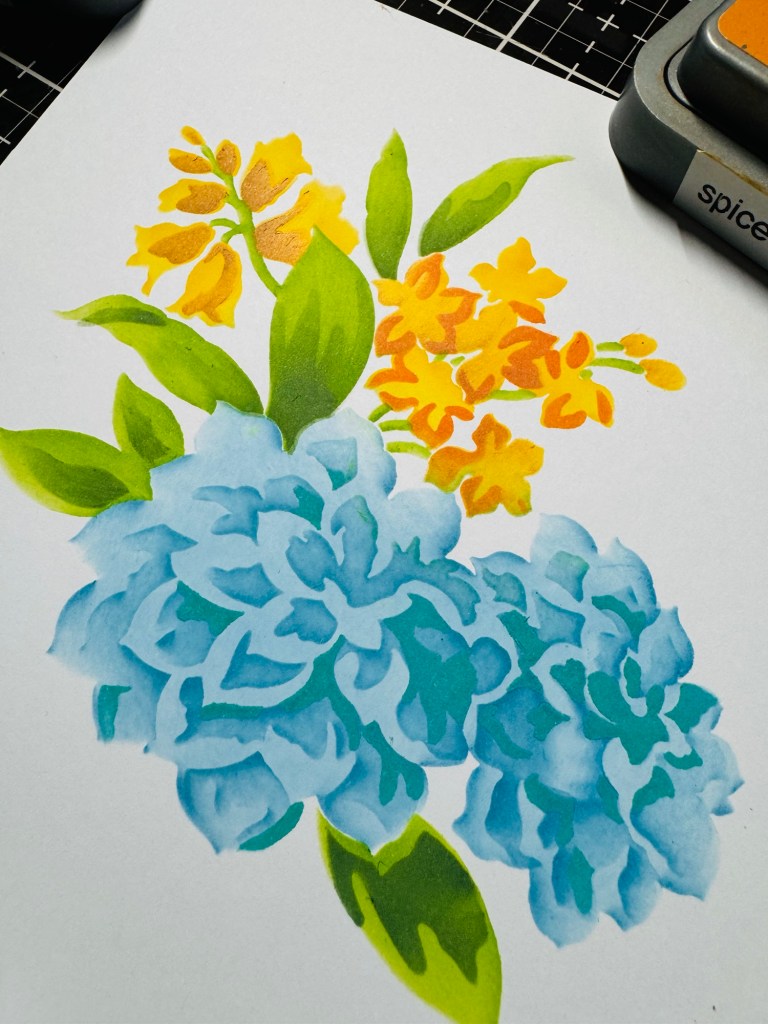
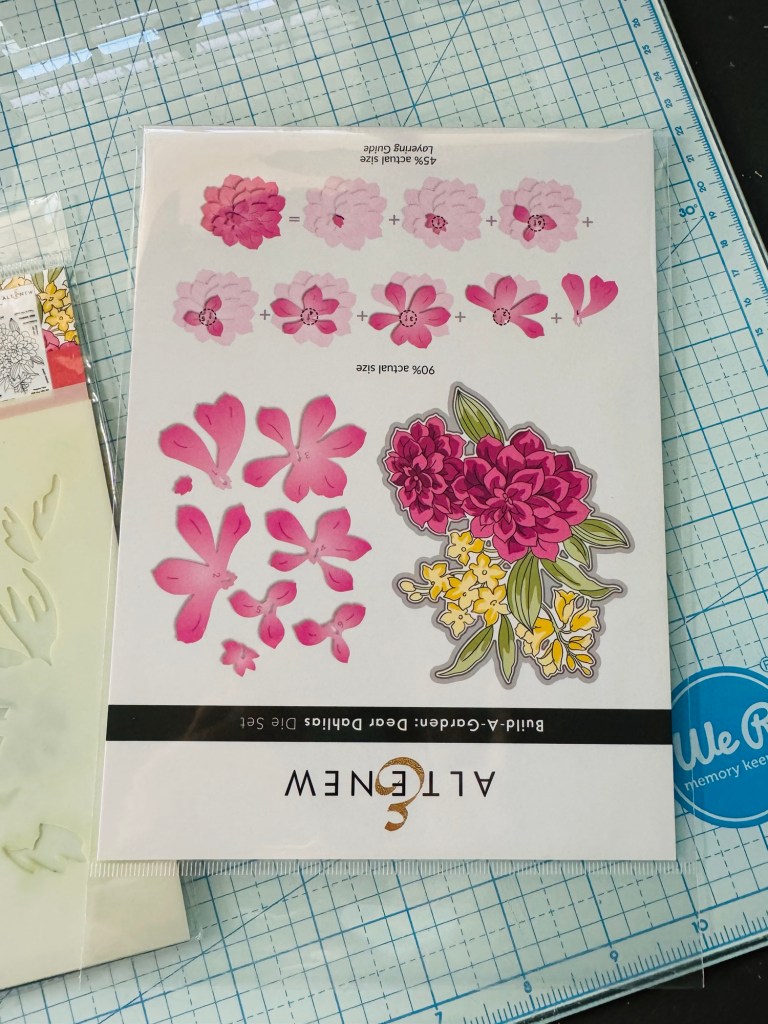
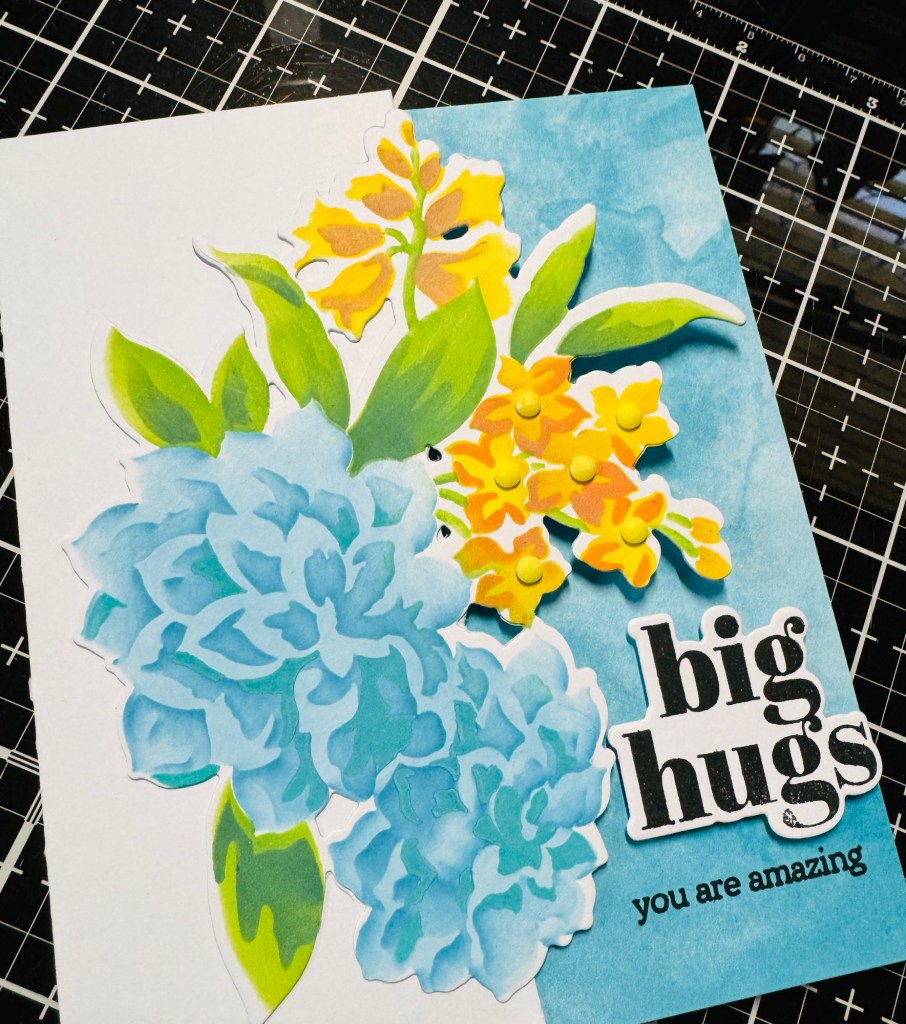
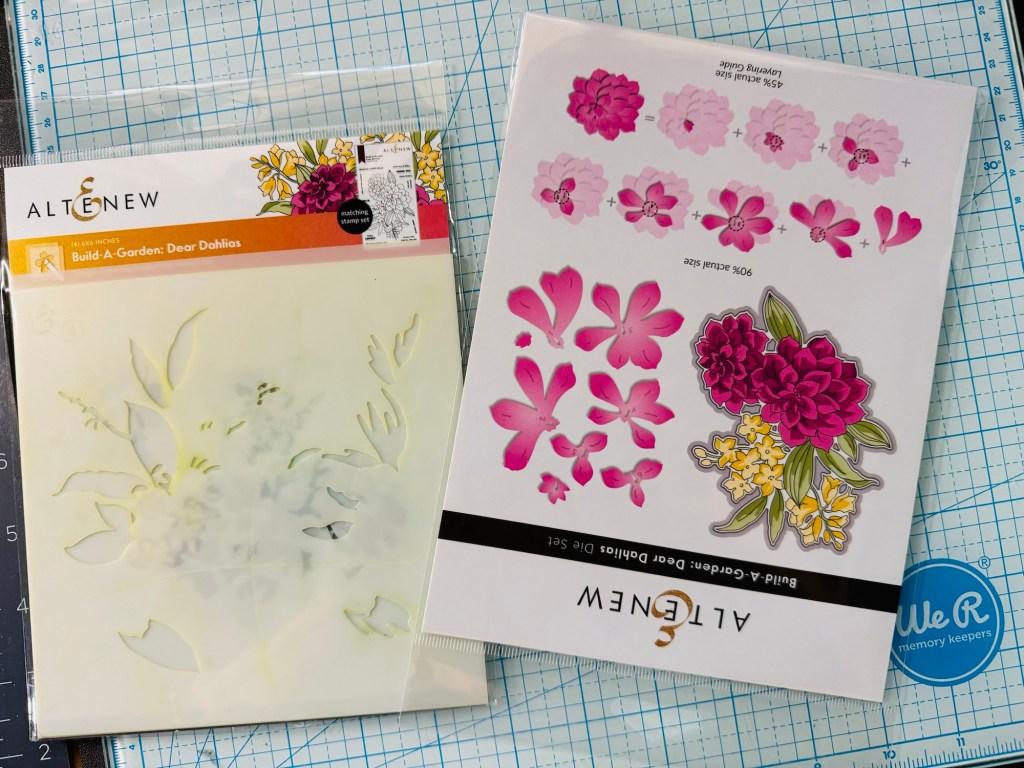
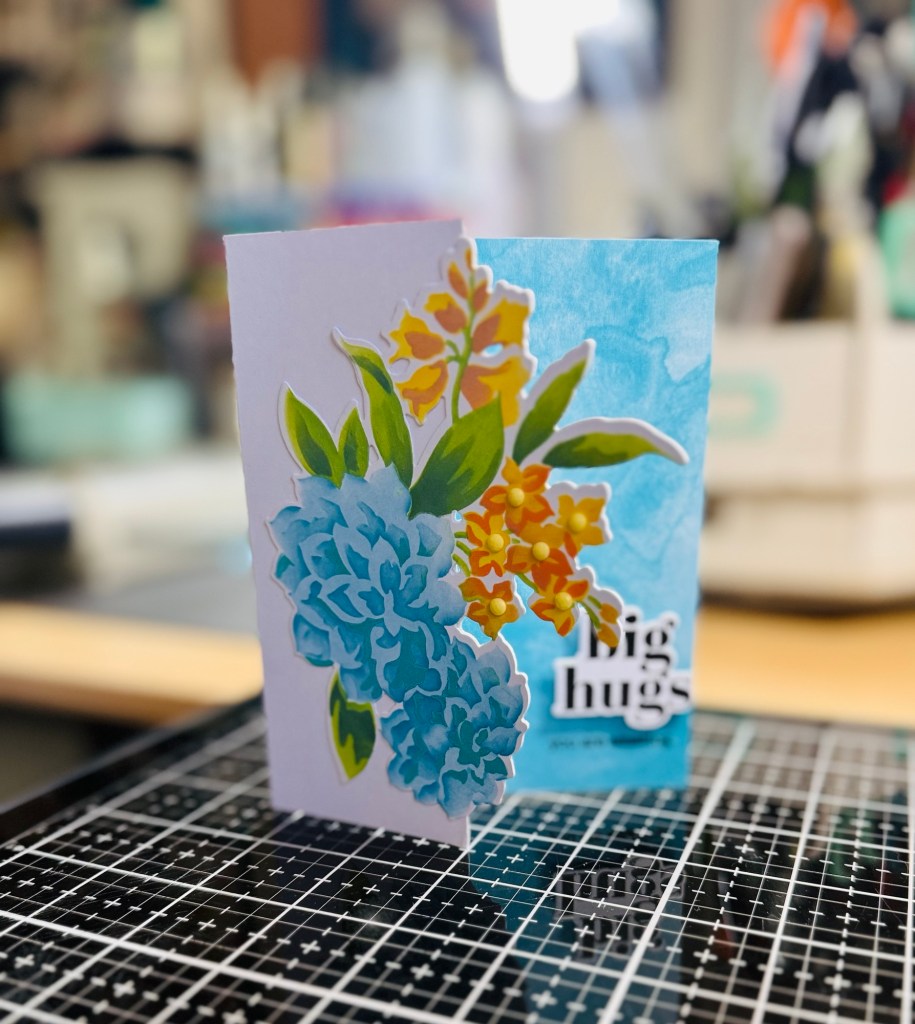
Hello my crafty friends! Hope everyone is staying cool during these few hot days. For me I decided to stay in my cool home and make some handmade cards using Altenew Build-A-Garden: Dear Dahilas Stencil and matching Die Set. I like the way this card came out and it really adorable. I like the colors that I used and I like how I cut the card out to look. 
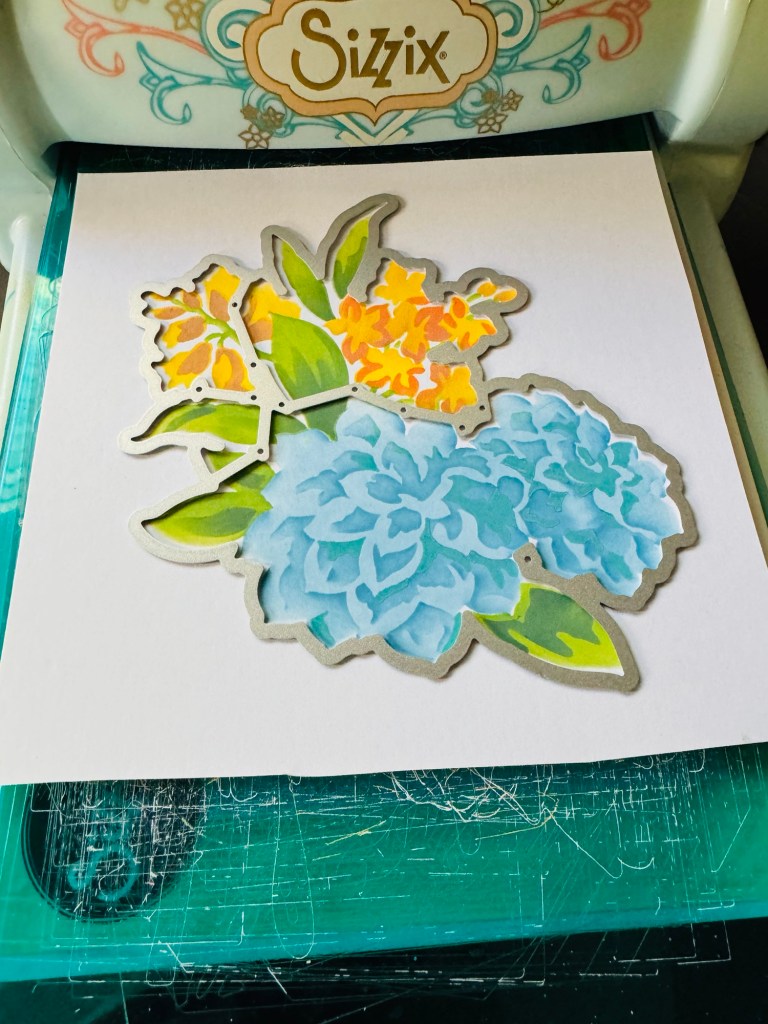
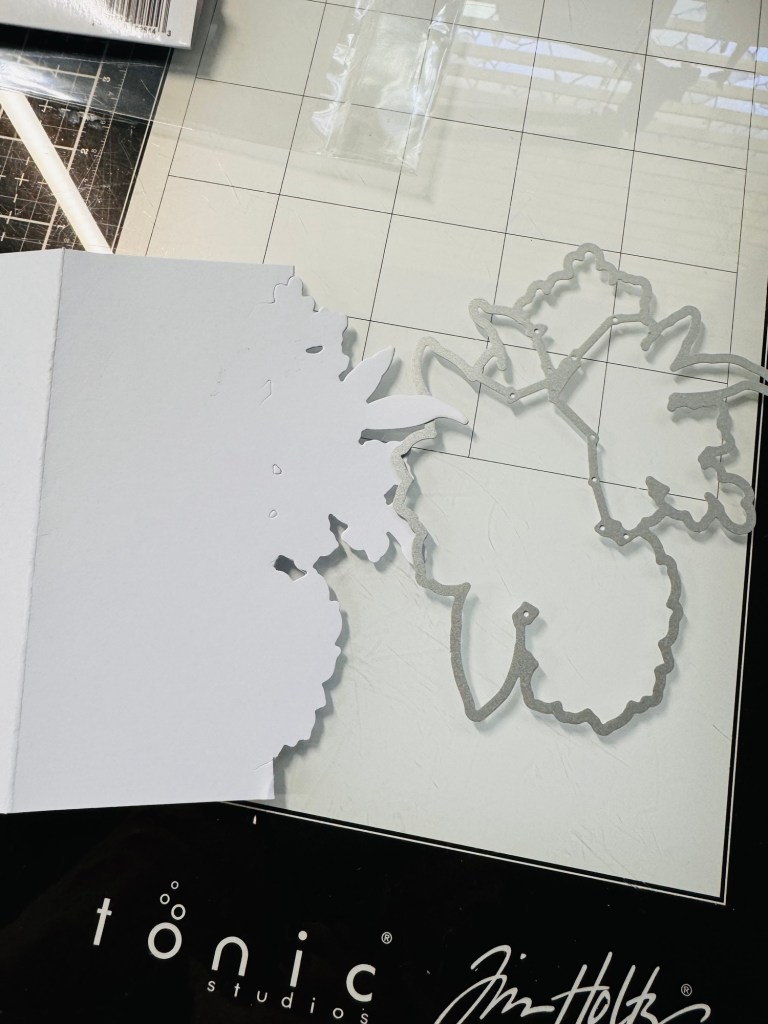
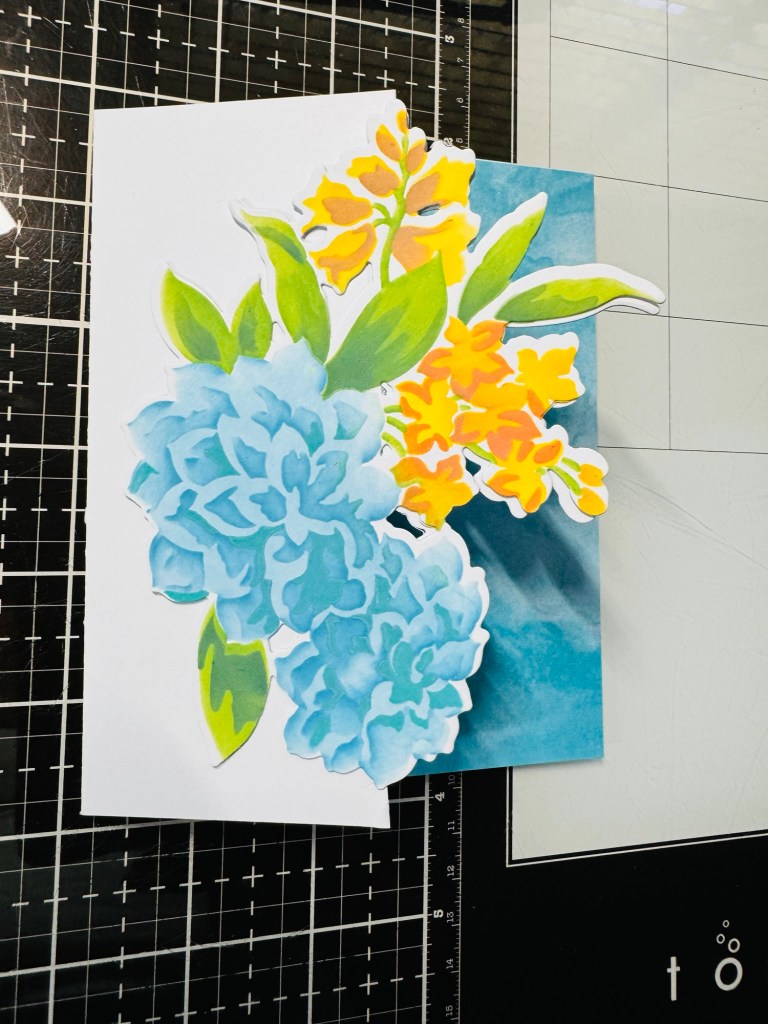
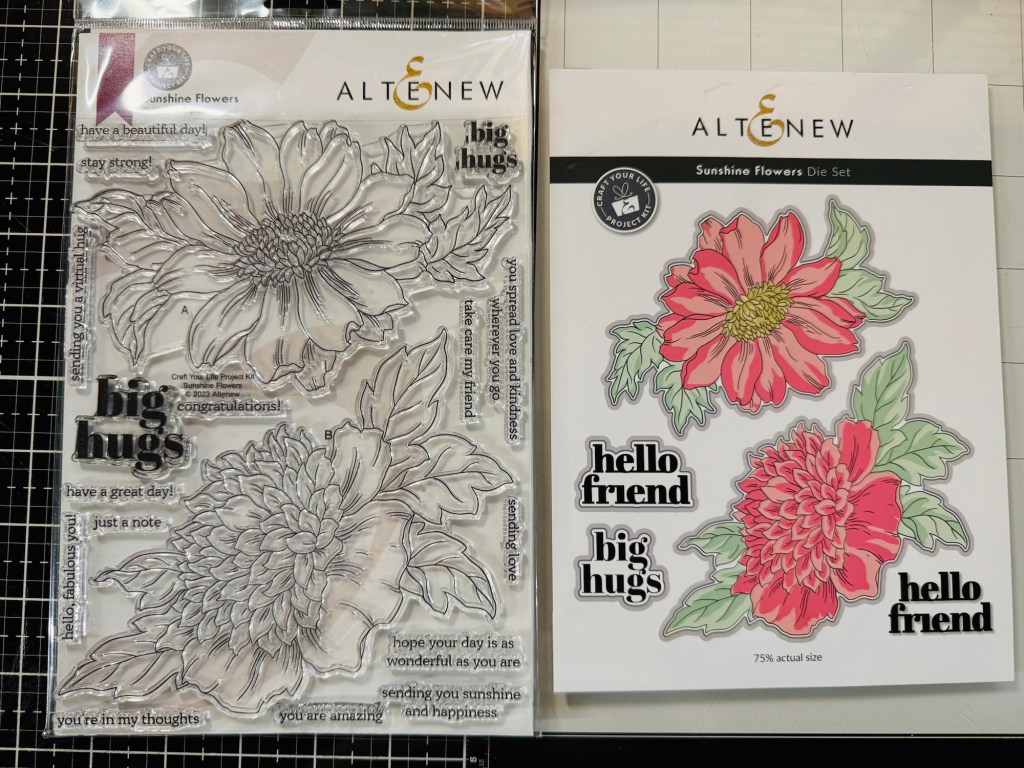
Big Hugs You Are Amazing I’m definitely going to make more cards like this using Altenew flowers. I took 110 white card stock and Altenew Dear Dahilas Stencil and laid it down on my card stock. Used Tim Holtz Distress Oxide: Mermaid Lagoon, Peacock Feathers, Mowed lawn, Twisted Citron, Rustic Wilderness, Musturd Seed, Spiced Marmalade and Wild Honey on my flowers. All colors work beautiful together. Took the Dear Dahlia Die Set and cut it with my Sizzix machine. Again I took 110 white card stock and cut it down to 4 1/2 x 5 1/2. I marked where I wanted to places my cut out with the Dahlias flower on the card, then I removed the die out and took my Sizzix machine and only cut half way on the card stock. Hope this makes sense to you guys. I also have this beautiful cloudy card stock that I cut out 4 1/2 x 5 1/2 to go on the inside of my card. Also took this sentiment from Altenew Sunshine Flowers, stamped it with Altenew Obsidian pigment ink, used the matching die and cut it out. Here’s is where I just started putting my card together.The last thing I did was took some yellow embellishments and put them on the little flowers..
Thank you for checking out my website. Is hope you guys will try this technique with any flowers that you might have in your stash. Have a great day guys. 
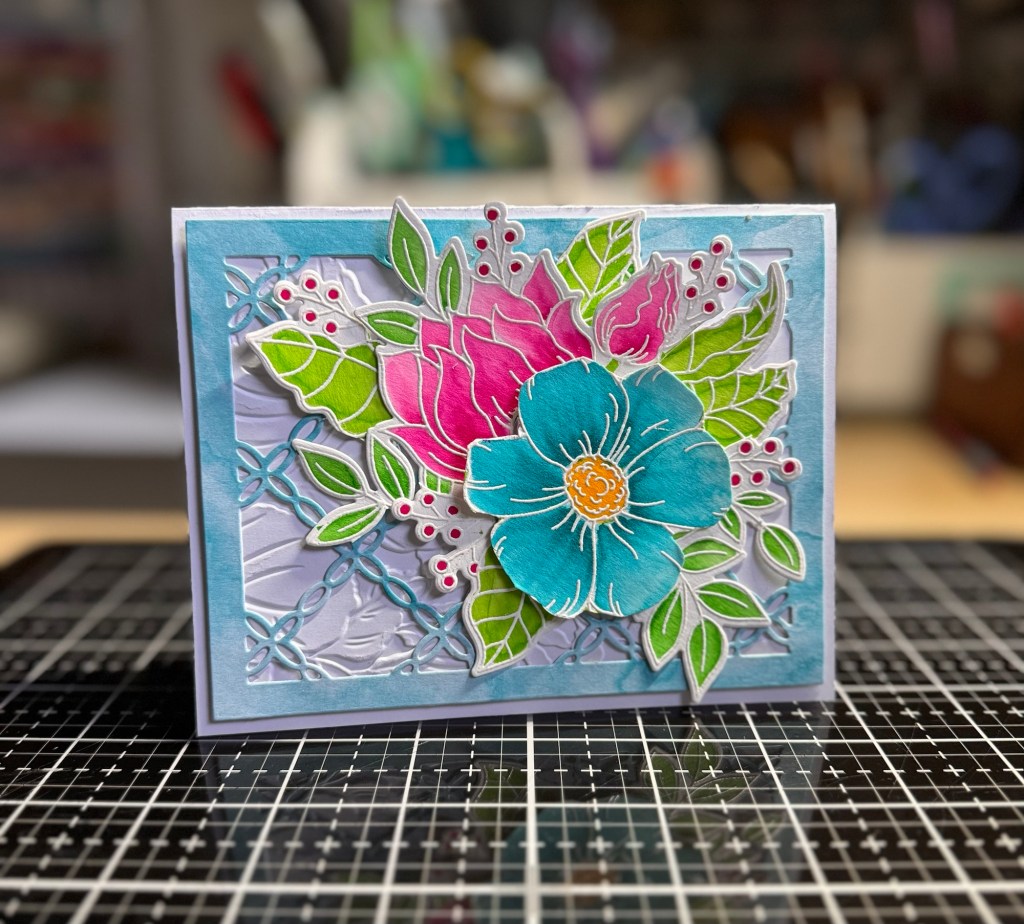
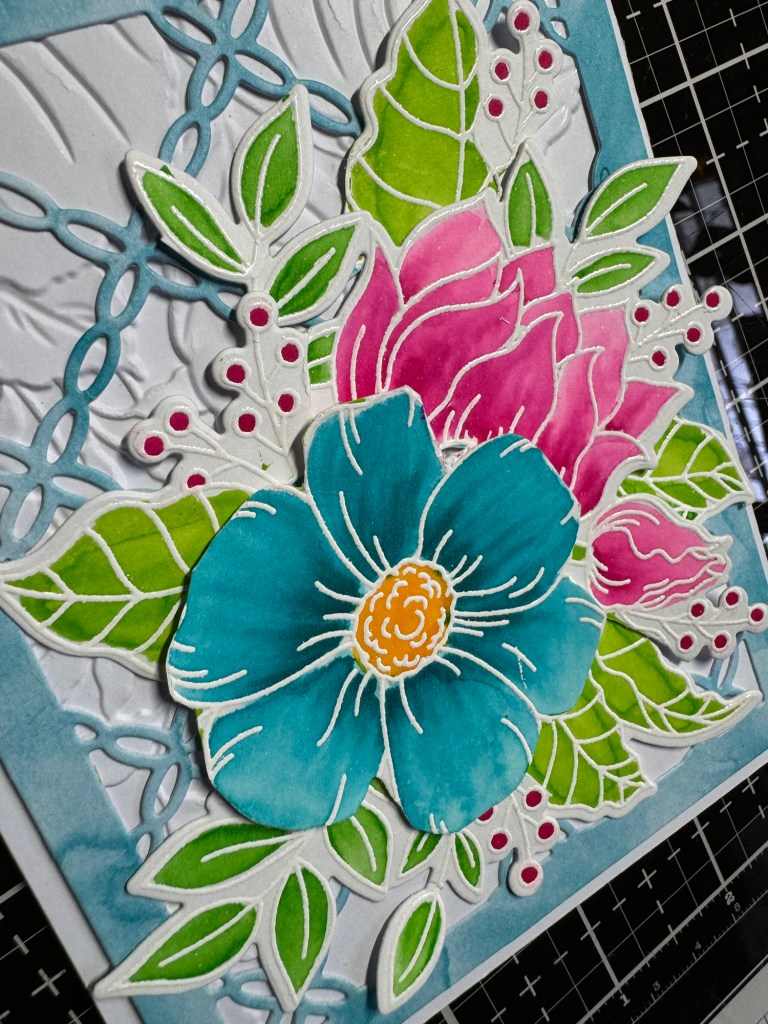
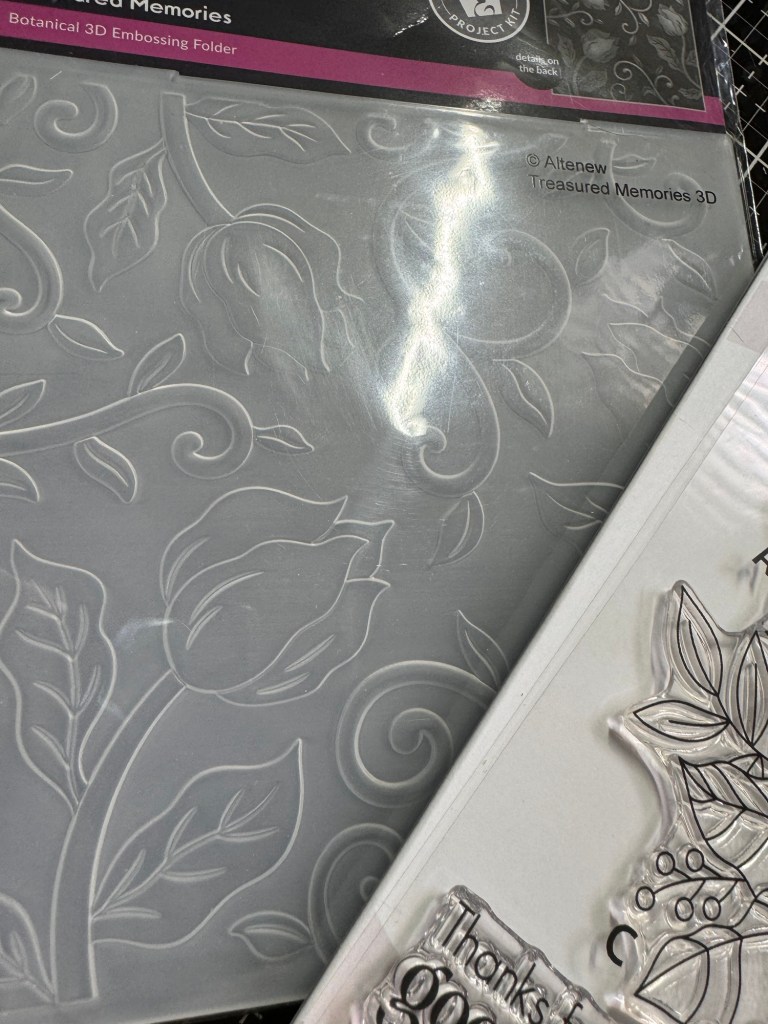
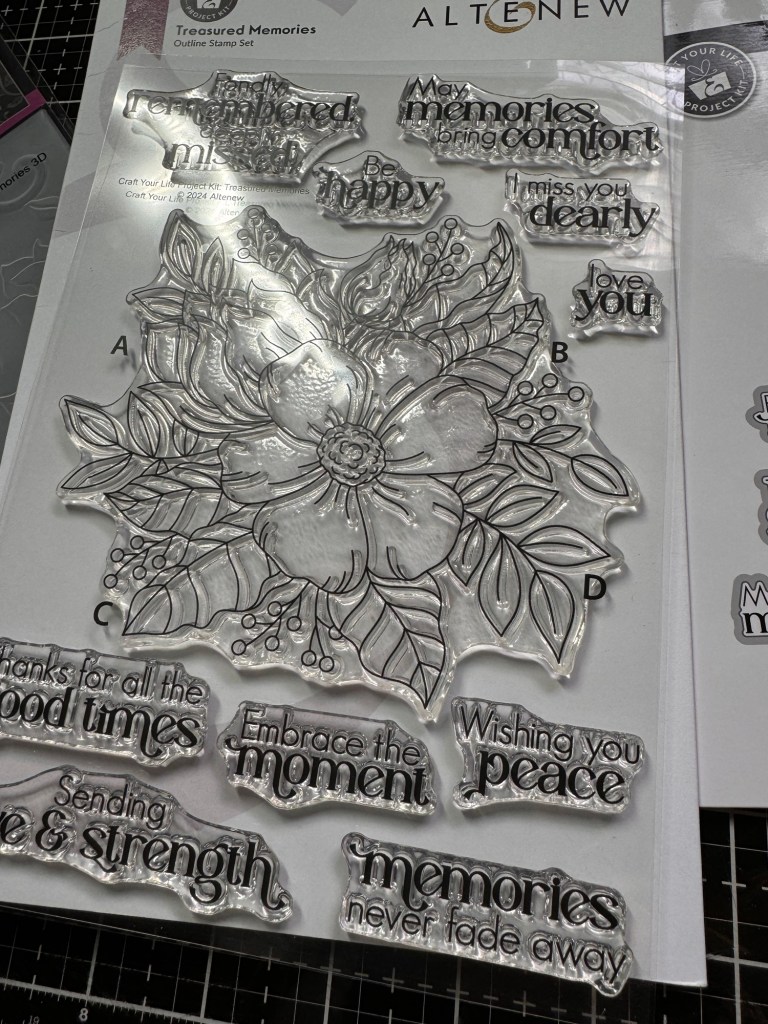
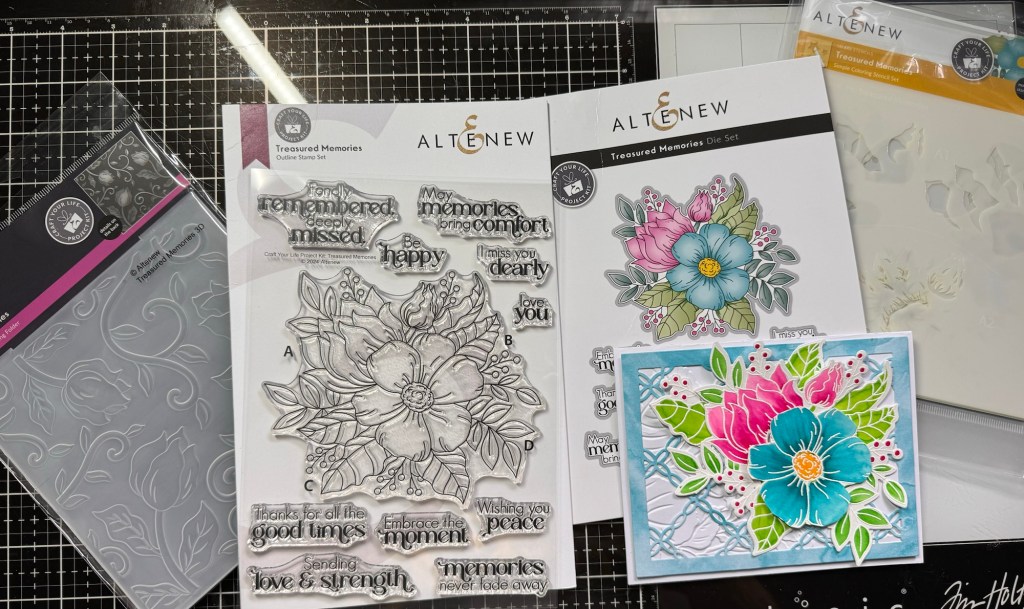
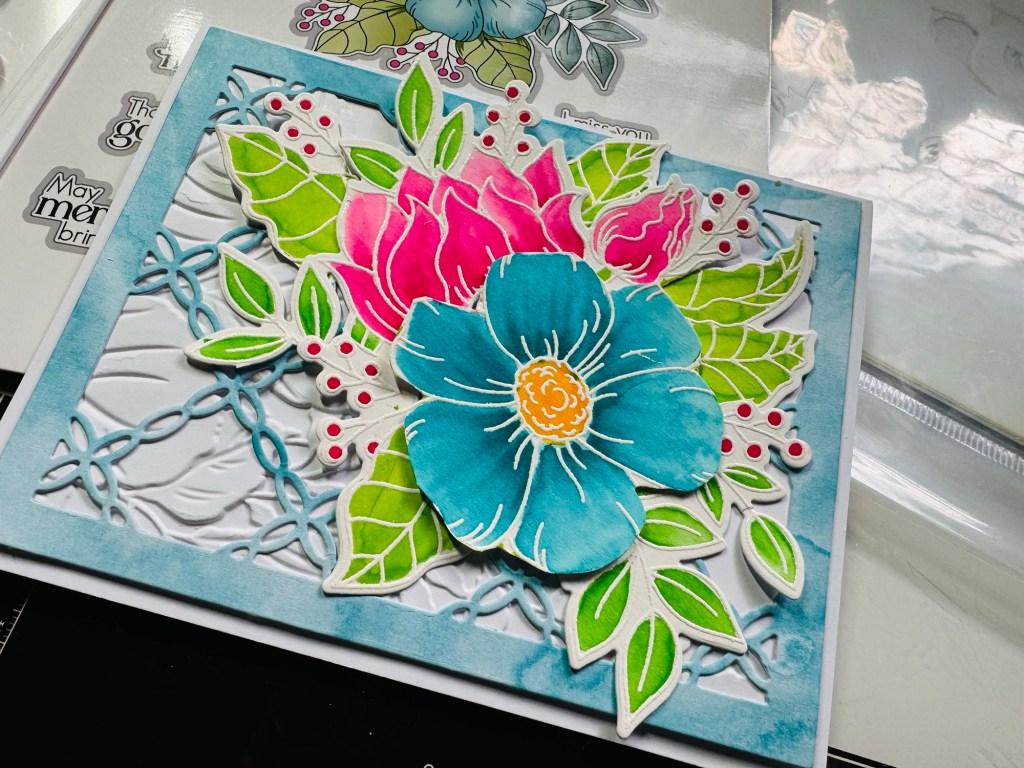
Hello my crafty friends! I hope all is well and everyone is having a wonderful week. Today I wanted to share with you about how I made this handmade card using Altenew Outline Stamp Set called Treasured Memories, Die Set and Botanical 3D Embossing folder.
I love the way this card looks. I decided not to put any sentiments  on the front of this card. Because sometimes I think it is a card I can turn into a Happy Birthday or Missing You or a Thank You card. So I wait until I need a card for a special occasion. Then I’ll created some sentiments and put them to the side. I took the Lattice Fence die that I purchased from Amazon and 110 cloud light blue cards stock and cut it out using my Sizzix machine. The colors I used to paint the flowers are by Karin Brush Marker Pro : Gold 283, Apple 210, Turquoise 654, Cool Aqua 204 and Cerise 375. First I took VersaMark embossing ink, Altenew Treasured Memories stamp set and stamp on water color card stock. Then I used white embossing power and cover it. Then heat set the embossing powder. Doing this process helps keeps the water colors inside the flowers while painting them. The background I did I used 110 white card stock and Altenew Botanical 3D embossing Folder. The picture on the right is Altenew Treasured Memories outline Stamp Set. I also thought that the flowers were too big for the A2 card, so I cut where I thought it would look good, then replace the flowers and leaves where I wanted them on my card.
Thank you for checking out my website. If you have this stamp set I hope you try these techniques with your cards. Please let me know what you think and if you like my card. Have a wonderful weekend.
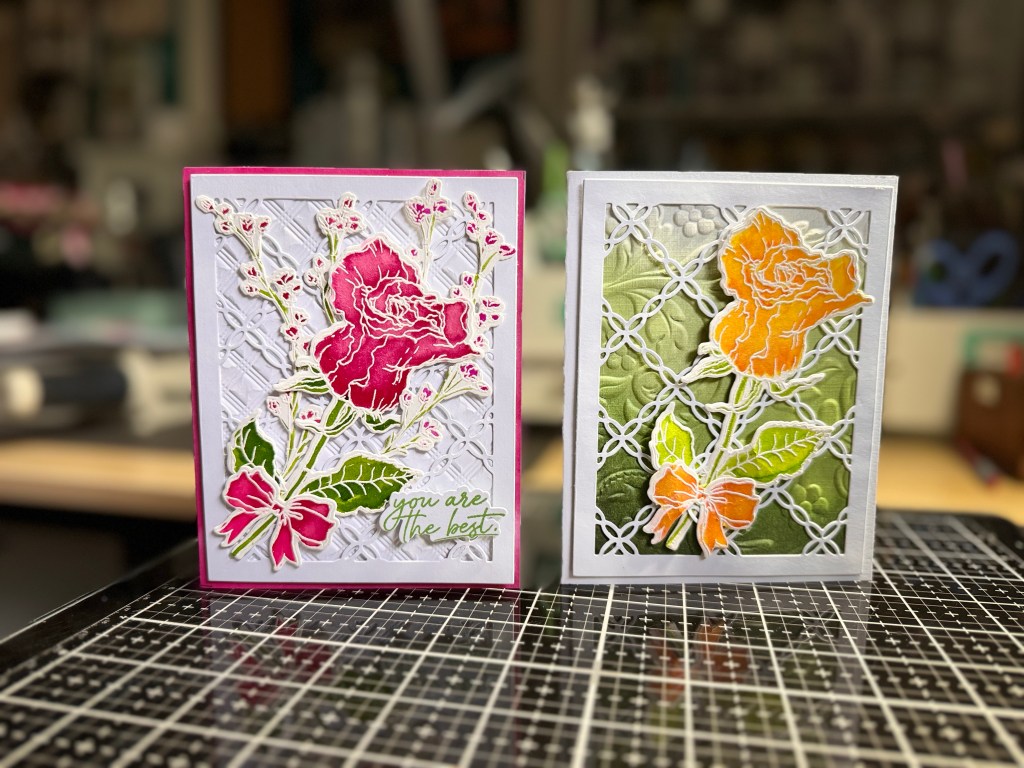
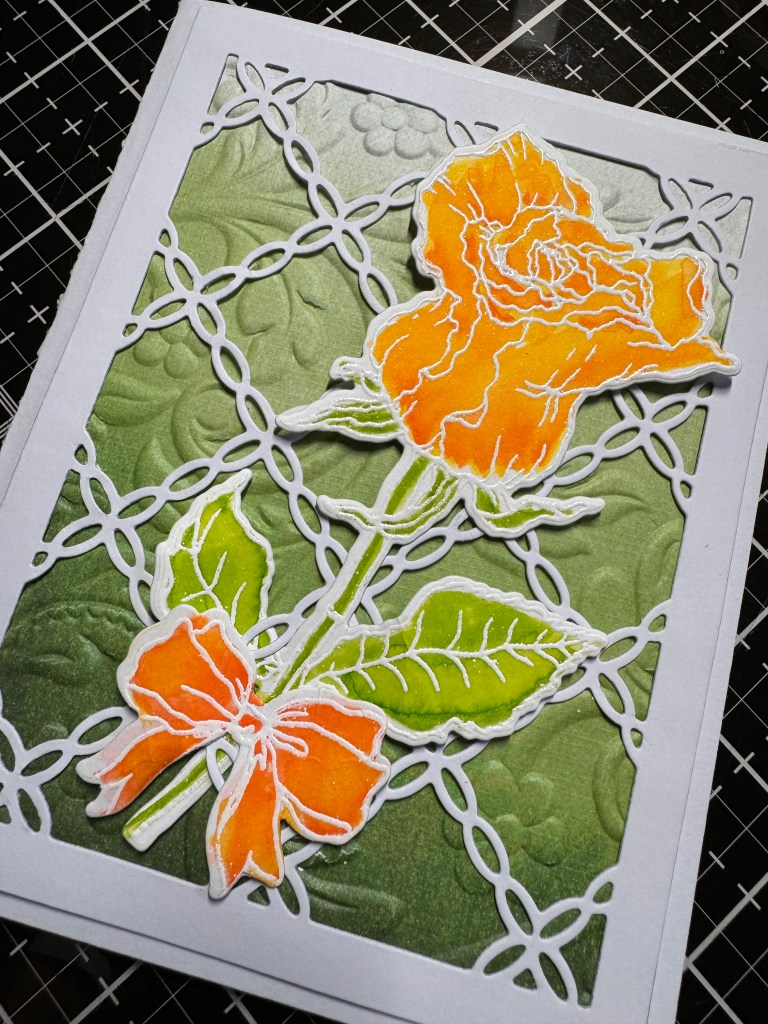
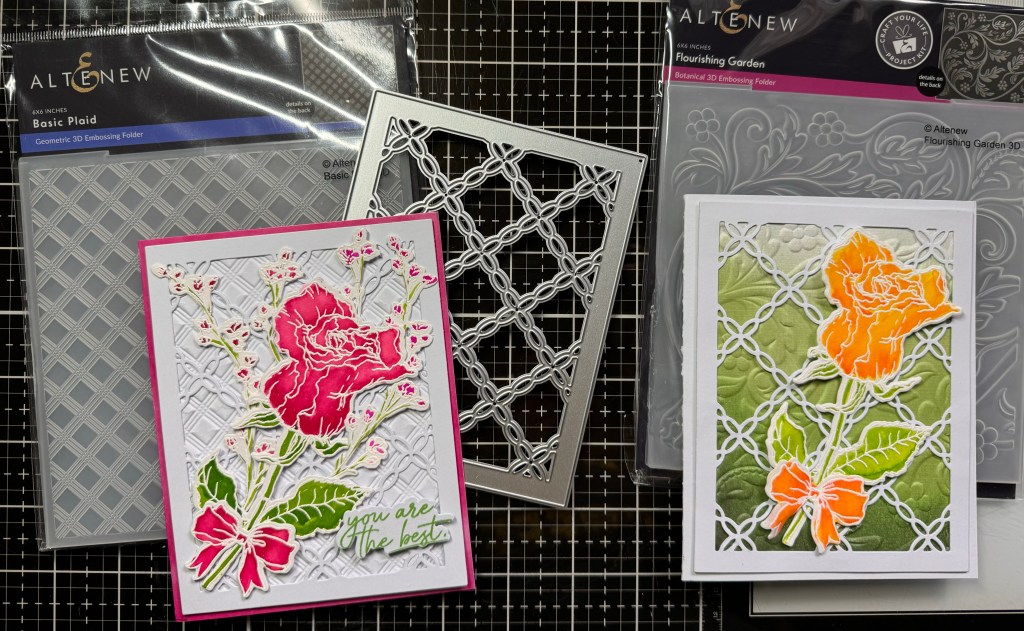
Hello my crafty friends! A coupe weekend ago I meet with some of my crafty friends for 5 hours. I started these two cards there and finished them all at home. I really like the way the cards came out. I hope you guys will like them too.
This Stamp set is by Altenew called Rustic Rose, plus I used Altenew Rustic Rose die set to cut them out. So there was no fussy cutting for me which is a plus. I don’t mind fussy cutting but if there’s a die set I’m a happy crafter. I really love this set by Altenew. Roses are my favorite flowers because my maid name is Rosas. First I took some Strathmore water color card stock, some VersaMark ink and stamp the roses on card stock. And then took white embossing powder and heat set it. I used Altenew Watercolor Brush Markers called Tropical Fiesta Set. Colors are Crimson, Lime, Sun Kissed and Fresh Lemon. Background was done with Altenew Flourishing Garden and Basic Plaid 3D Embossing Folders. Card stock is Recollections Color Splash. Other card stock I used was !10 White and Pink Cloud. Lattice Fence I purchase from Amazon.
I hope you guys will try making these cards for someone special. Thank you for checking out my website. Please let me know if you like these cards or leave a comment. Have a great day everyone.
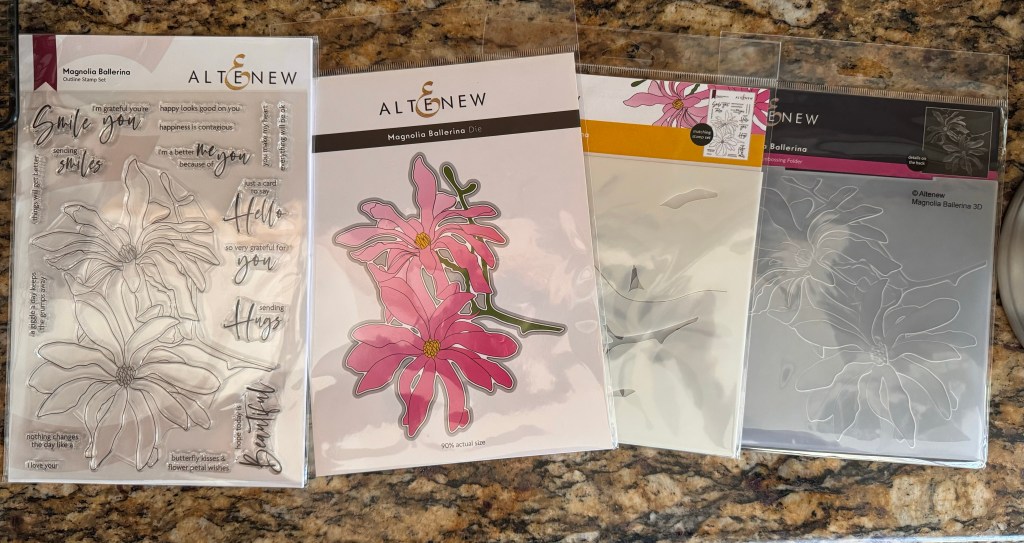
Hello my crafty friends! Today I just wanted to share my Happy mail I received from Altenew today. Then in the next couple of days are started getting creative with these Stamps set and more. Right now I’m finishing a couple cards that I started this weekend when I was with my crafty friends. I’ll probably post those later tonight. So here’s my happy mail.
Altenew: Magnolia Ballerina Outline stamp set, Die set, Stencils set and 3D Embossing FolderAltenew: Crafty Your Life Project Kit: Meadow Breeze Outline Stamp Set, Die Set, Stencils set and 3D Embossing set. Altenew: Craft-A- Flower: Orion Geranium Layering Die Set and their Enamel Dots Northern Shore and Sugar Plums.
I’m so looking forward to getting creative with this new Happy Mail I received today.
Thank you for checking out my website. Have a wonderful day!
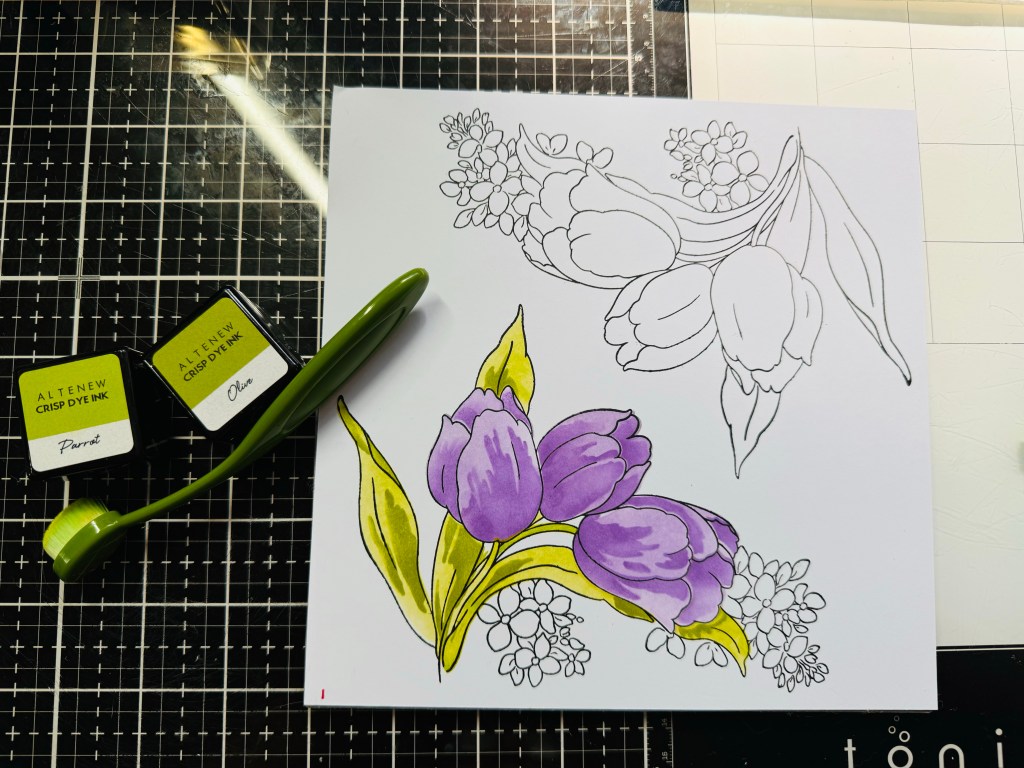
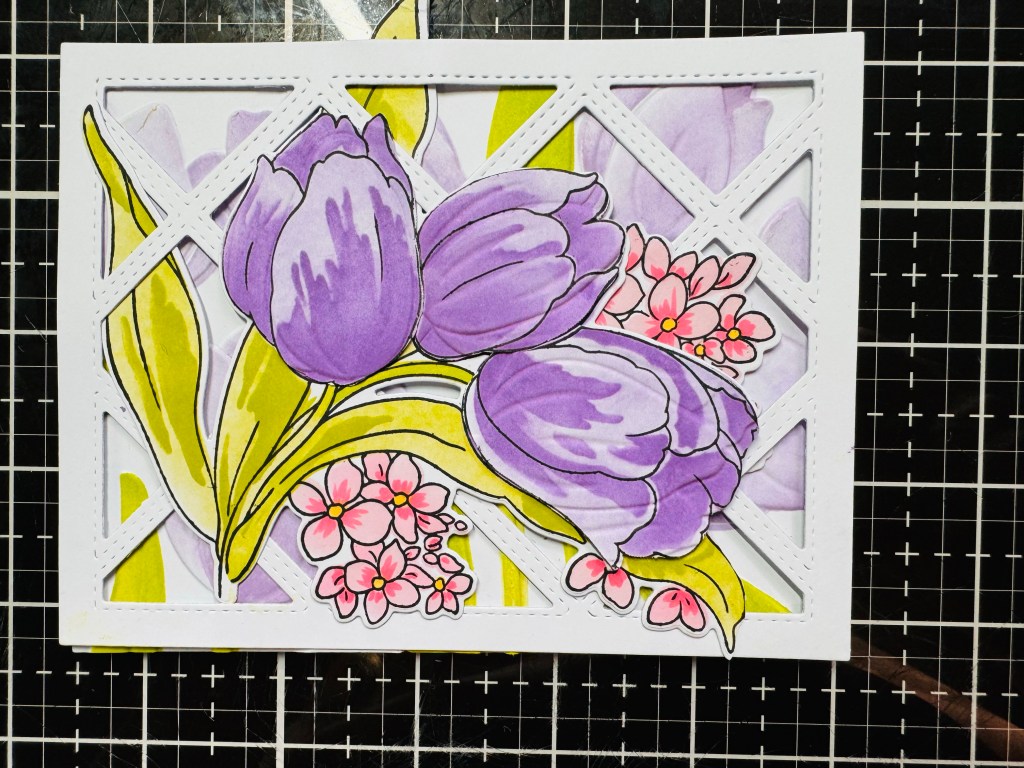
Hello my crafty friends! This morning I was watering my Tulips on my front porch. They look beautiful right now. After I was done watering everything around our home.
I went into my craft room, started to create a card using Altenew Build-A-Garden: Tulips & Friends layering stamp set, stencils and die set.
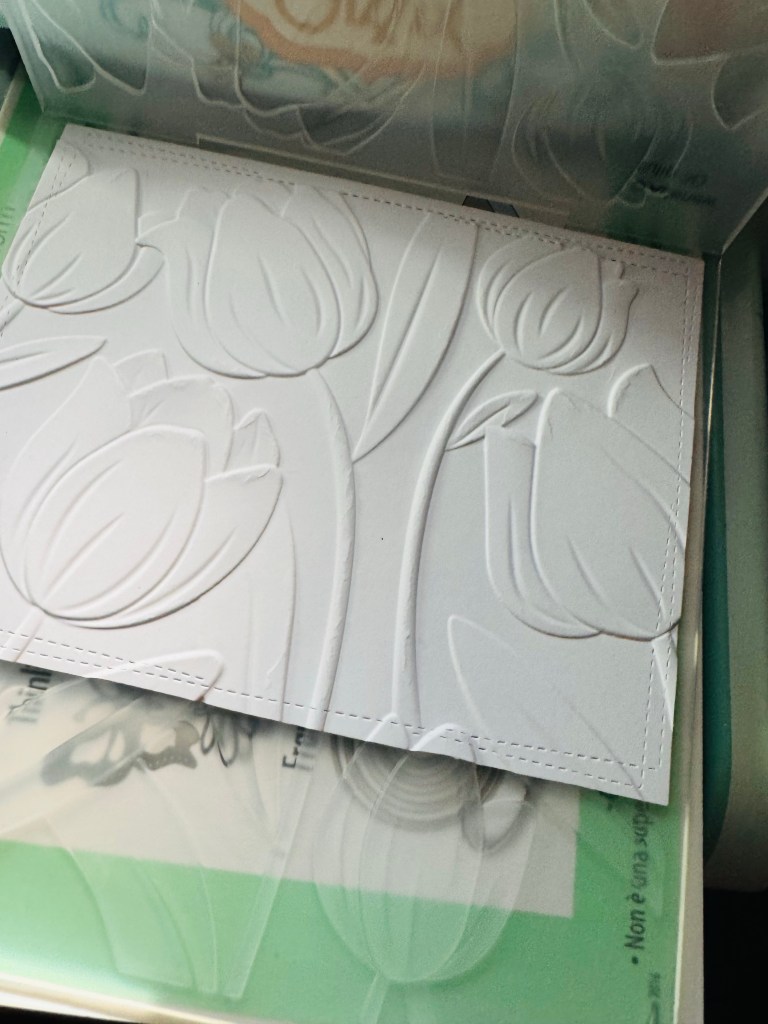
Plus I combined Altenew Tulip 3D embossing folder and their tulip simple coloring stencil set too. I will explain what I did and how I made this beautiful cards.
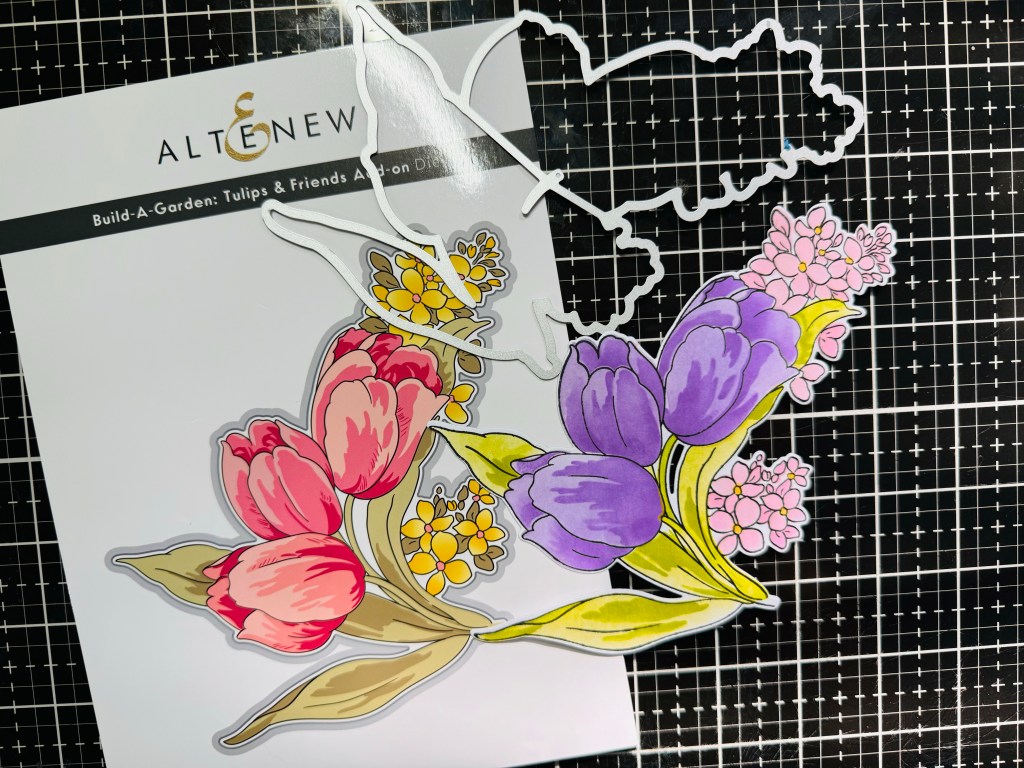
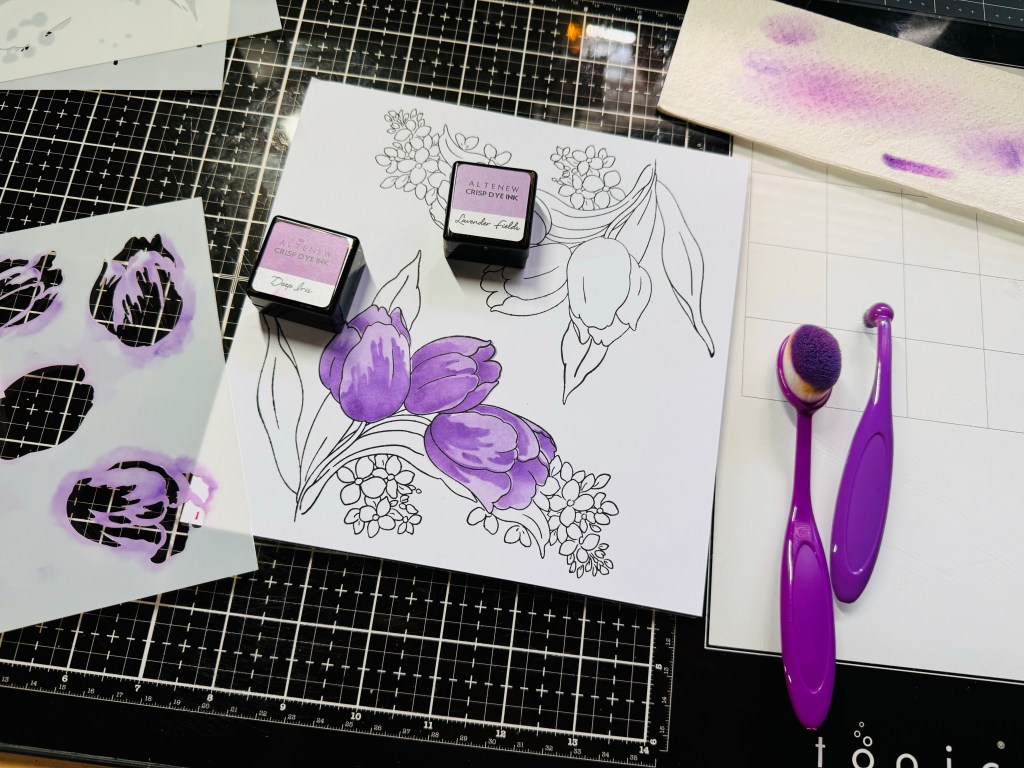
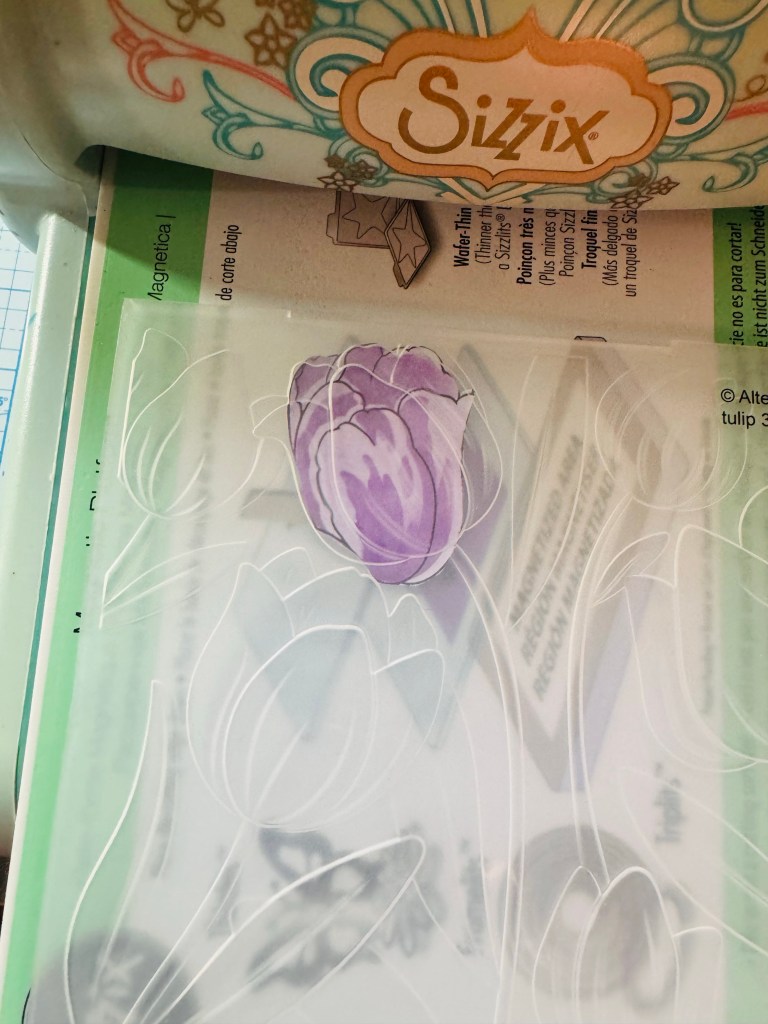
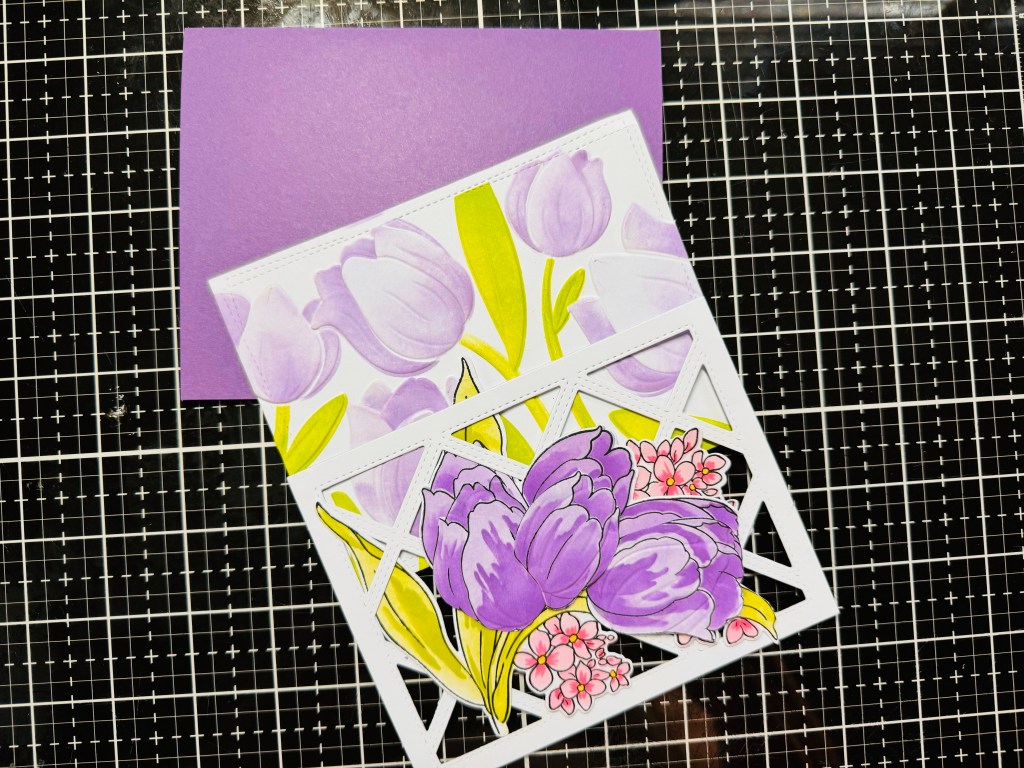
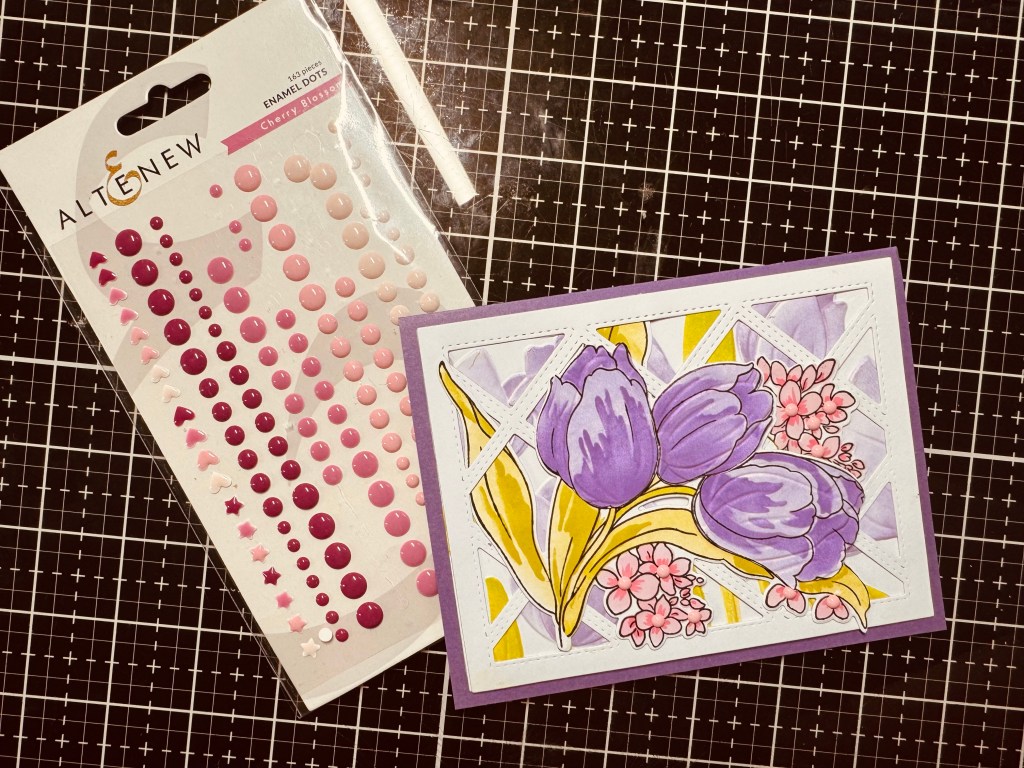
Handmade Tulips card! I stamp the tulips with Altenew black pigment ink on 110 white card stock. Then took the the stencils and color with Altenew ink: lavender fields, deep Irish, parrot, olive, pink diamond, maple yellow. The colors combinations are beautiful. Took the Tulip die and cut them using my Sizzix machine. Frames I used is the one I got at Amazon lattice fences and wrapped stitch rectangles die from memory box. I needed the background to look like it was full underneath the lattice fence. So I took the other Altenew Tulip embossing folder and stencils set that goes with this one, used 110 white card stock and put it through my machine. I colored the tulips using the same inks and started blending colors together.I cut out each tulip that I color again and put it in my embossing folder each one at a time. I wanted to give dimension for the front of my card.Here are all the pieces I need to make my card. Then I started just glueing everything together.Here’s a picture of everything I used to make this pretty card.
Hope you like my card, if you do please leave me a like and comment. Also I hope you try making this card with whatever you have in your stash. Thank you for checking out my website. Have a great evening.


Recent Comments