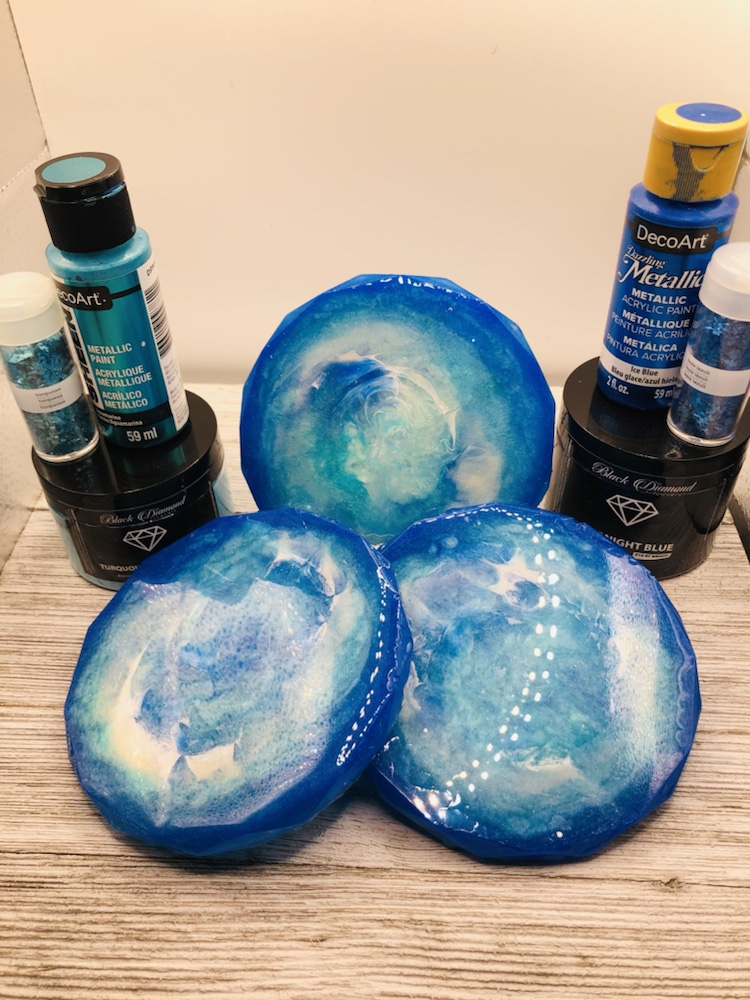
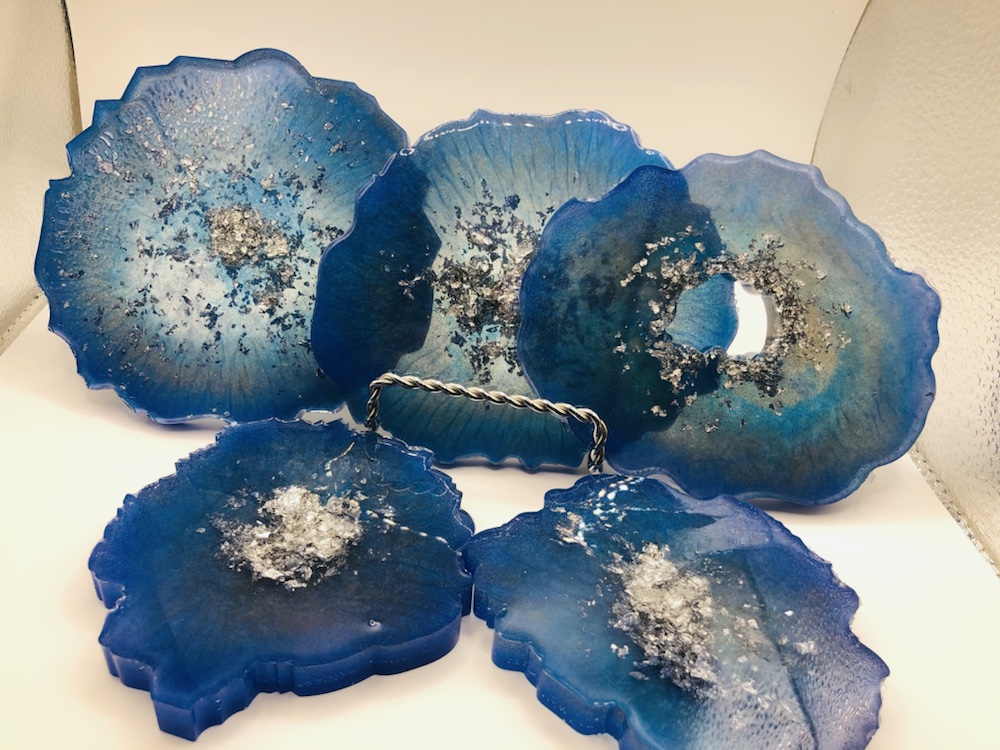
Hey my crafty friends! Today I did another set of coasters. This time I wanted to work with the Deco Art Dazzling Metallic acrylic paints and Diamond Pigment Powders. I wanted to see if they mix’s good together. And they did, I’m so happy the way they came out. Colors are so beautiful and vibrant together. I hope you guys get a chance to try theses combinations together. I’ll list all products down below.
Agate Slice Coassters
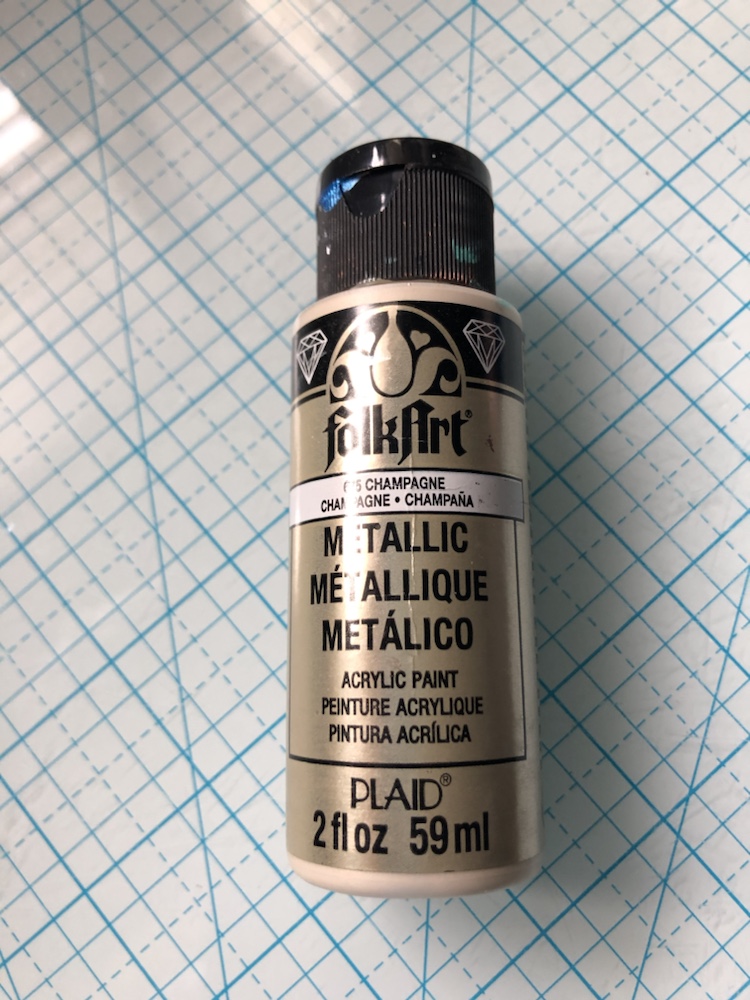
Products used are Deco Art dazzling metallics acrylic paints Ice blue, Aquamarine and Folk Art G75 Champagne Metallic. Mix’s with Art Resin, 4 ounces of resin and 4 ounces of hardener. Other products use are Diamond pigment powder turquoise and midnight blue. I also used Martha Stewart Glitter flakes turquoise and lapis blue. Before you cover for 24 hours make sure you take your heat-gun and pop all bubbles. Then cover for 24 hours, also check within that time for any bubbles coming to the surface. Thank you for checking out my blog. Wishing you guys a wonderful day. Simplycraftydesigns.com by Annalicia Spannaus
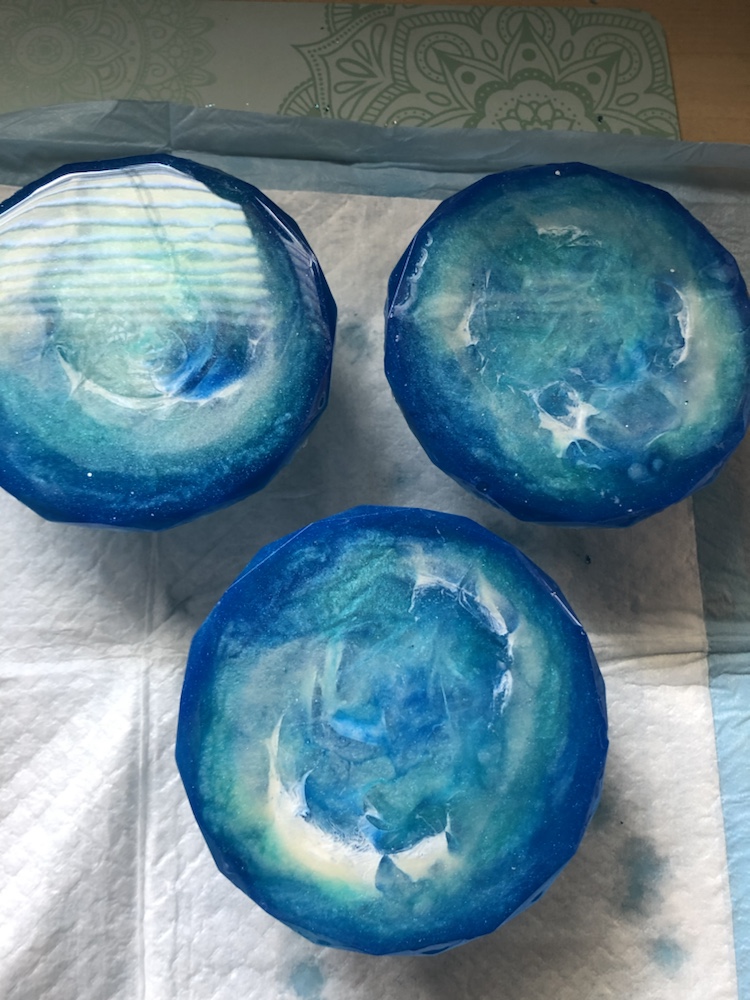
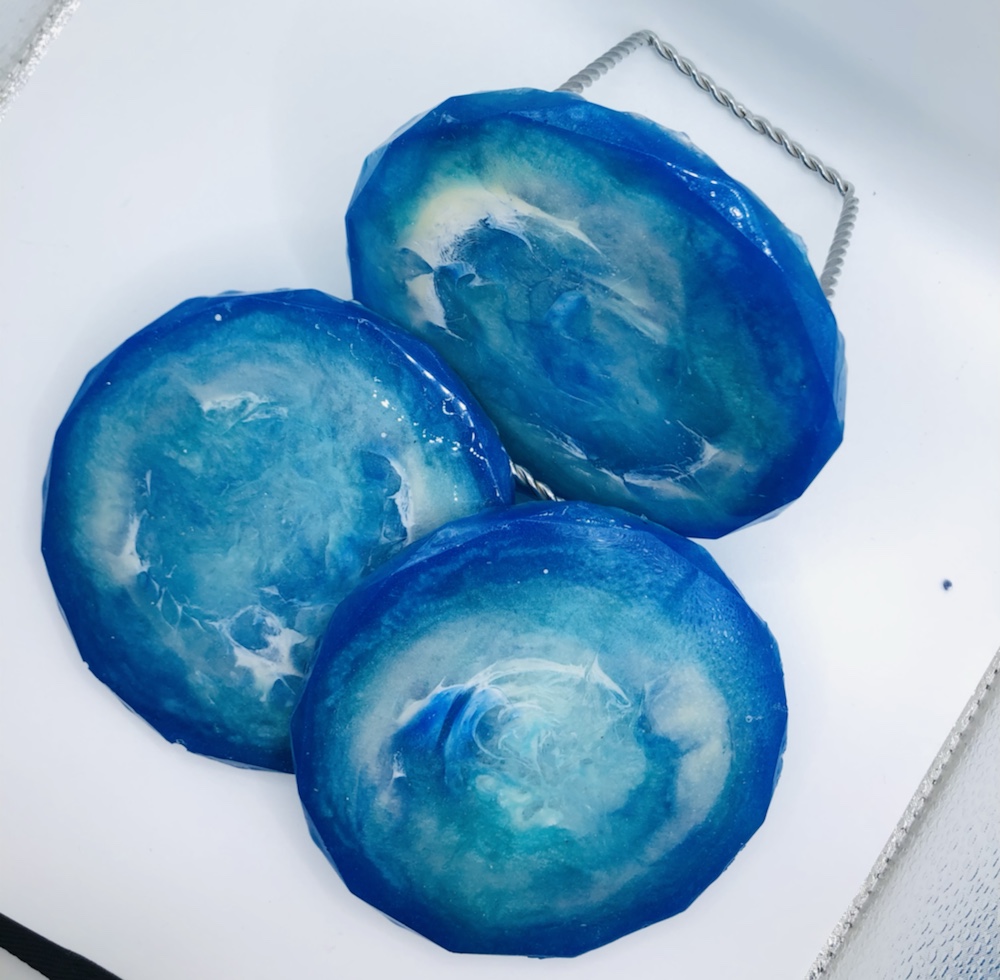
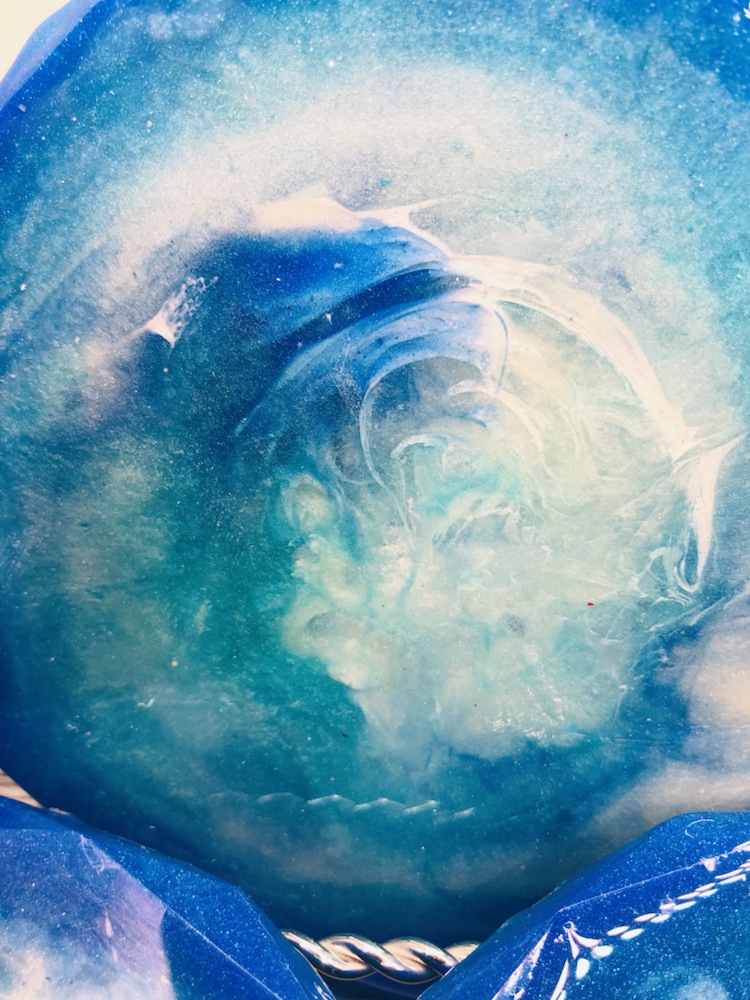
Hello my crafty friends! Last week I made these four coasters to match my new dinning room furniture. And I’m loving they way they came out. I’ll list products down below.
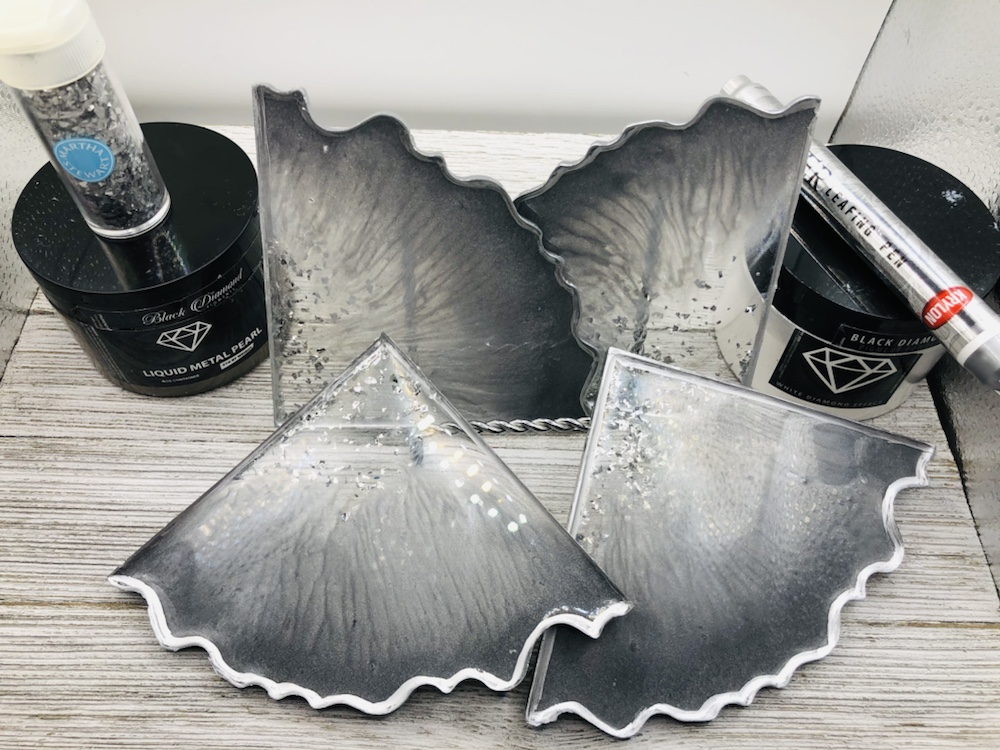
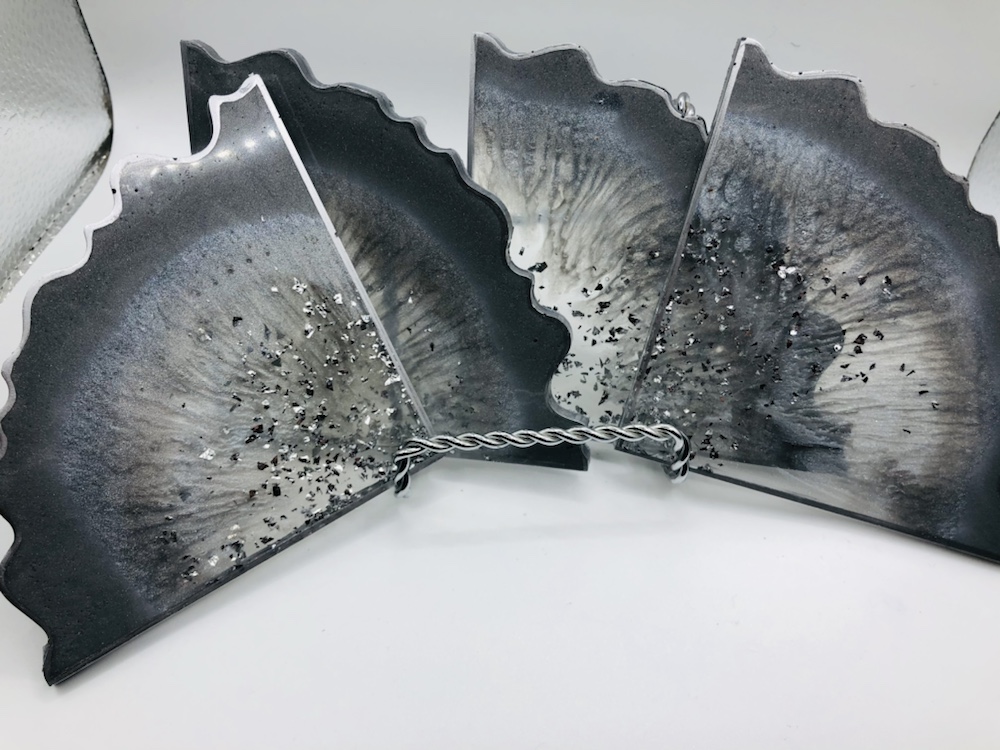
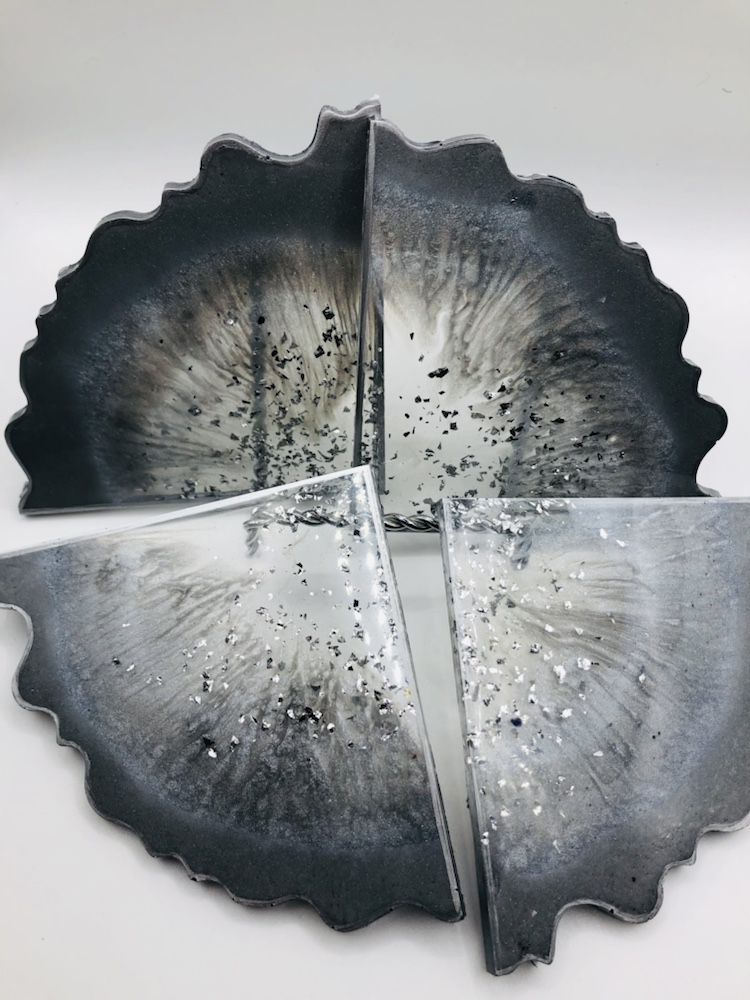
Art Resin Coasters made by Annalicia Spannaus
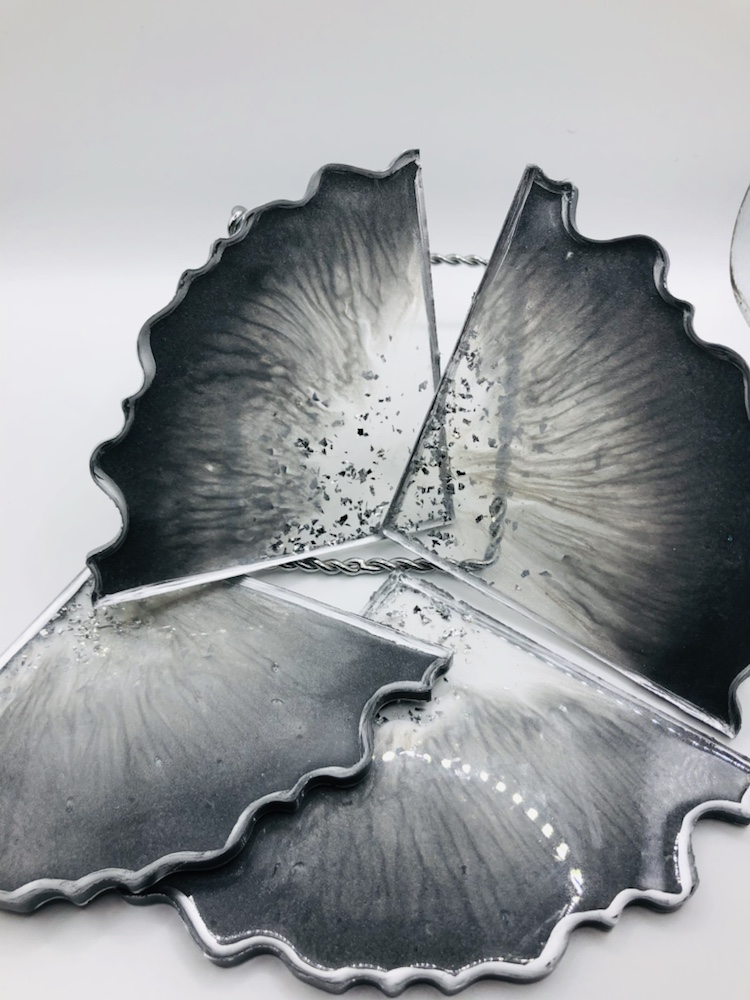
On the left is the front of the coasters and the right is the back. I love making art resin coasters because you get two beautiful different looks of the coasters. So you can used either side. I also love the way you can see the veins threw the coasters.
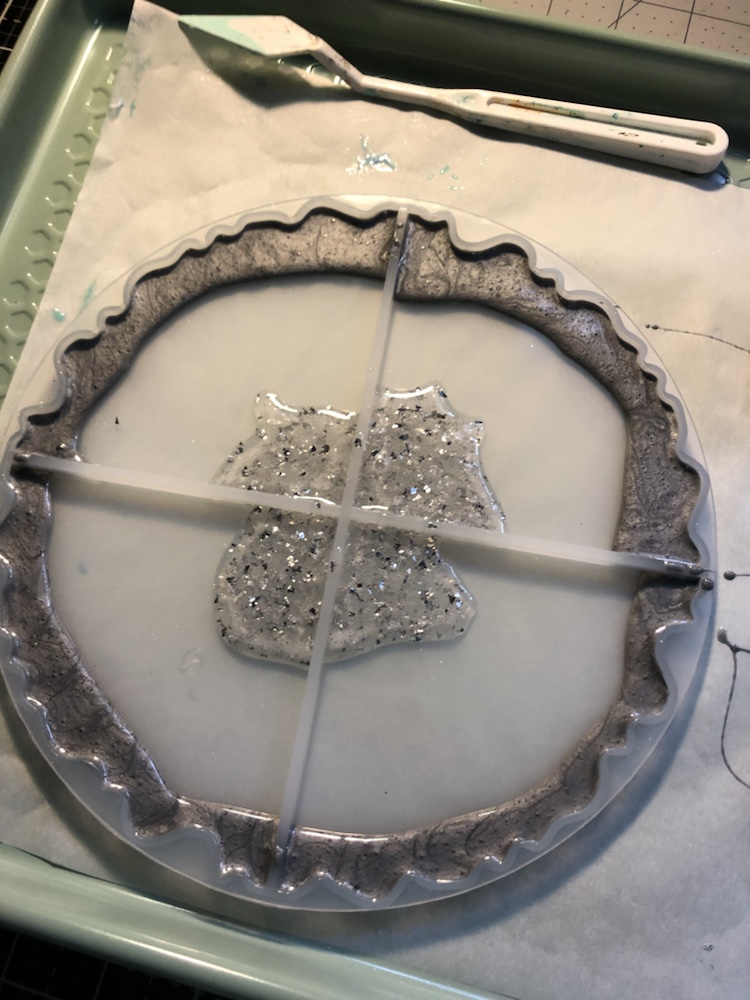
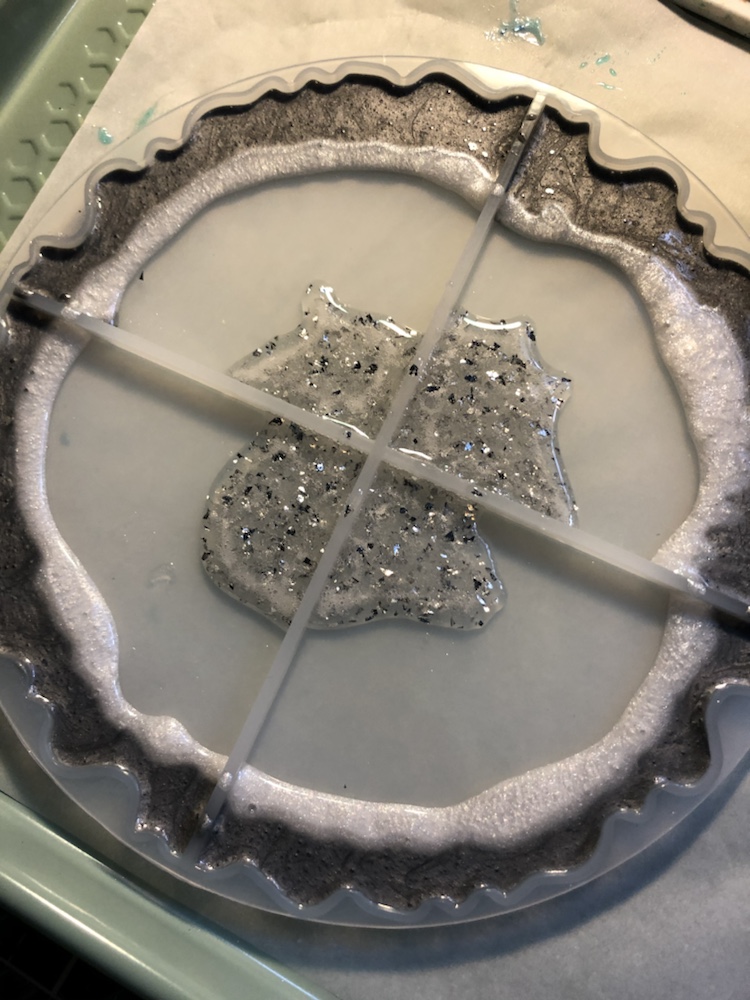
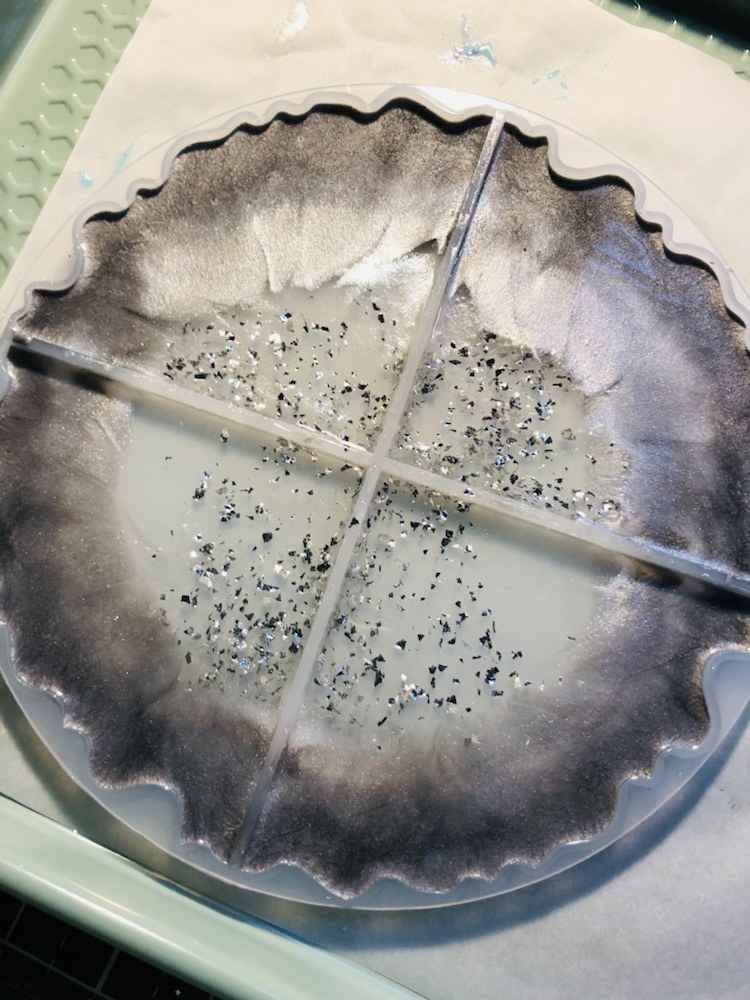
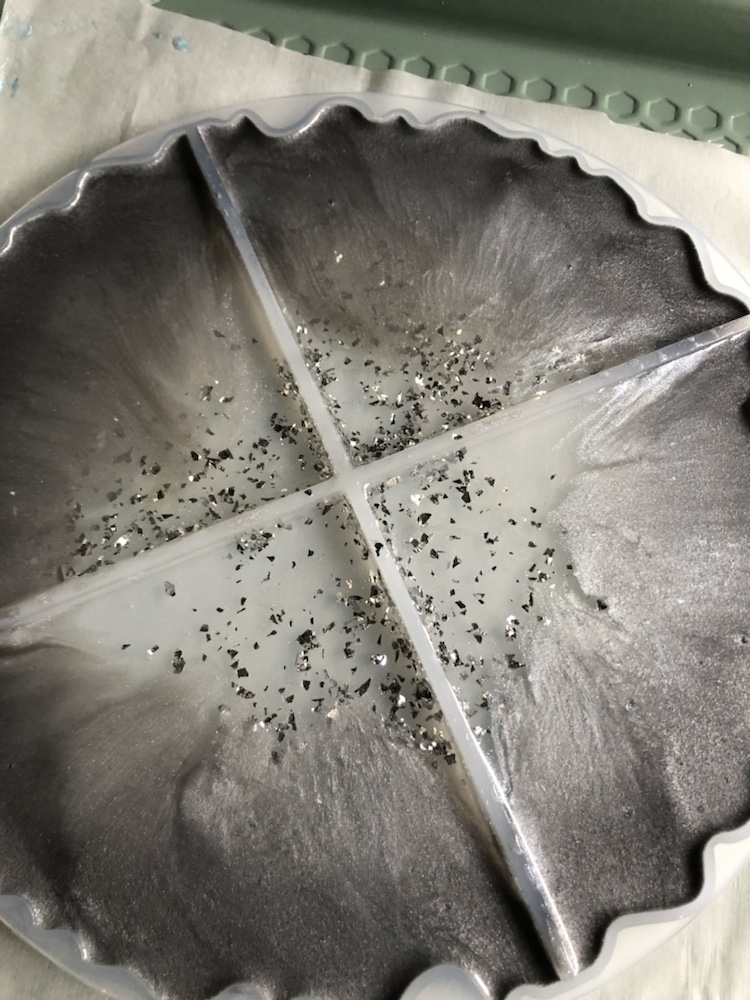
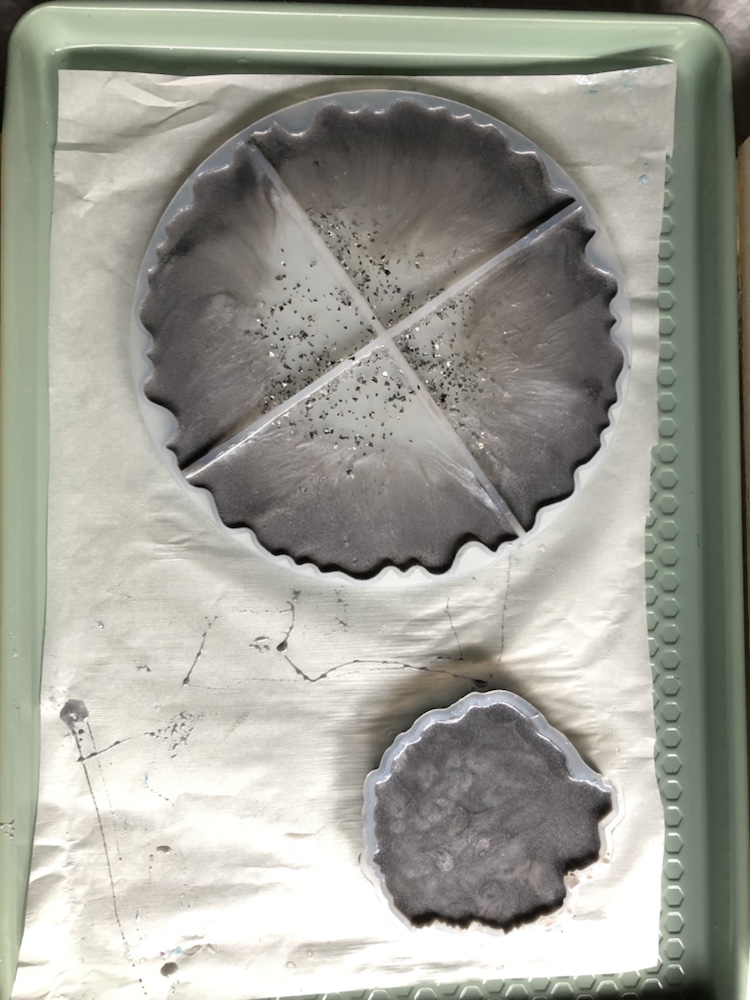
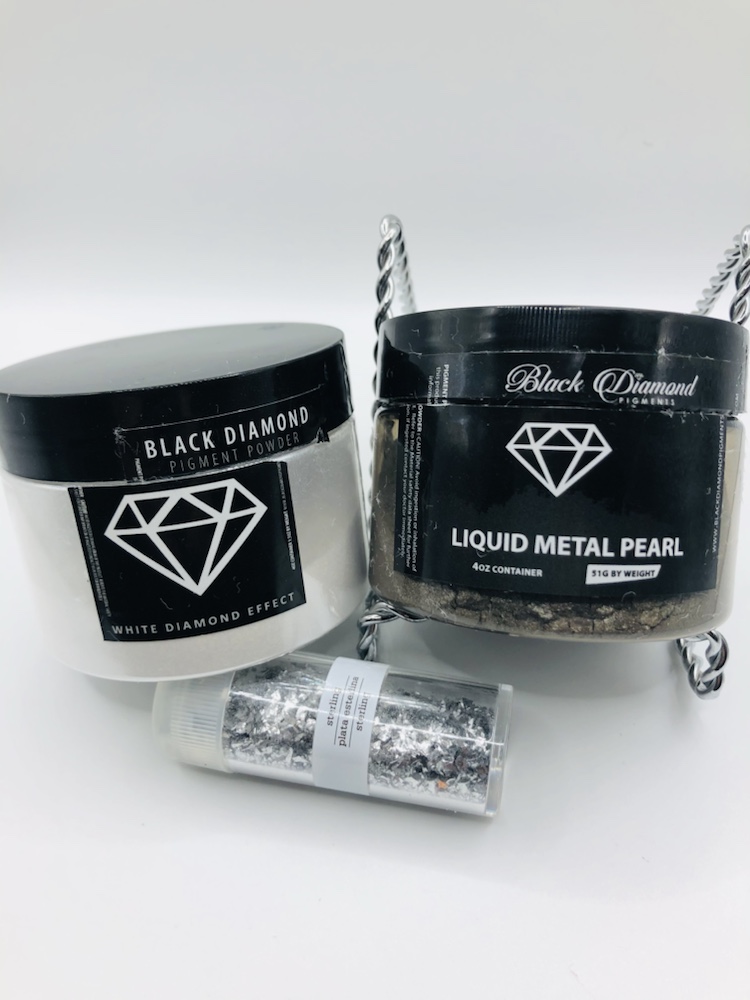
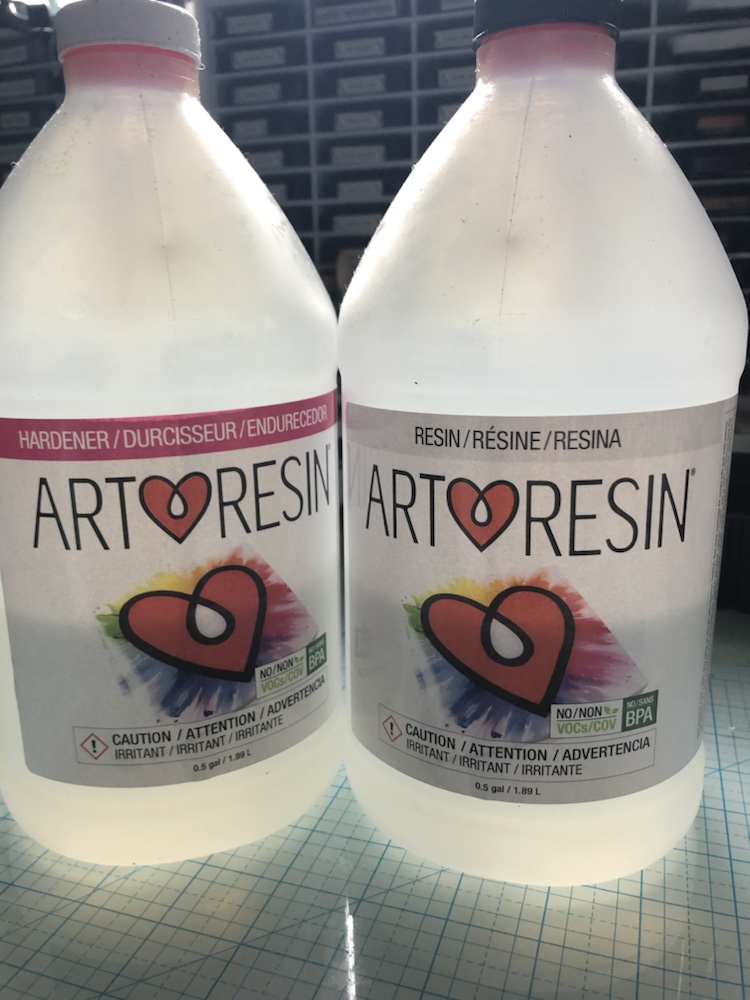
I started first mixing my Art Resin I used 3 ounces of harder and 3 ounces resin so total of 6 ounces. Mixed for 3 minutes, set your timer and sometimes I mix another few minutes more. The most important thing is to mix it for 3 minutes. I took resin and pour some in a cup, add Martha Stewart sterling glitter flakes. Pour this first on to my Leobro puzzle silicone mold, 4 quarter circle patterns with irregular edge. Second mix is Black Damond pigment powder liquid metal pearl, pour next around the outside mold. Third pour was black Diamond pigment powder white Diamond effect. Pour next to the metal pearl. Fourth pour was jus the art resin clear and around the white. Took a heat-gun and move it around for a few minutes to get the look I wanted and to get rid of any bubbles.
I had a little left over so I made a smaller coaster. I cover and let set for 24 hours.
Here’s pictures of products I used. I purchased from Amazon and Black Diamond. Thank you for checking out my blog. If you like please let me know or leave a comment. Have a wonderful day. Simplycraftydesigns.com by Annalicia Spannaus
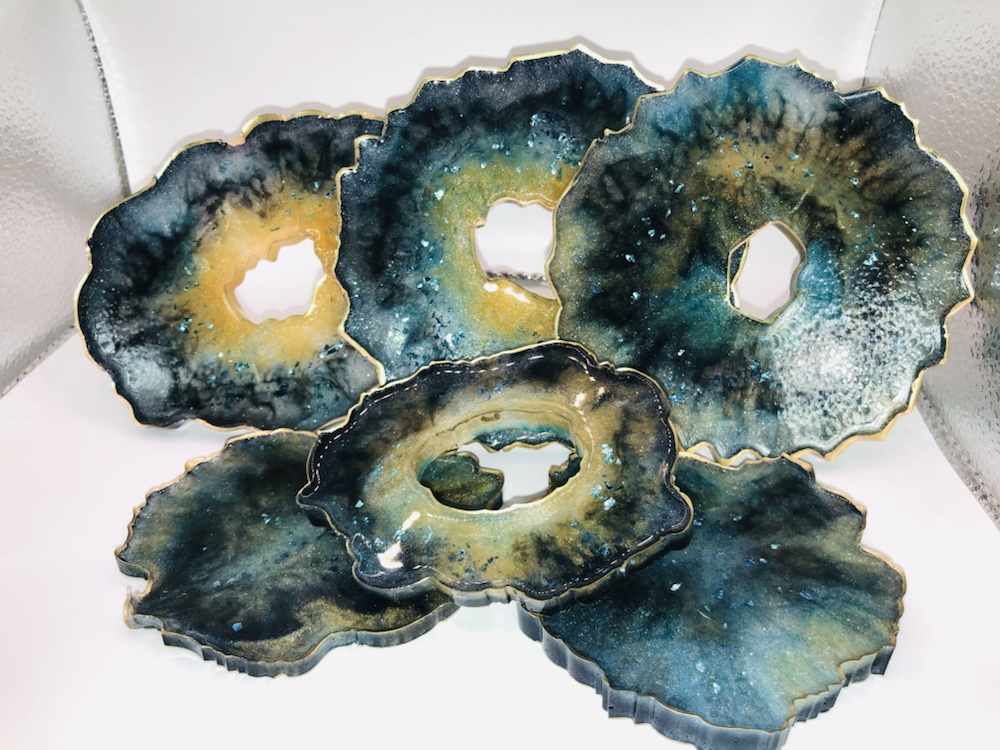
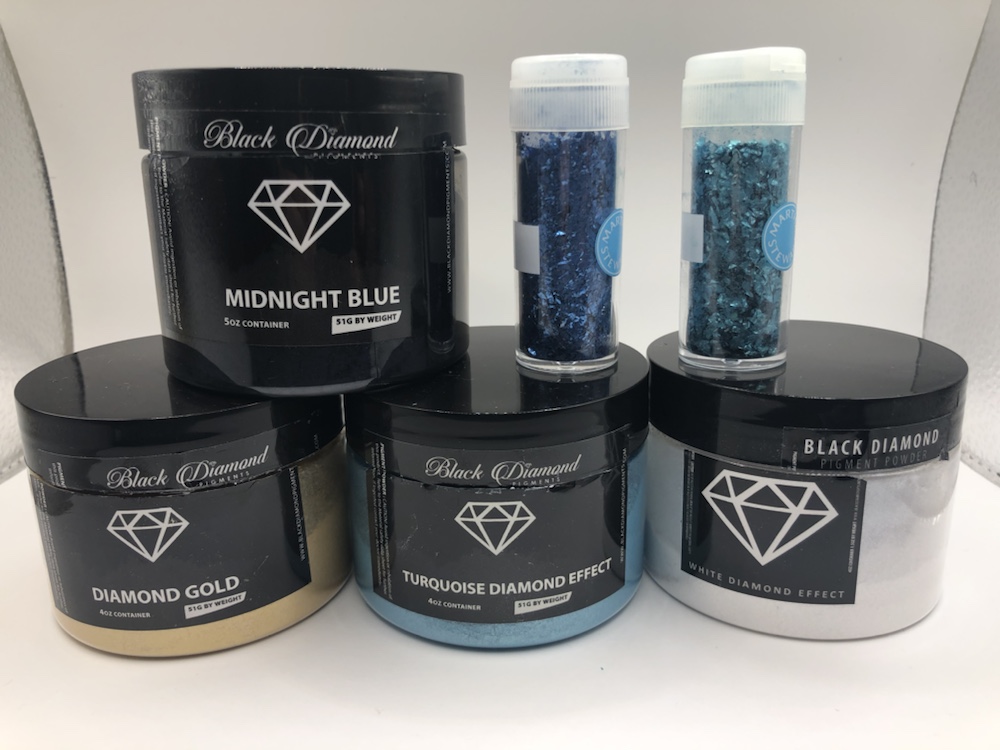
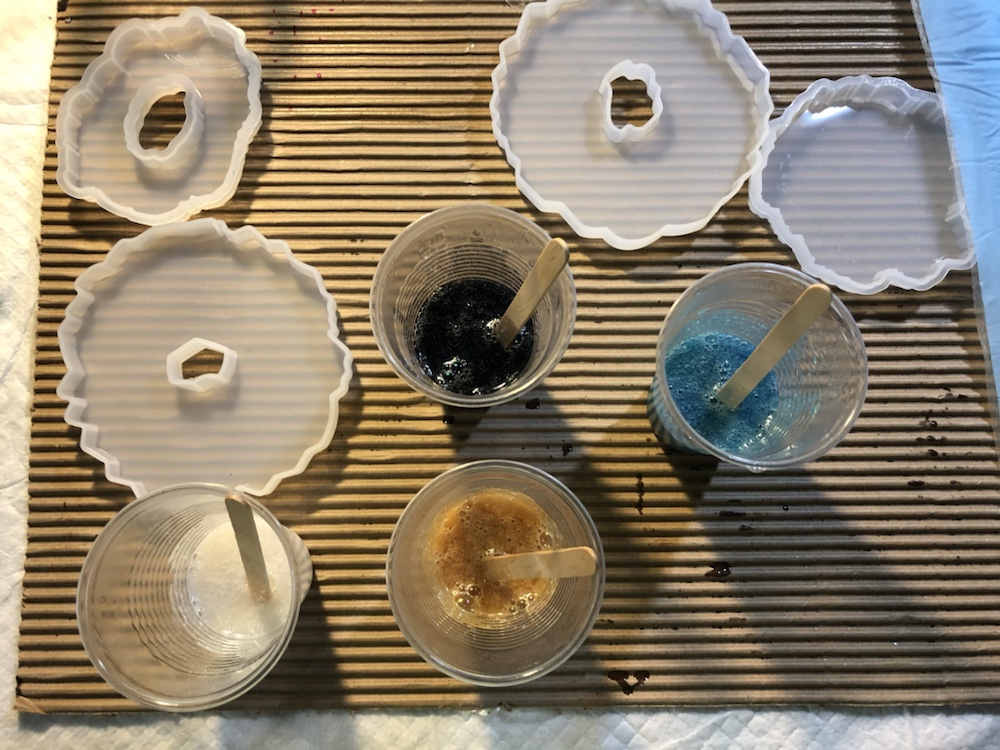
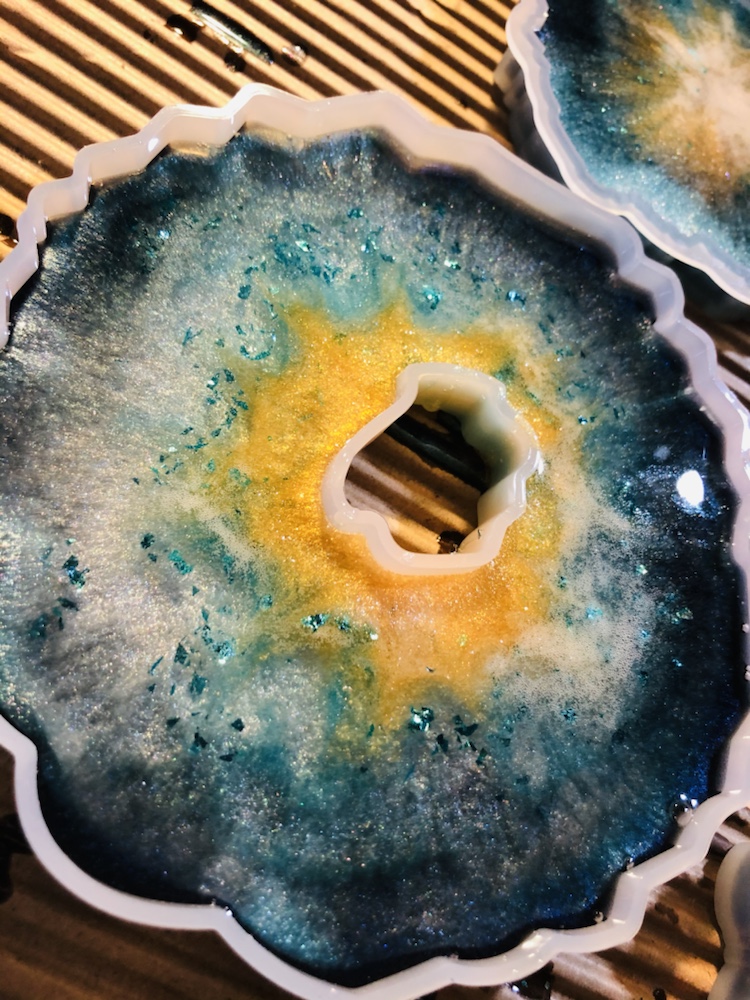
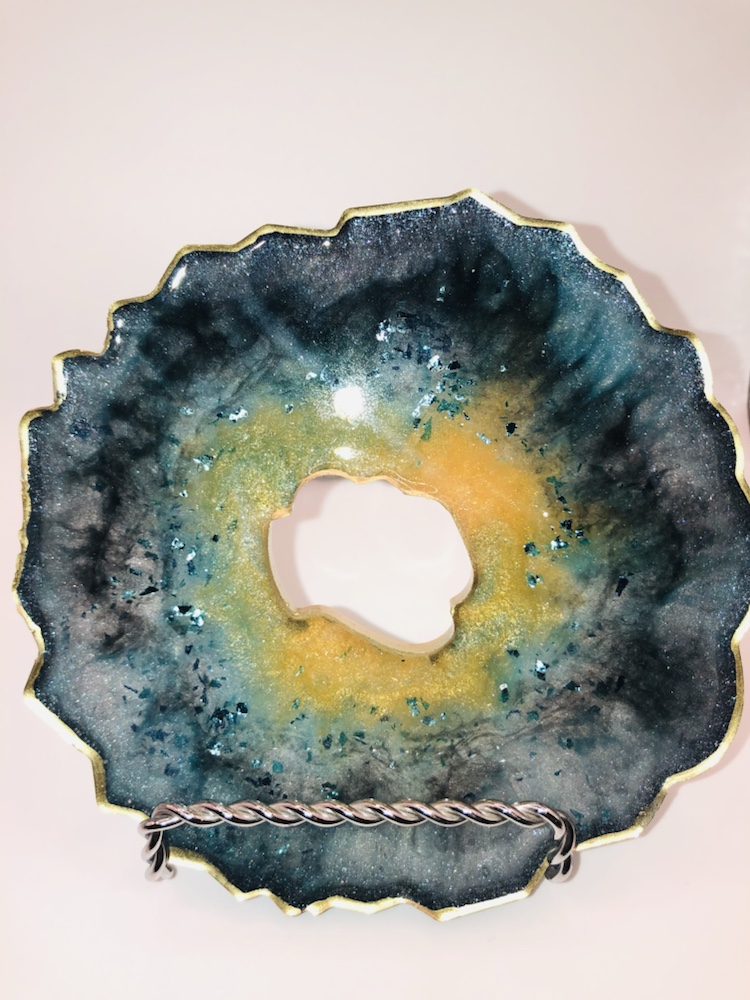
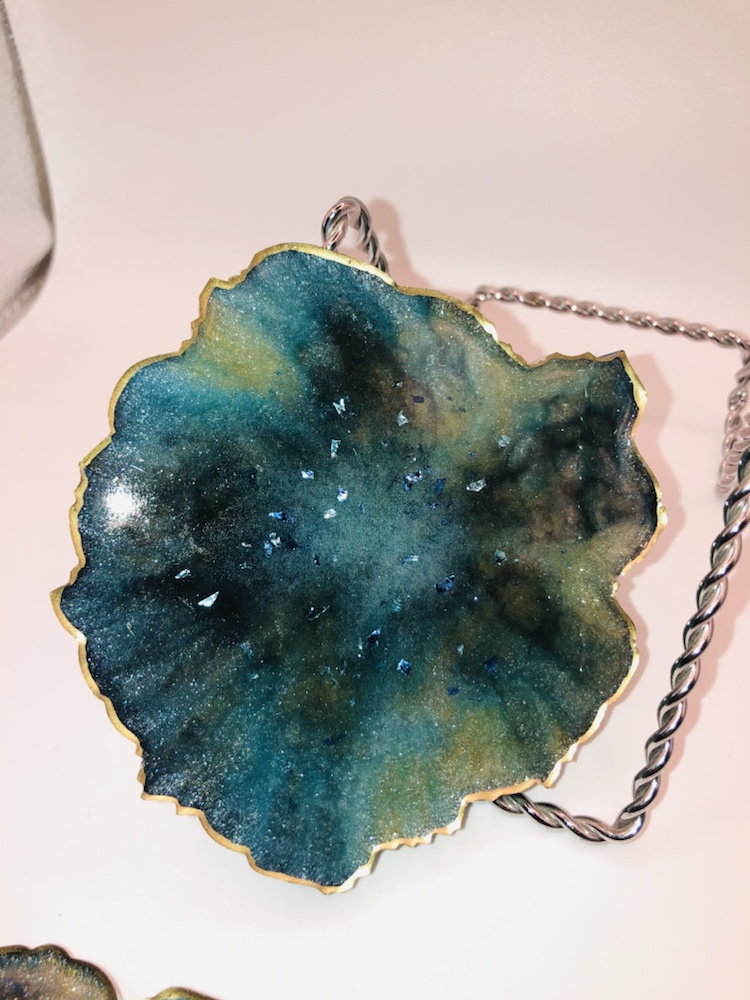
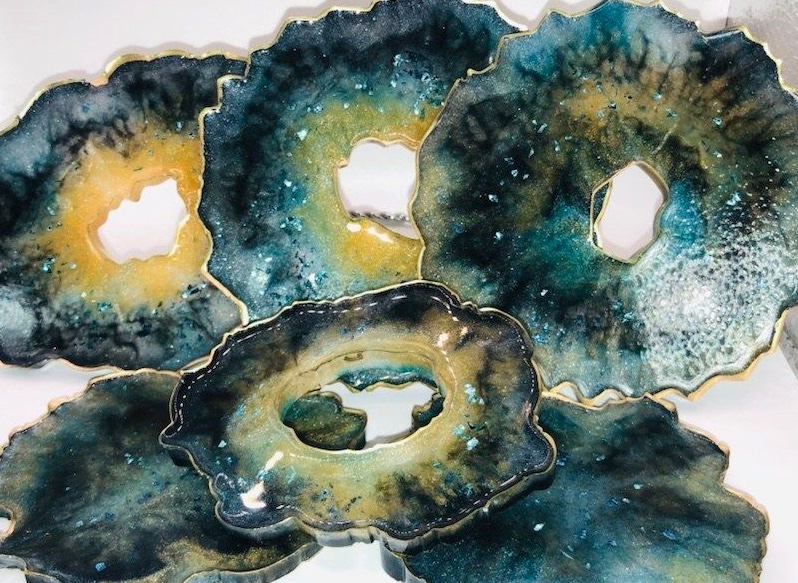
Hello my crafty friends! A few days ago I decided to make some-more coasters using art resin and Black diamonds pigment powders. I totally love the shimmer, beautiful colors of theses pigment powders. Also how easy it was mixing the pigment powders with the art resin. I’ll list products I used down below.
Coasters Black Diamond Pigment Powders & Martha Stewart Gunny Glitters
I used Black Diamond Pigment Powders Midnight Blue, Turquoise, Diamond Gold and White Diamond Effect. Also use Martha Stewart gunny glitter navy blue and turquoise. With Art Resin it only takes 24 hour for it to harden. I took a heat gun to pop all bubbles.
I also applied Arteza Gold acrylic maker to just the top and bottom of the coasters. Simplycraftydesigns.com By Annalicia Spannaus
Thank you so much for checking out my blog. If you like please leave me a like or comment. Have a bless day.
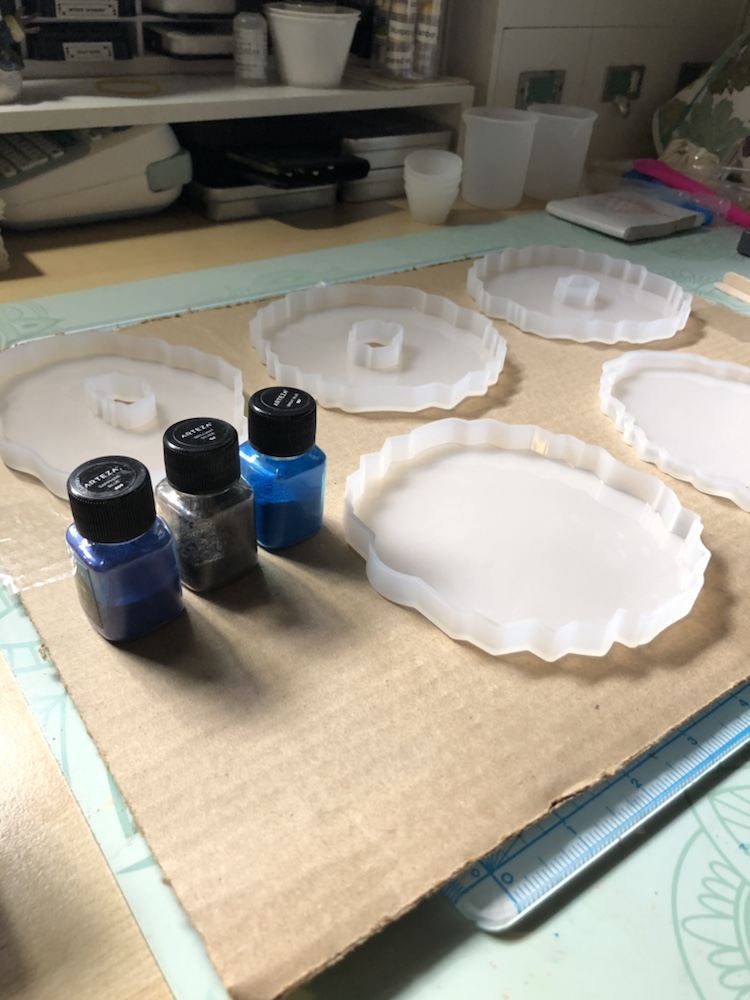
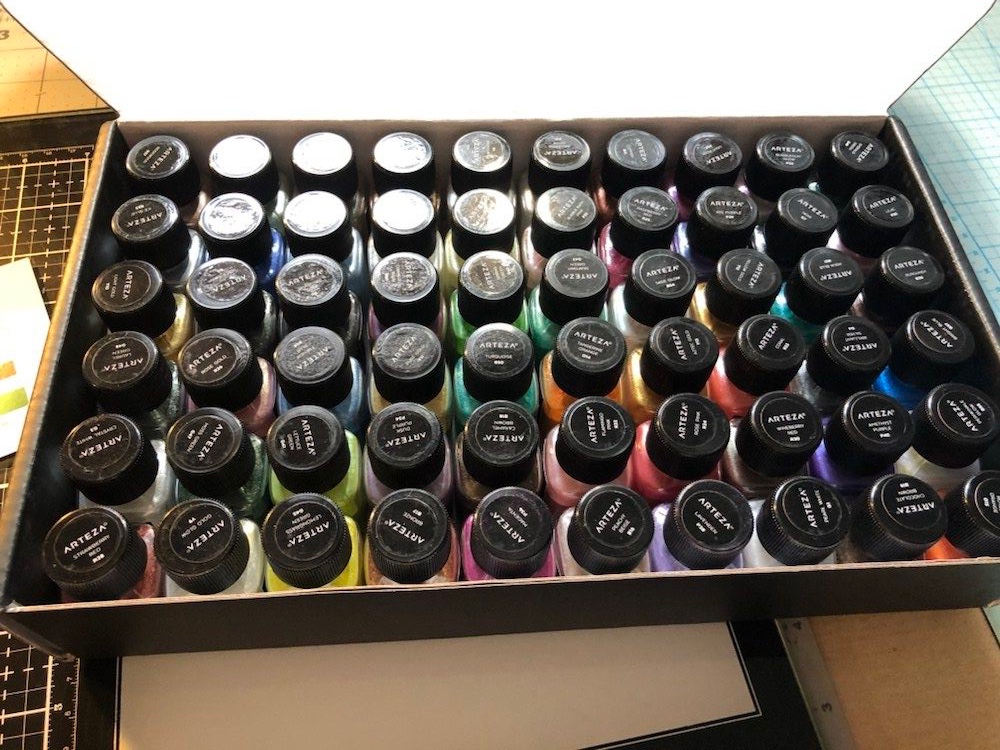
Hello my crafty friends! Yesterday I decided to do a resin pour using Art Resin and Arteza mica powders. I got a set of 60 different colors of mica powder. So of course I couldn’t wait to play. And here is how it came out.
I made five coasters and they came out perfect. Each one has there own look and shines so pretty.
Arteza Mica powders I used are Silver G4, sapphire blue 859 and bright blue 857. I also used Nuevo gilding flakes silver.
Before I get started I always make sure everything is in front of me. Because you know when working with resin your time is important. Working with Art Resin you have a window of 45 minutes to work with before it starts to get hard.
This is a beautiful set of mica powders, I can’t wait to do other creative things with theses colors.
I did do a video and I’ll post it on YouTube and thank you for checking out my blog. Please leave me a like or comment. Would love to hear what you think. Have a wonderful day.
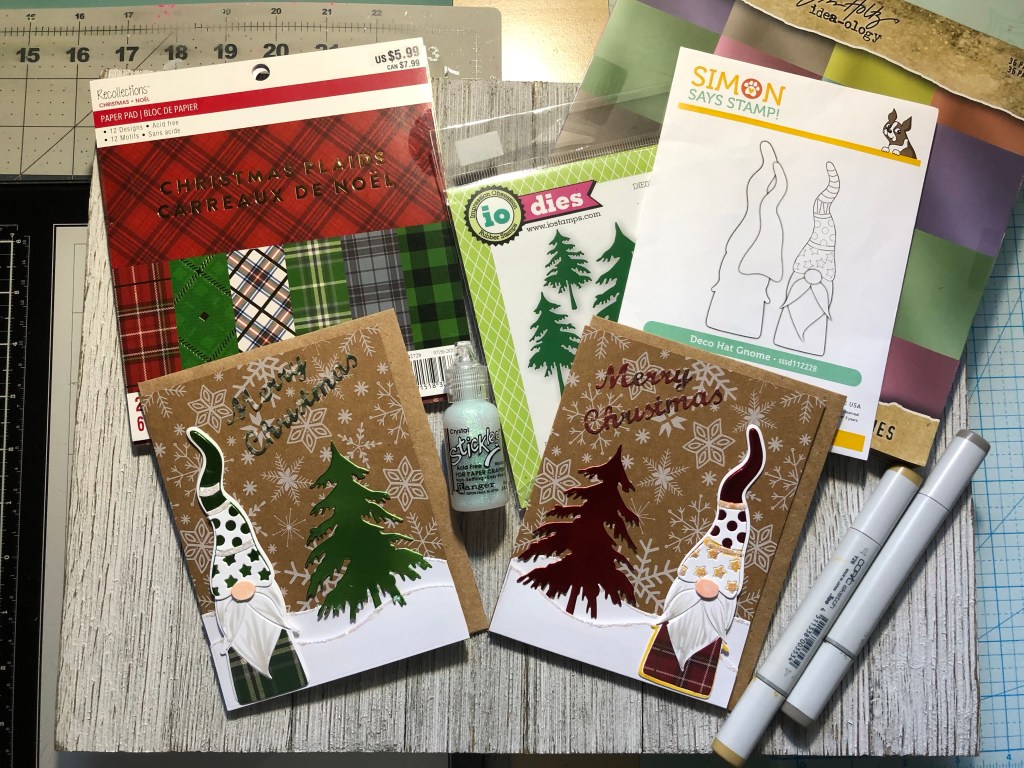
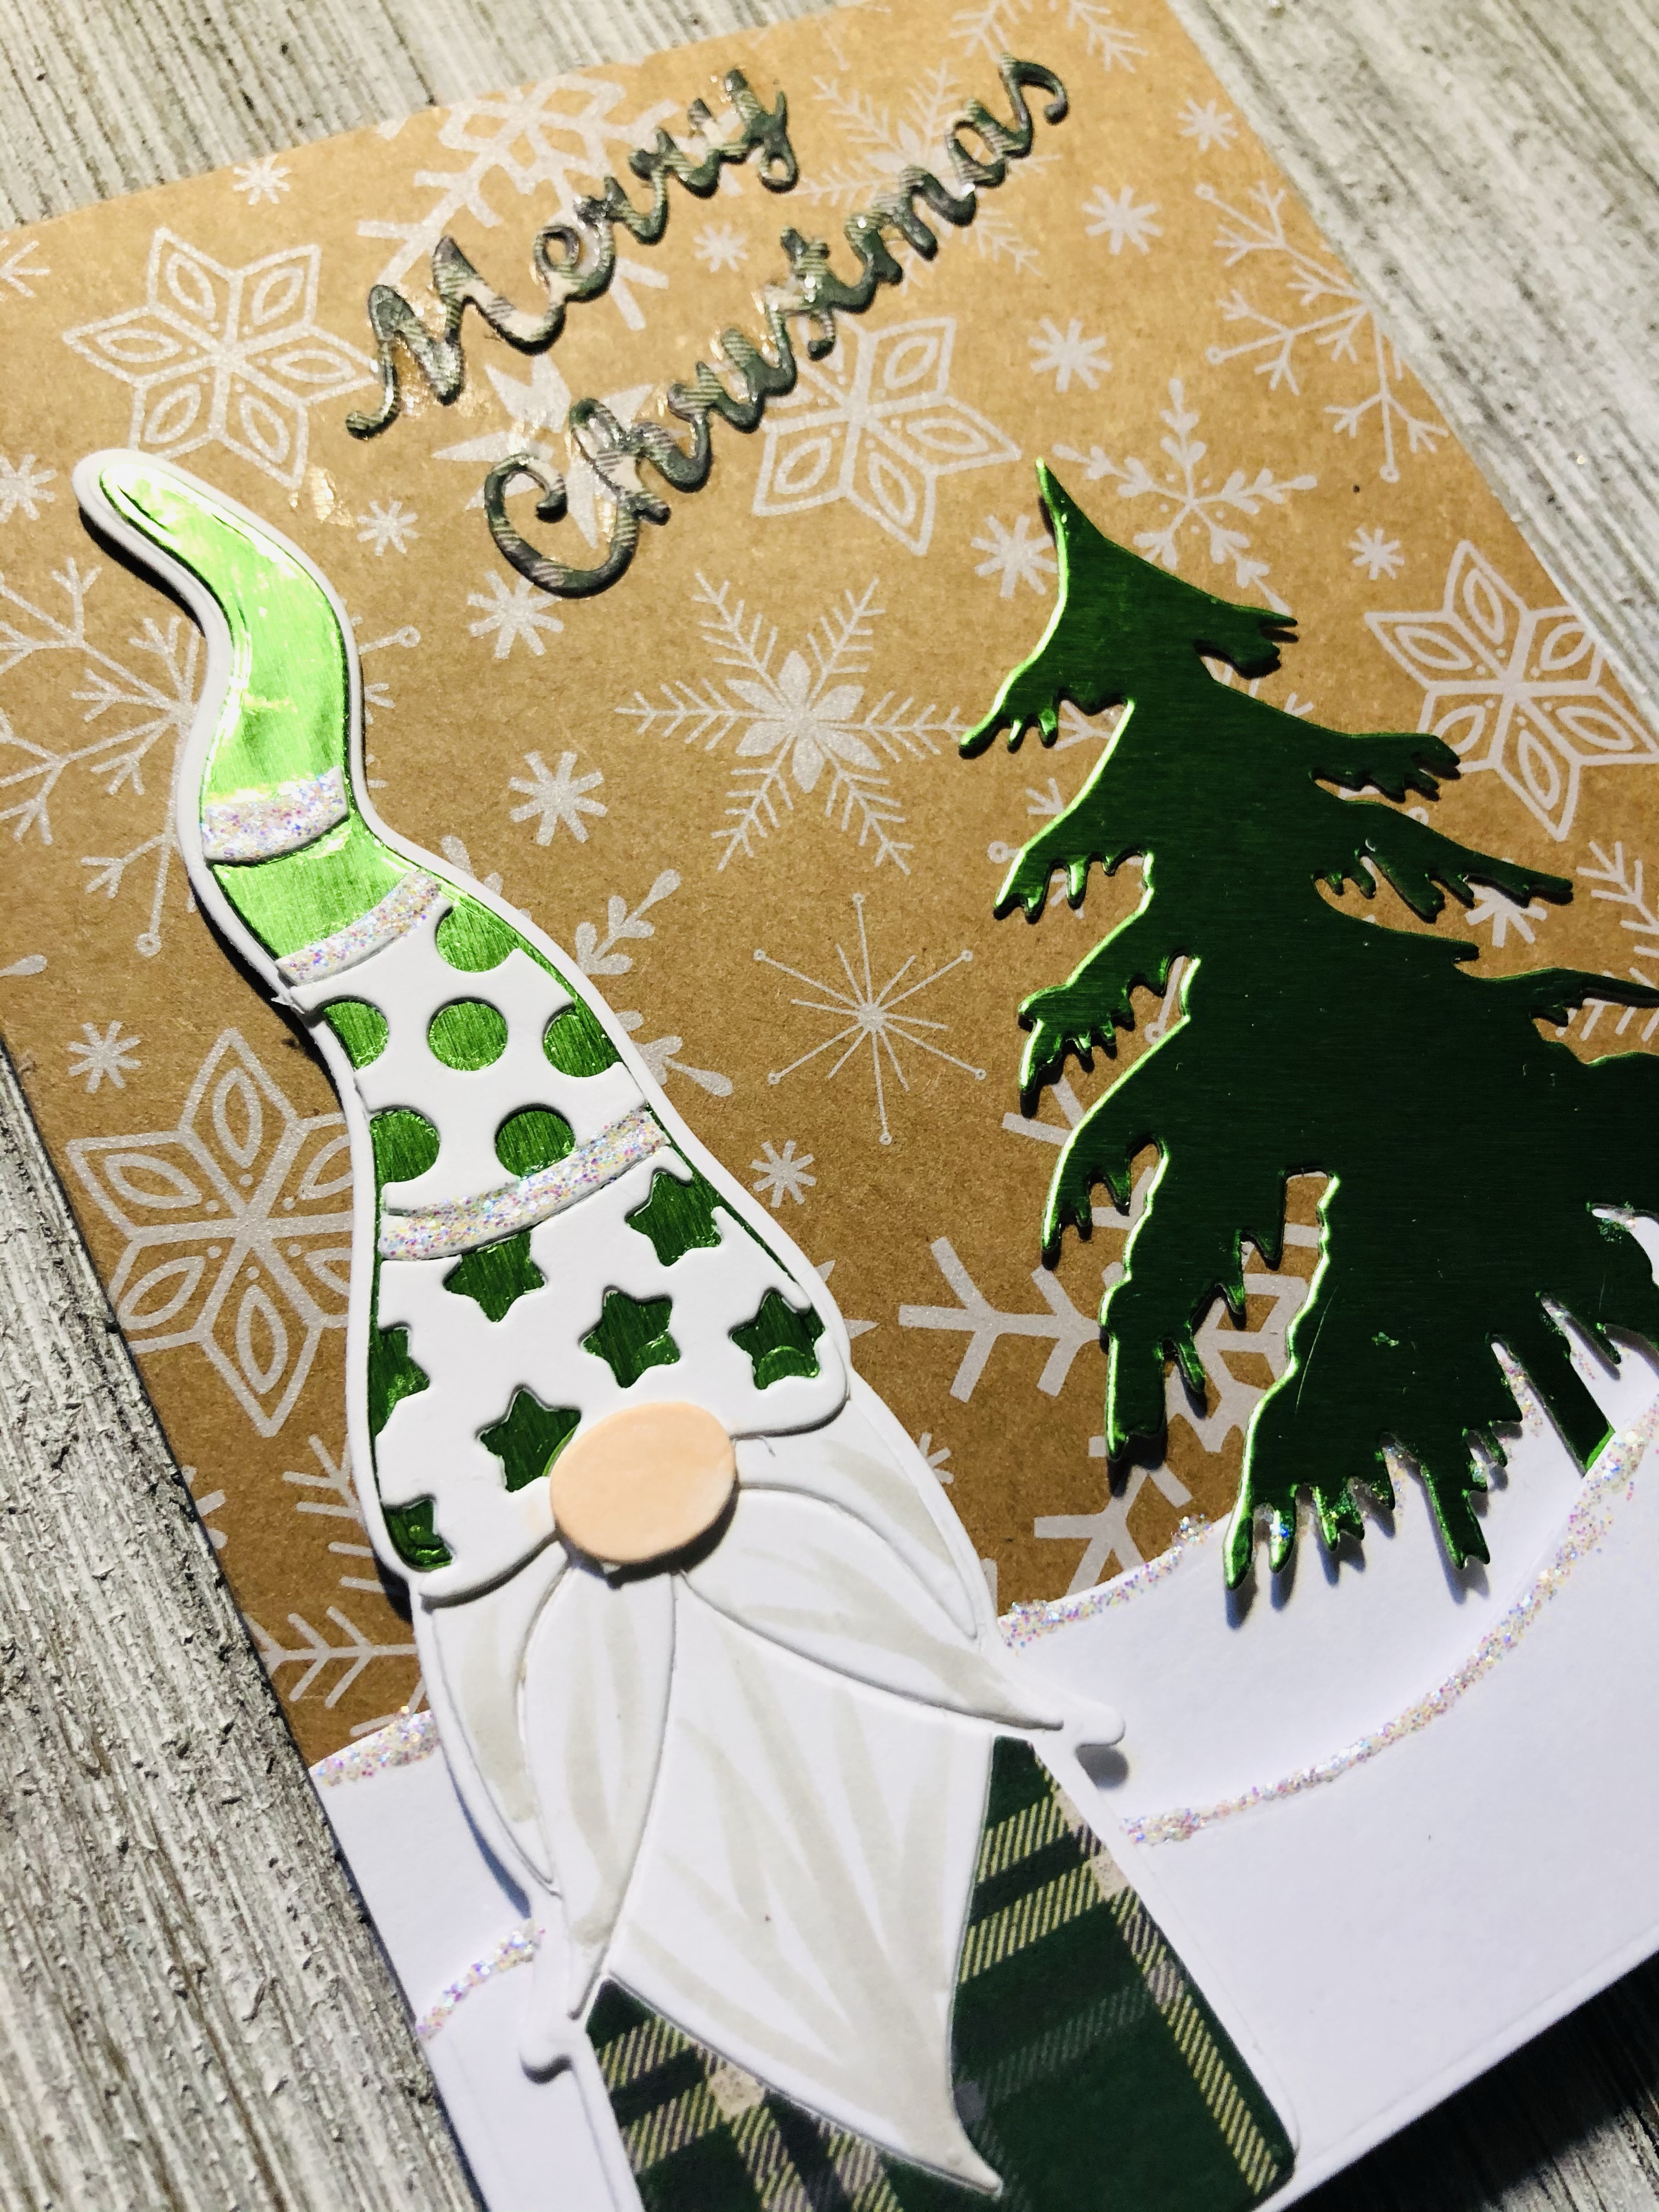
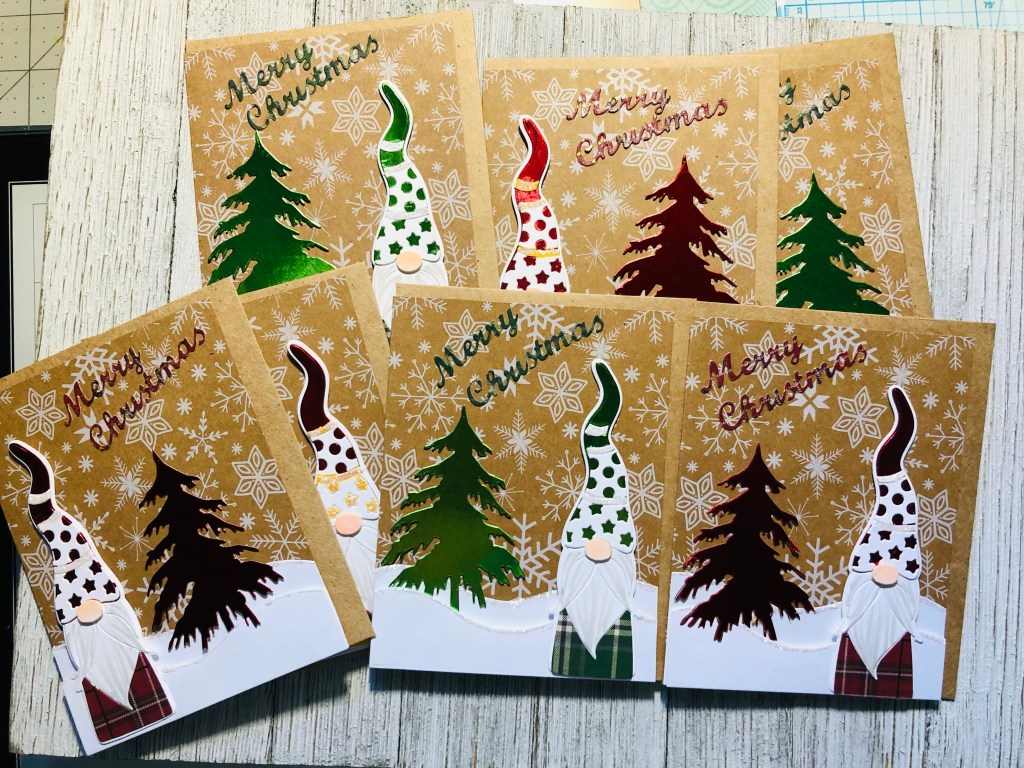
Hello my crafty friends! I wanted to share another set of Christmas cards I made using Simon Says Stamp! deco hat gnome steel die. I’m so glad I ordered this cute little set.
Here I used Tim Holtz metallic confections Kraft stock and Recollection Christmas Noel paper pad. On the gnomes noses and beard I used copic markers E21 baby skin punk and w5 warm gray.
I also used Impression Obsession Christmas tree dies with TH metallic Kraft stock. To make the snow I used TH Home From The Holiday dies. On 110 cards stock and ranger star dust sticklers. I really had so much fun putting together these Deco Hat Gnome dies.
I also wanted to wish everyone a wonderful and beautiful Merry Christmas this year. Thank you for checking out my blog. If you like please let know or leave a comment.
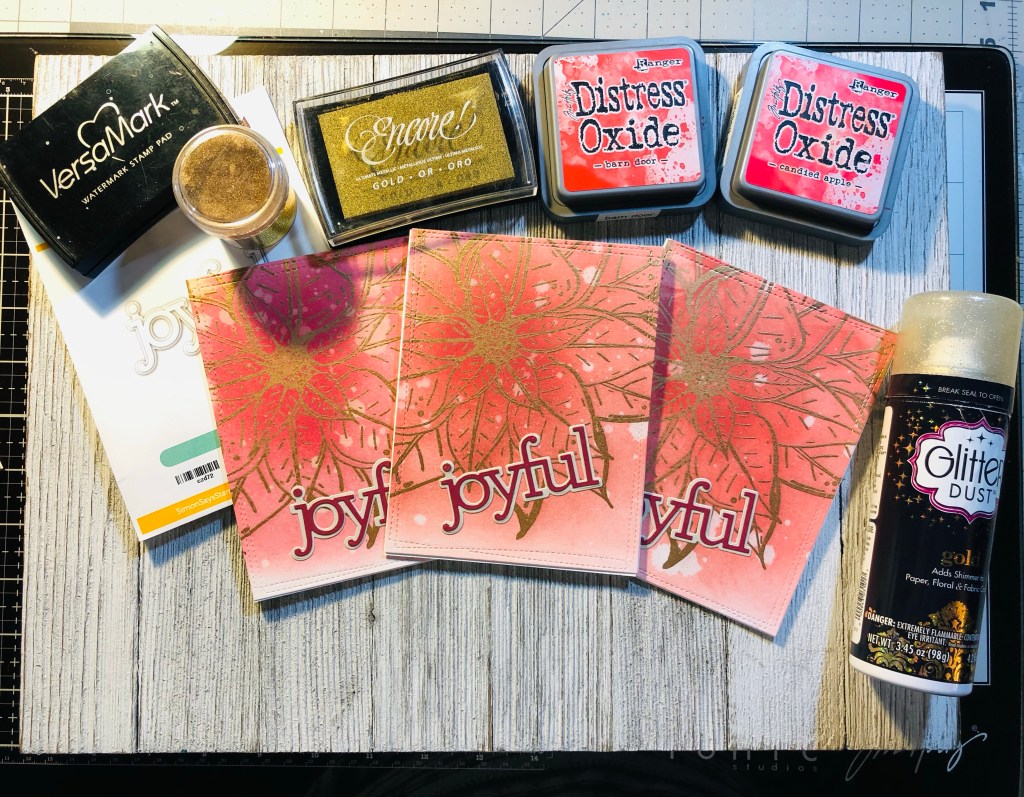
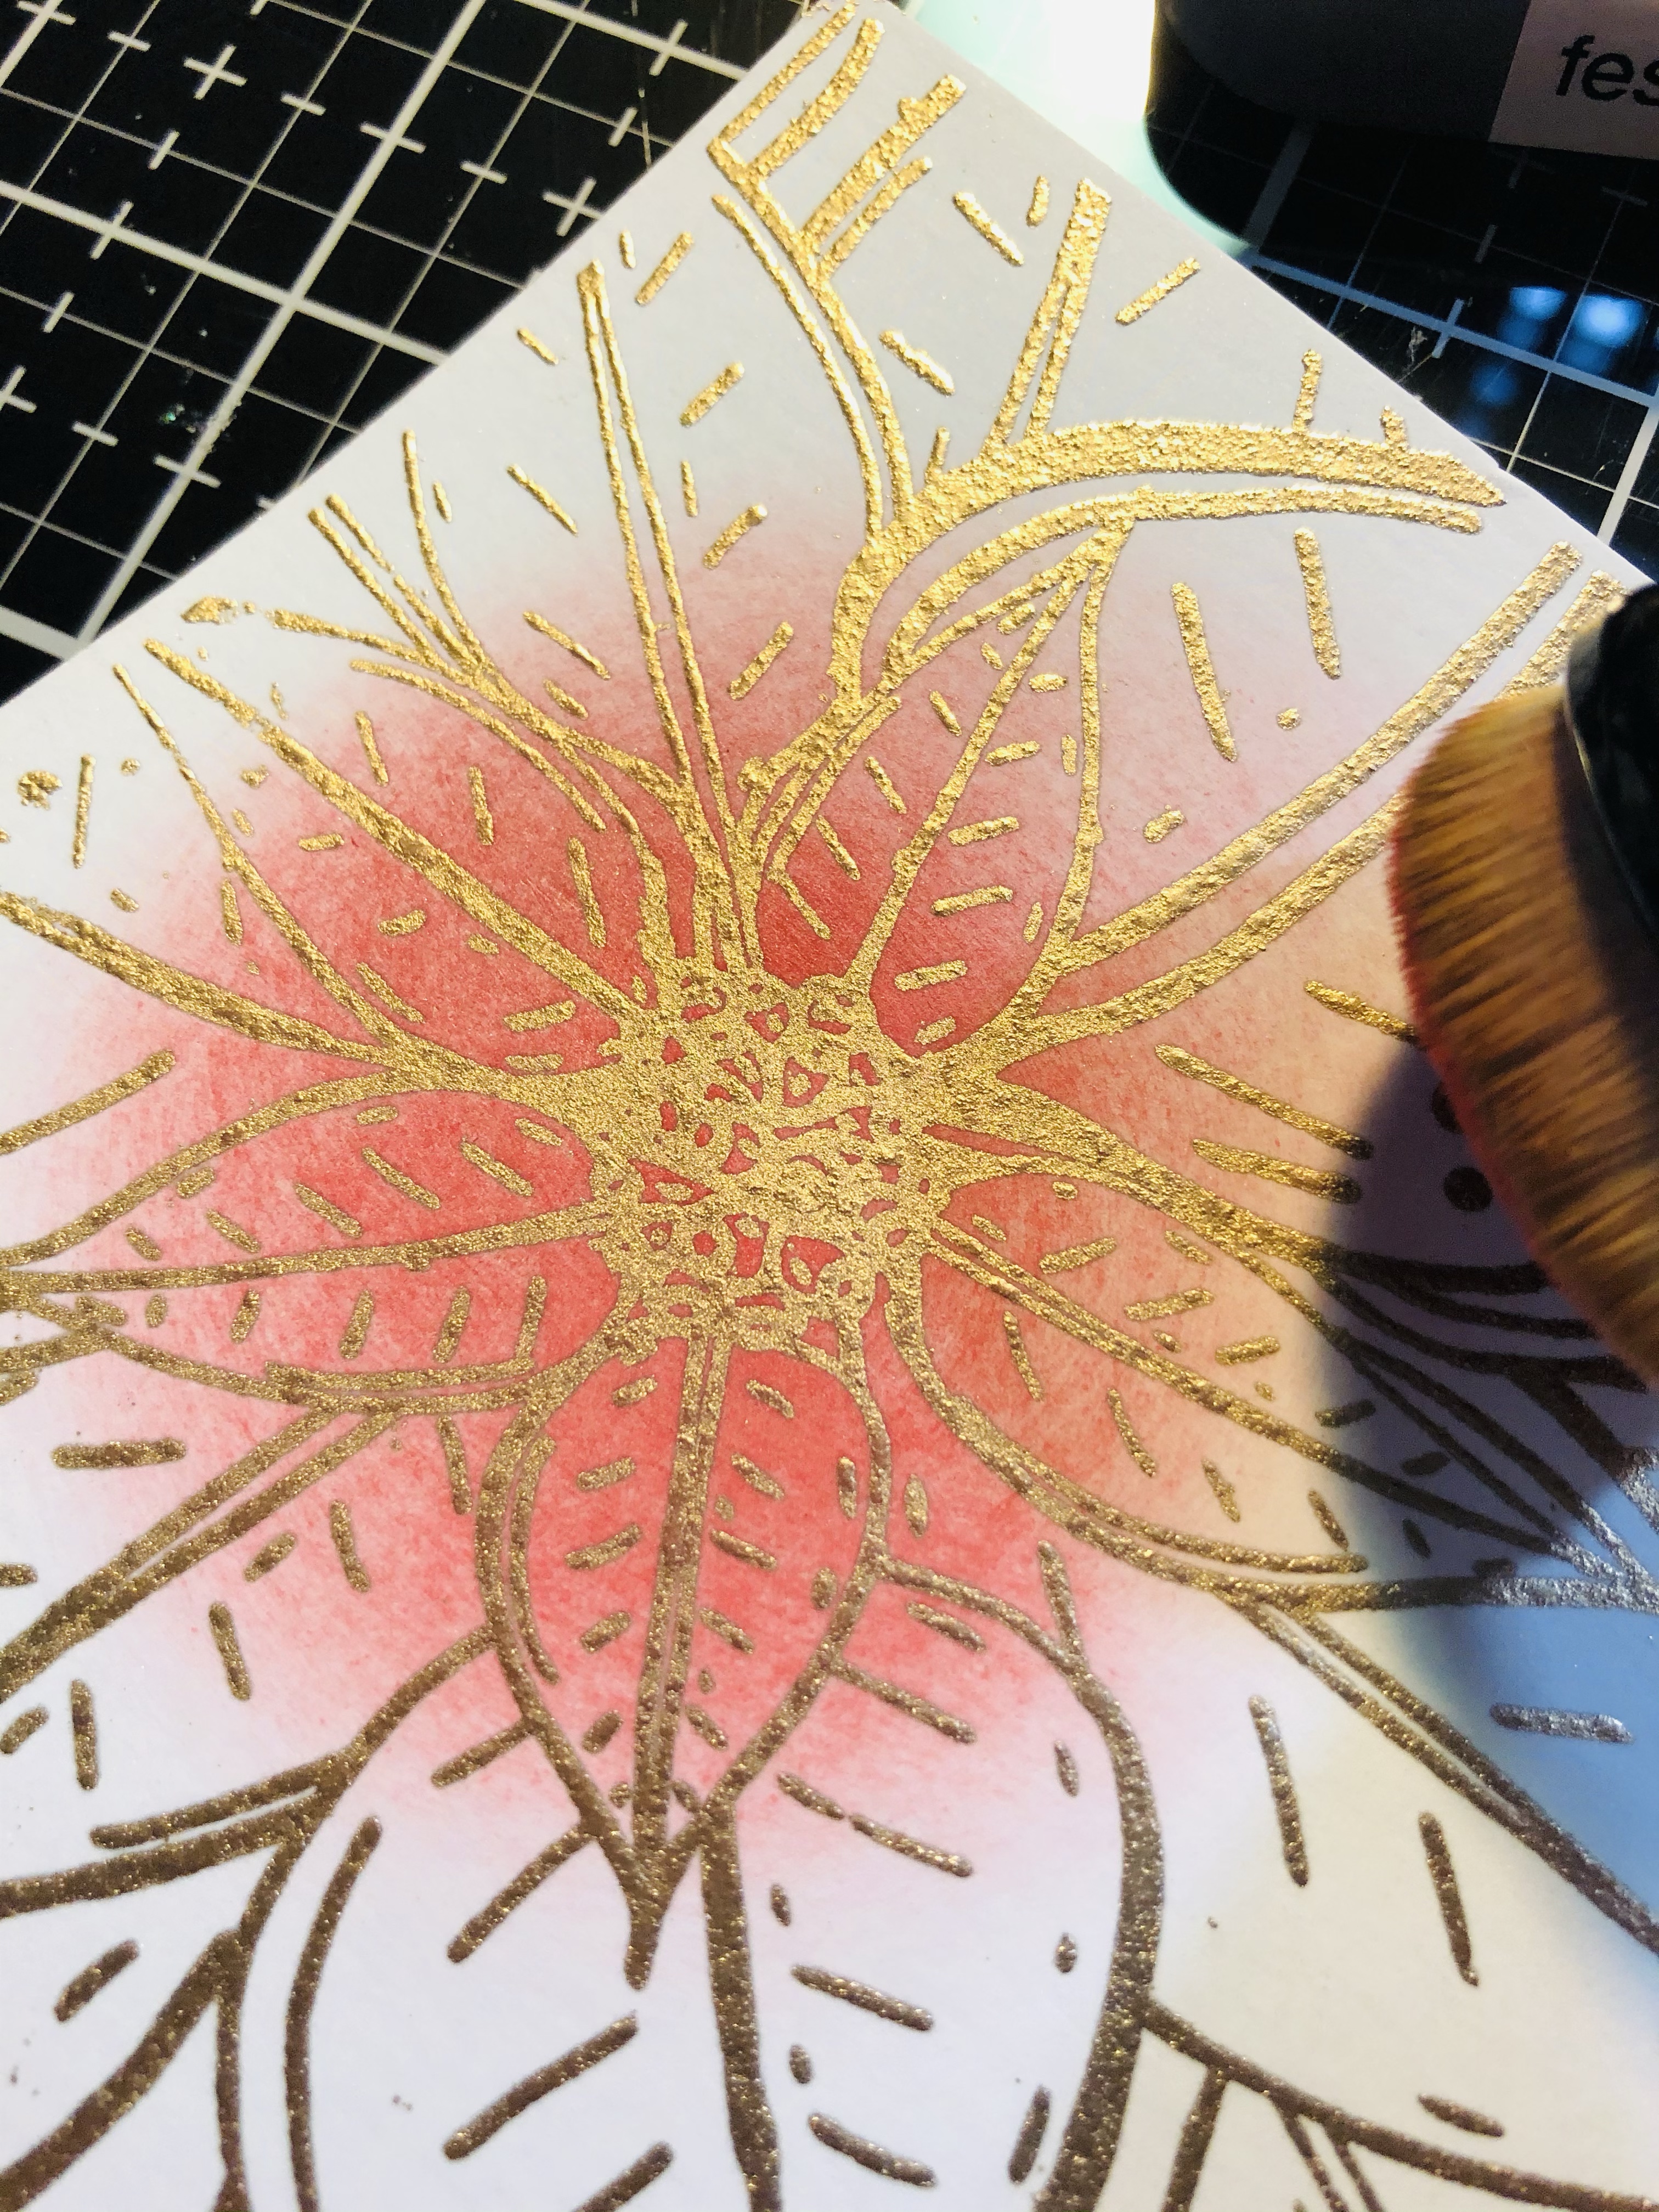
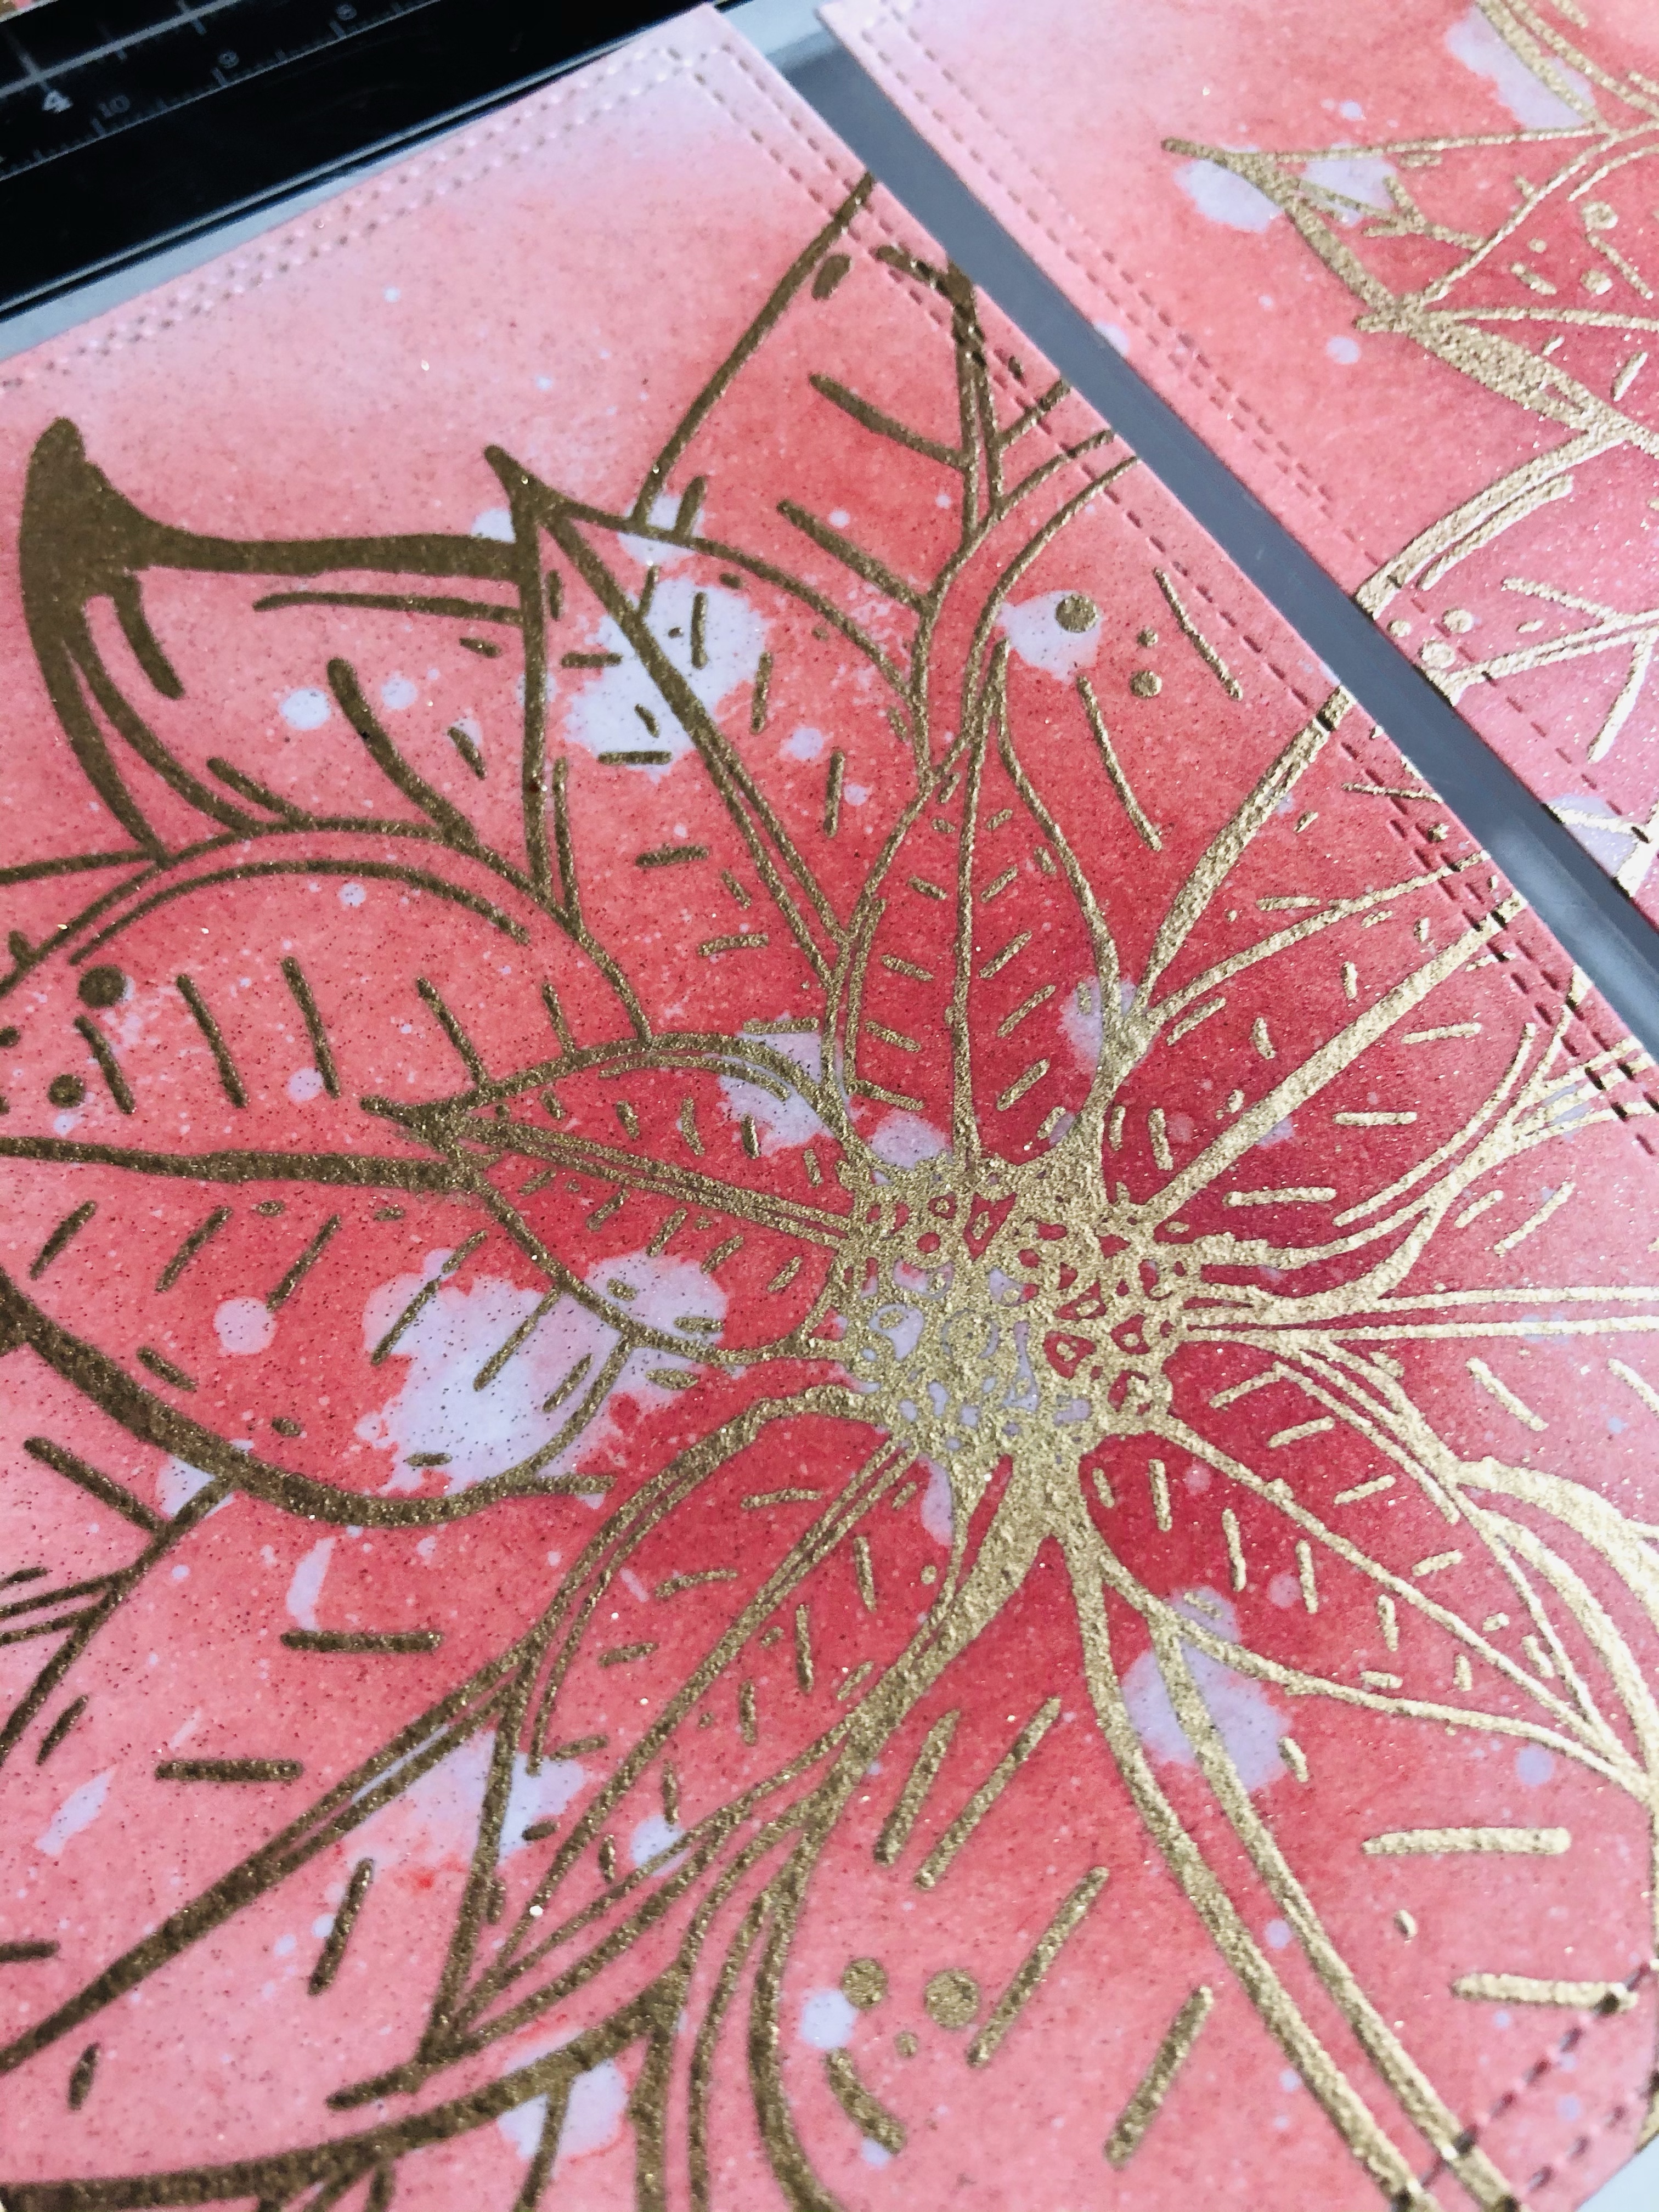
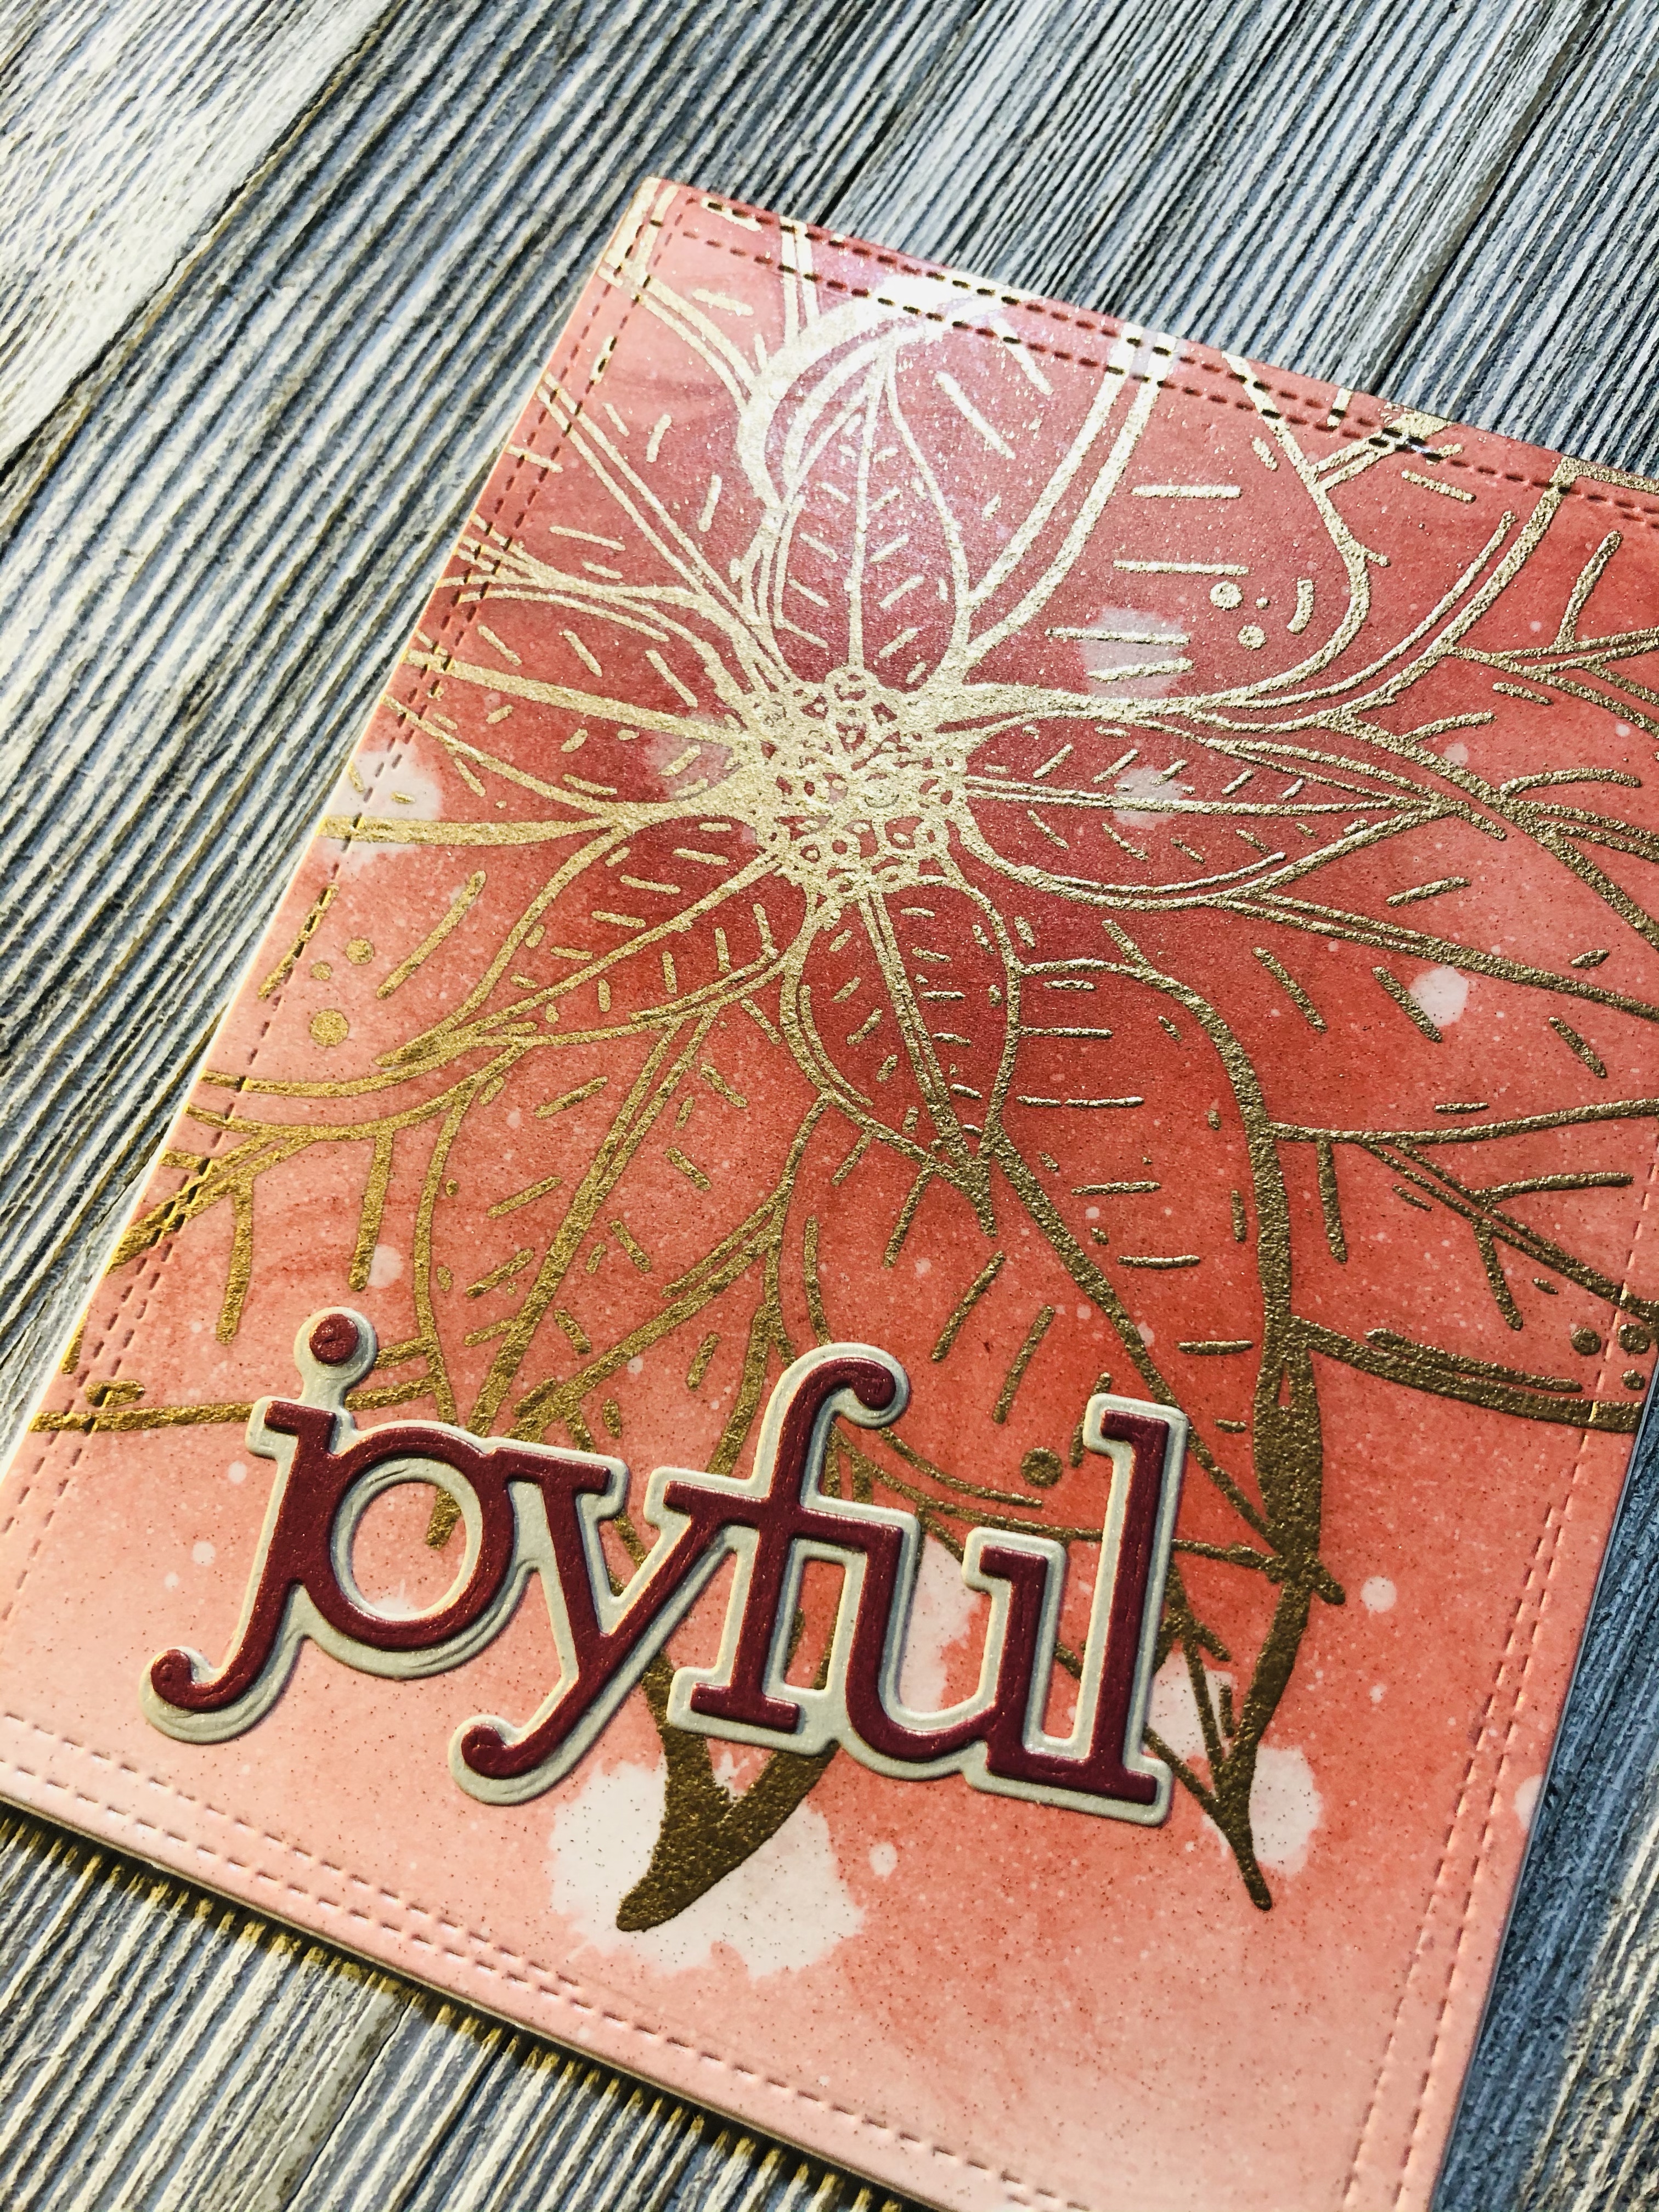
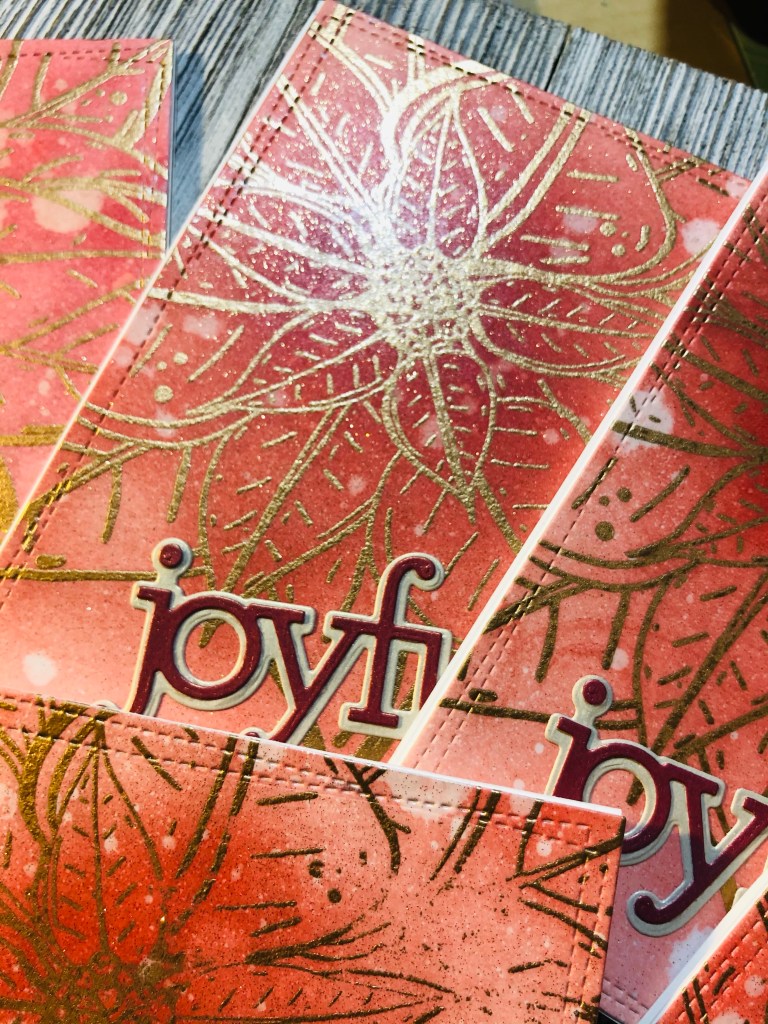
Hello my crafty friends! I hope everyone is having a great weekend. I decided to make some poinsettia cards today. And I’m really loving the way they came out.
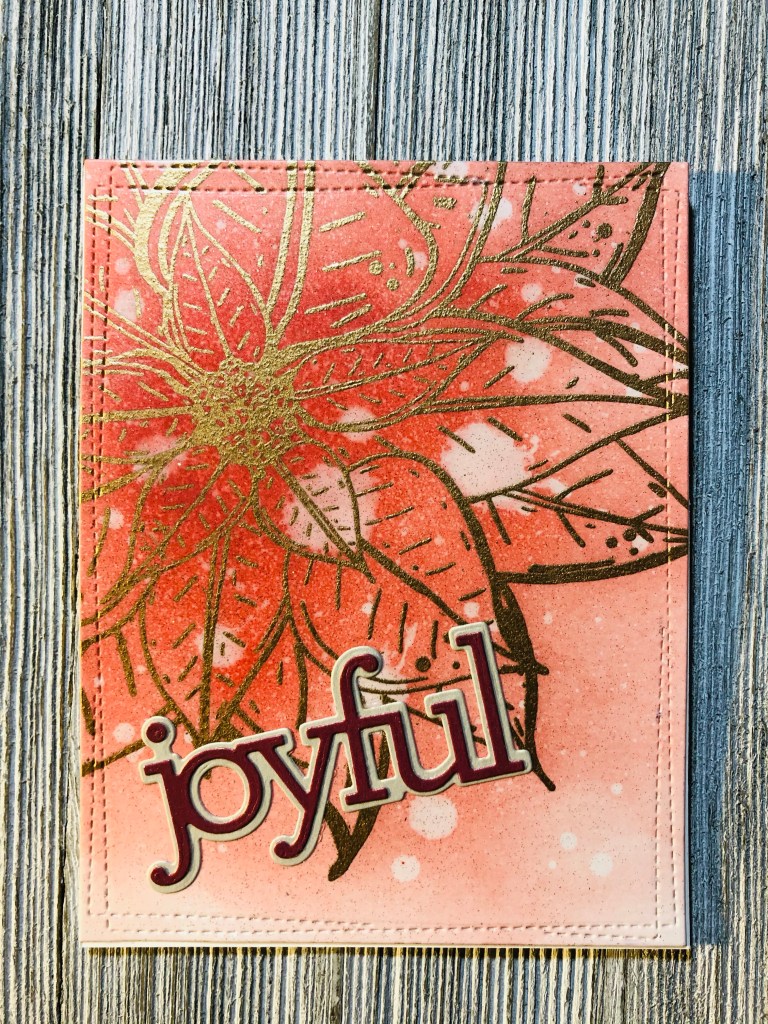
First thing I did was use versa Mark watermark stamp pad and rangers queen Gala royal satin embossing powder and then dried with a heat gun.
I also took distress oxides barn door and candy apple and blended the colors in on the poinsettia. I took some water drops and tripped it onto the poinsettia and then tap dry with a paper towel. The poinsettia stamp I use is by picket fence studio.
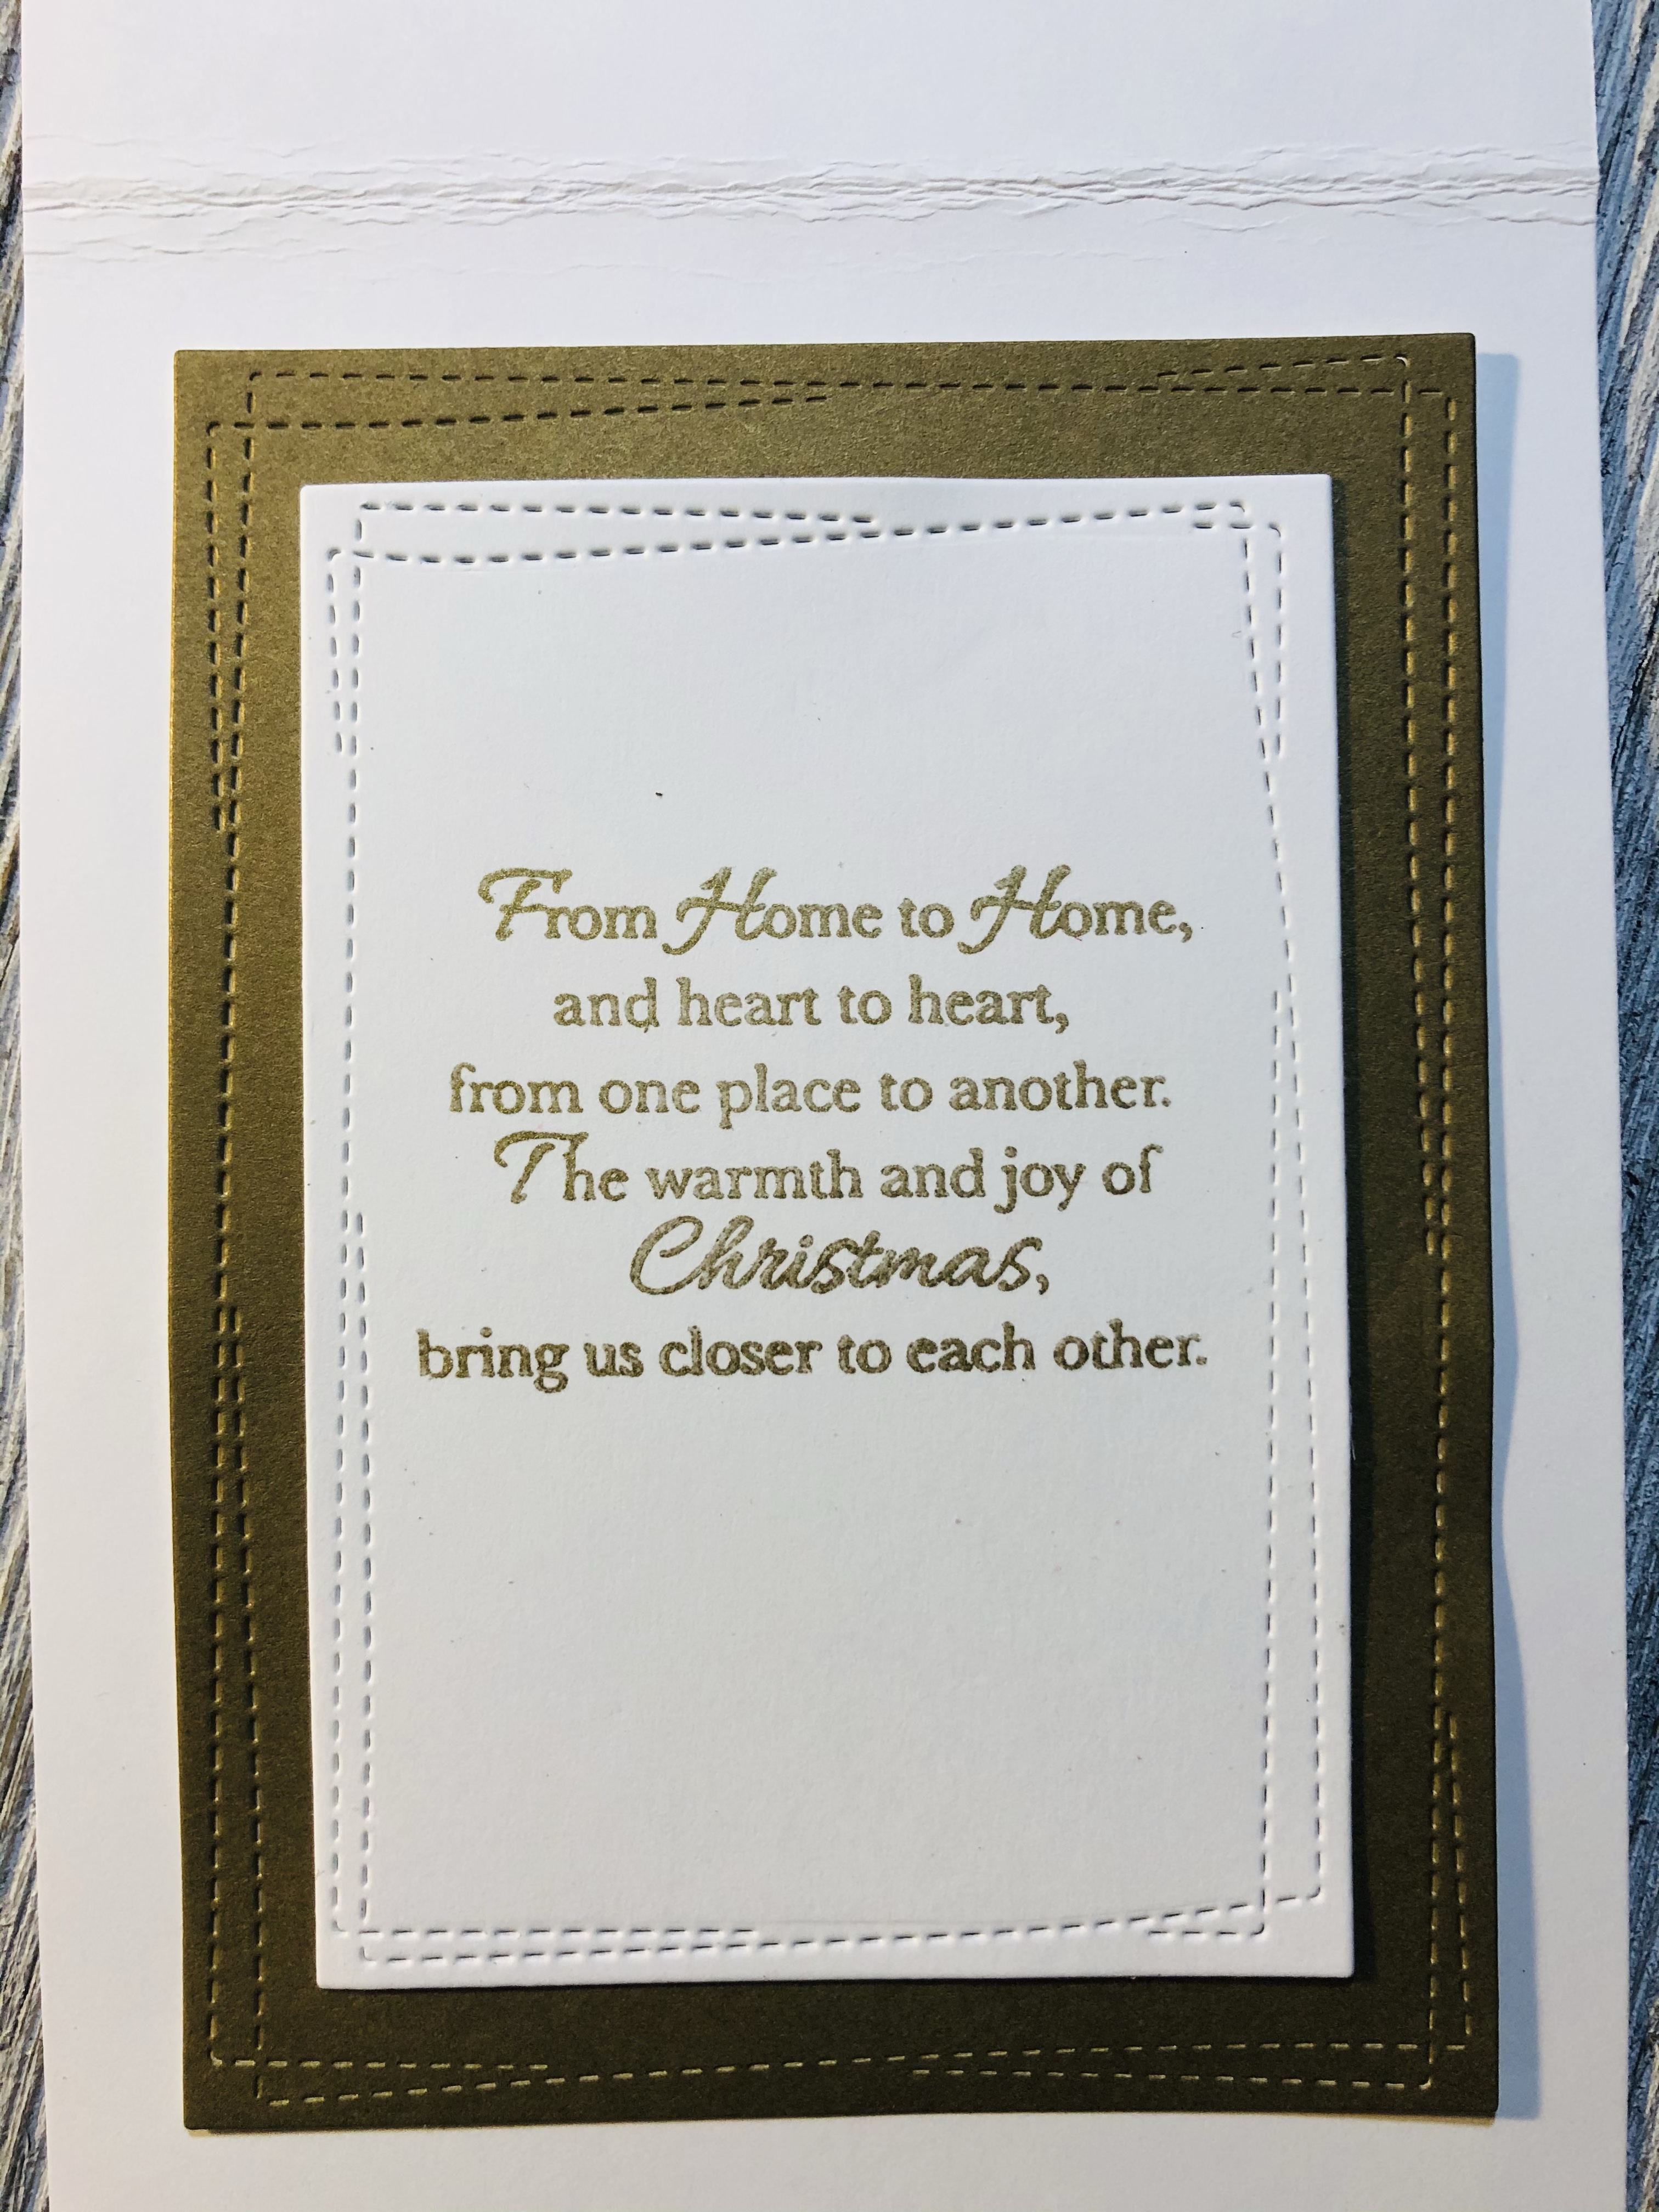
I used Simon Says Stamp die joyful and cut it out with beige and red shimmer paper. The inside of the card is stamped with Recollections stamp set called Christmas verses and Encore gold metallic ink.
Other products used are strathmore mixed media watercolor paper vellum smooth and memory box wrap stitch rectangle frames dies #30094. Spayed the cards with glitter dust gold. Used 110 white card stock, Recollections holiday shimmer cards stock.
Thank you for checking out my blog. Please leave me a comment or like. And have a wonderful day.
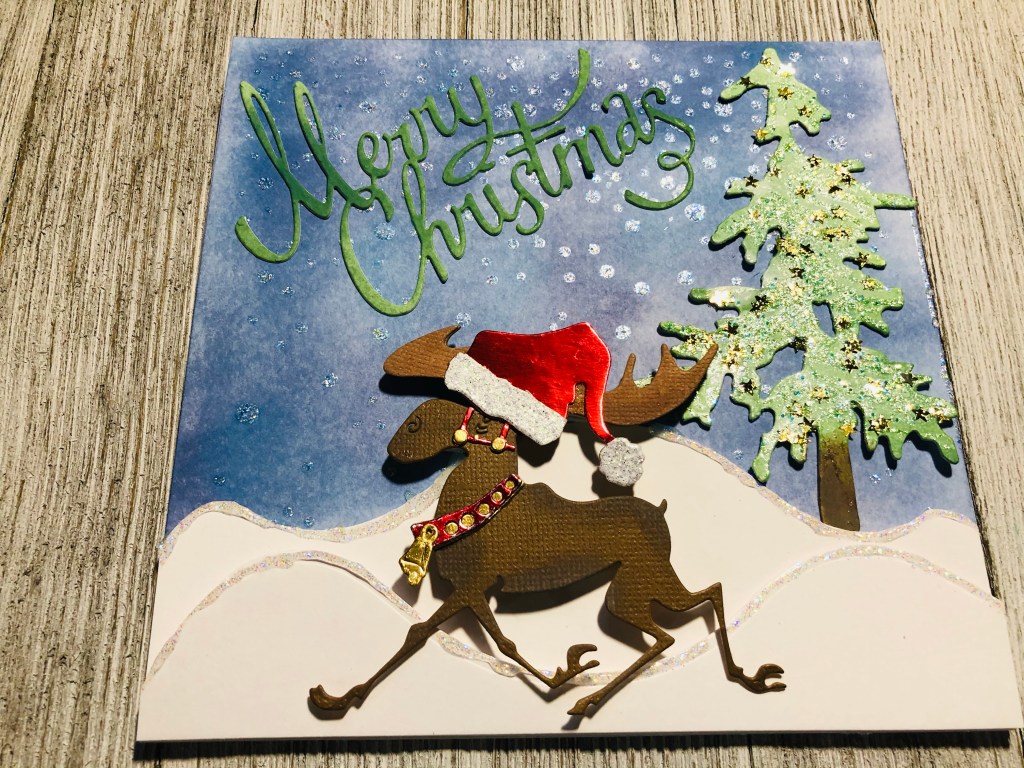
Hello my crafty friends! I hope all is well and everyone had a beautiful Thanksgiving this year. Today I wanted to share a couple cards that I made using Tim Holtz products.
Merry Moose
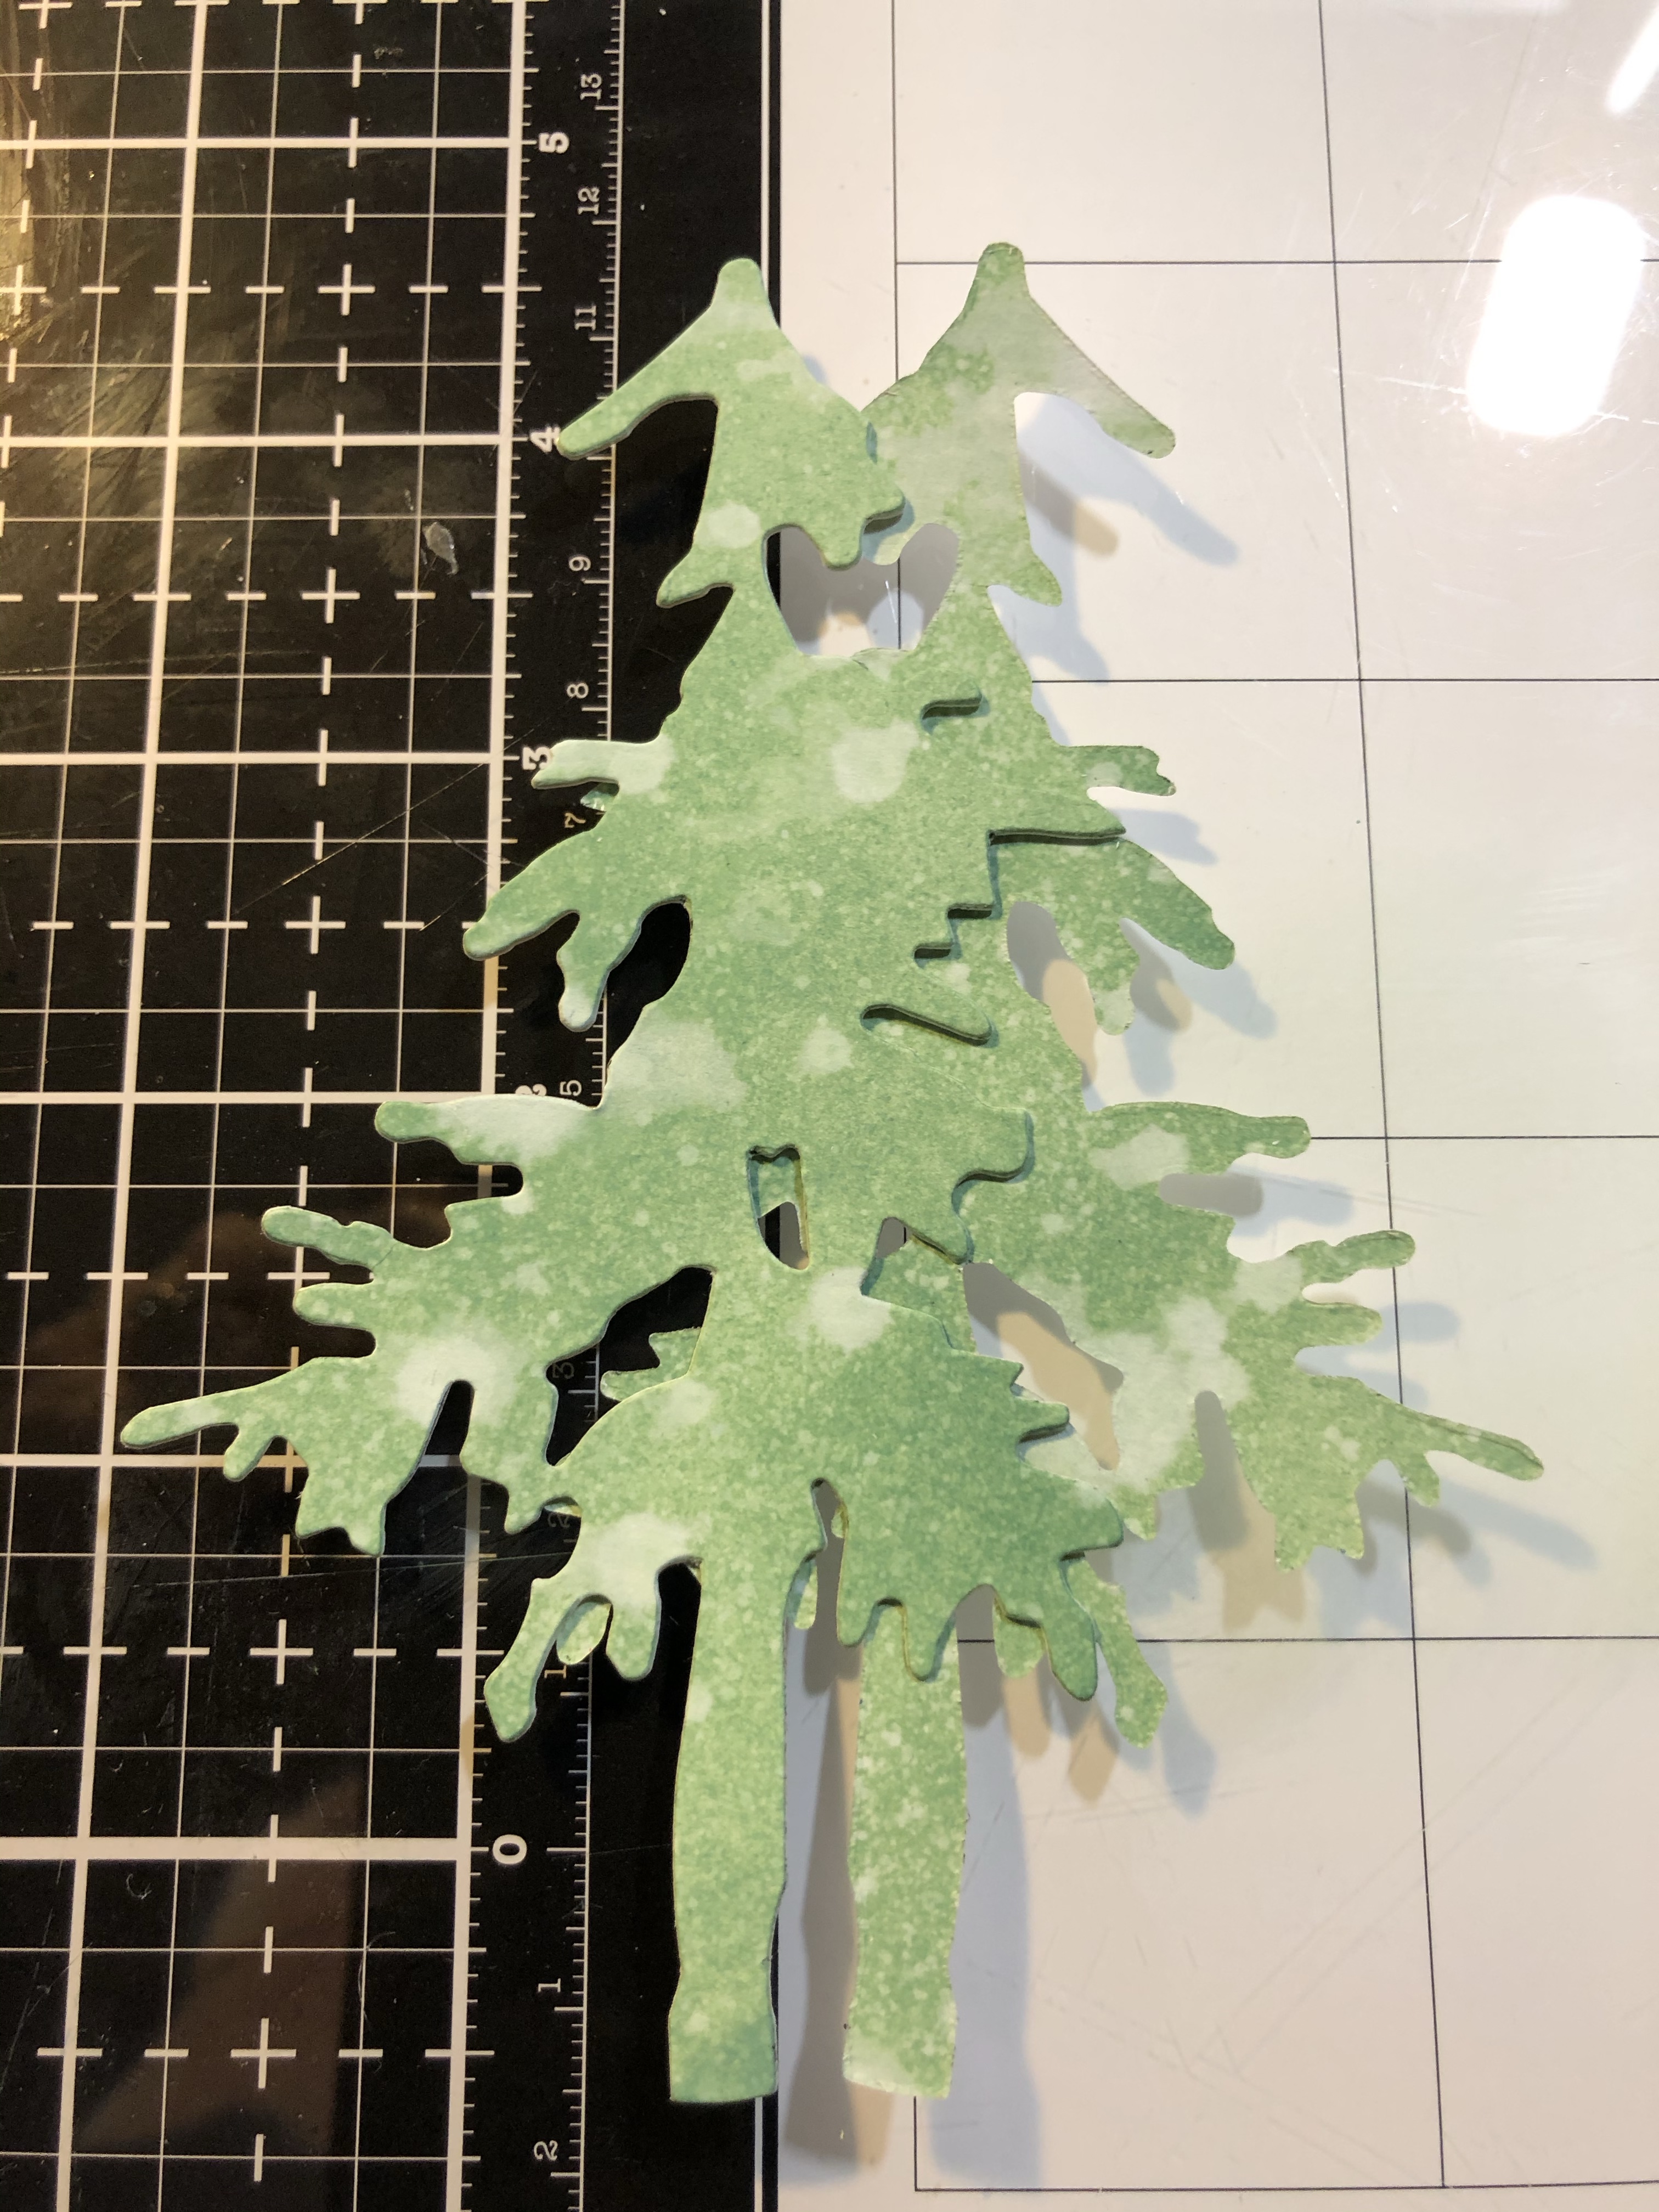
I use the new tim holtz distress oxide rustic wilderness on some watercolor paper. Sprayed water on it and then took a paper towel and pat it dry. I also users tim holtz alternation pine tree to cut my trees out. I took his sticklers nebula glitter gel, cover the trees. Tree trunk color is distress oxide ground espresso.
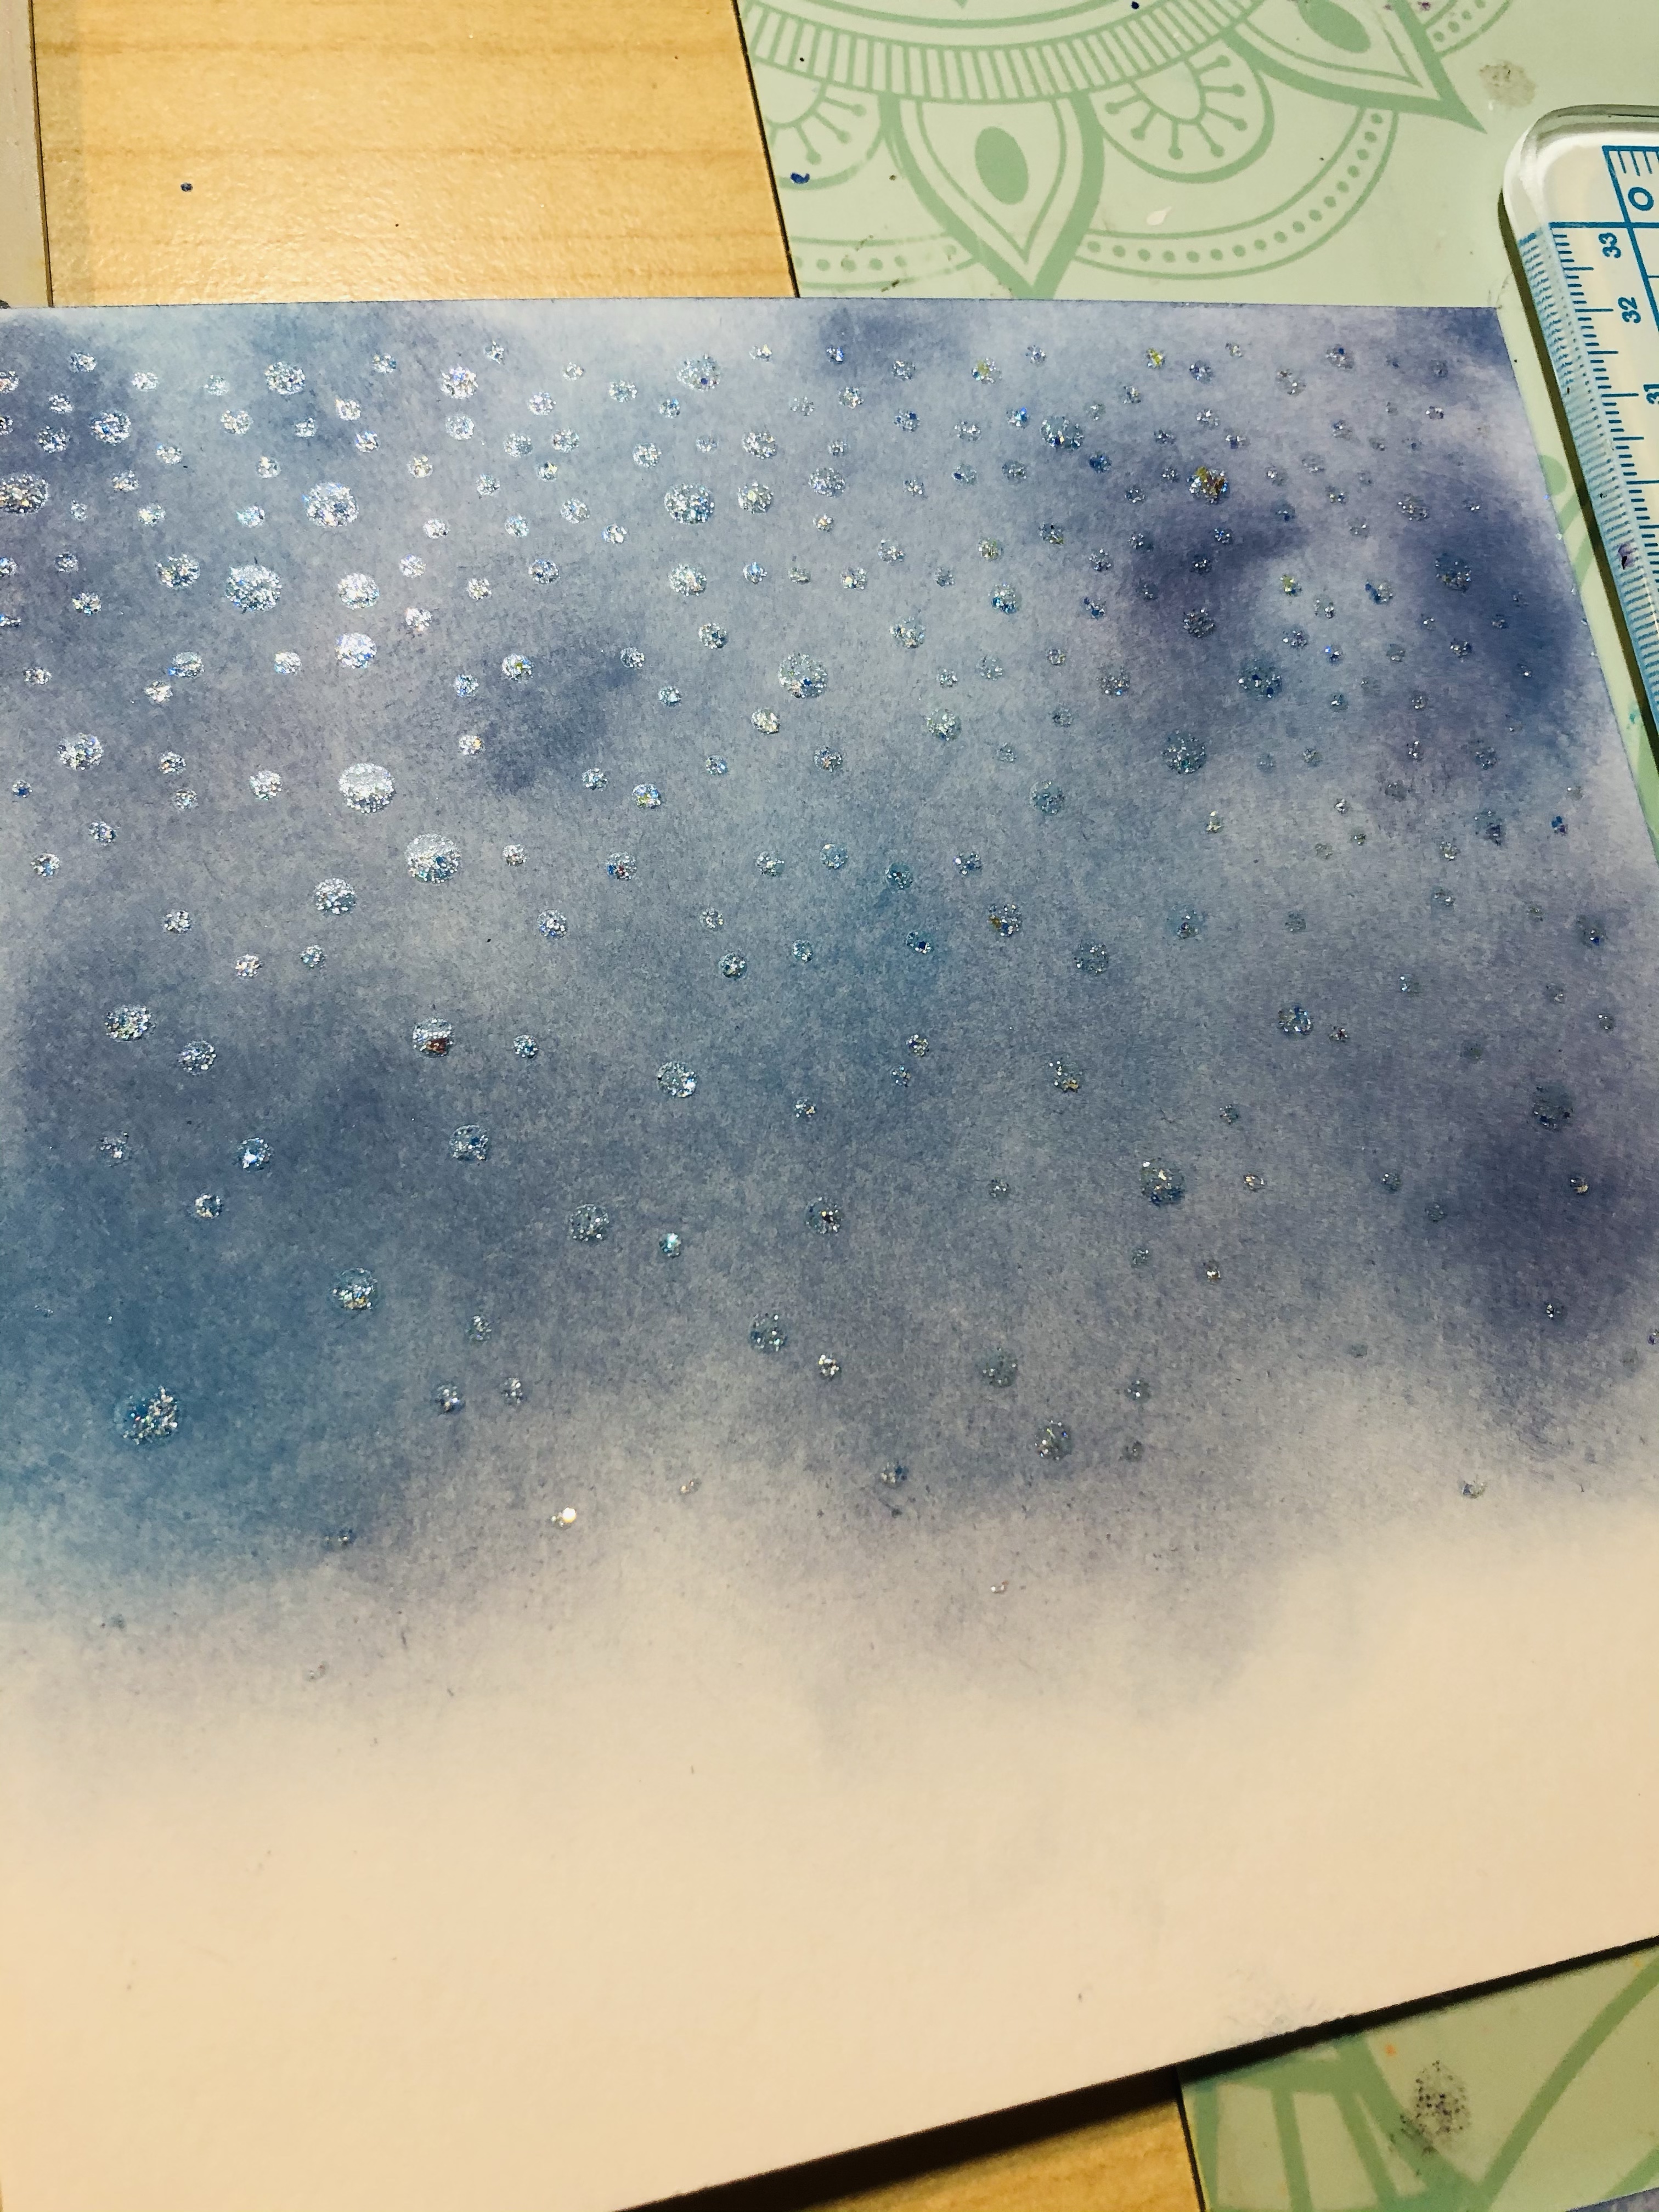
My background colors are Tim Holtz distress oxides chip sapphire, faded jean and mermaid lagoon. I also took a snow stencil and used TH sticklers moon dust glitter gel on backgrounds.
TH other products used are Home for the holiday, Bird crazy things, Christmas ribbon and merry moose thinlits. TH Kraft-stock classic, nostalgic, metallic jewels and metallic. And stickers star dust on my snow hills.
Thank you for checking out my blog. If you like please let me know. And I hope you try making theses cards for Christmas too.
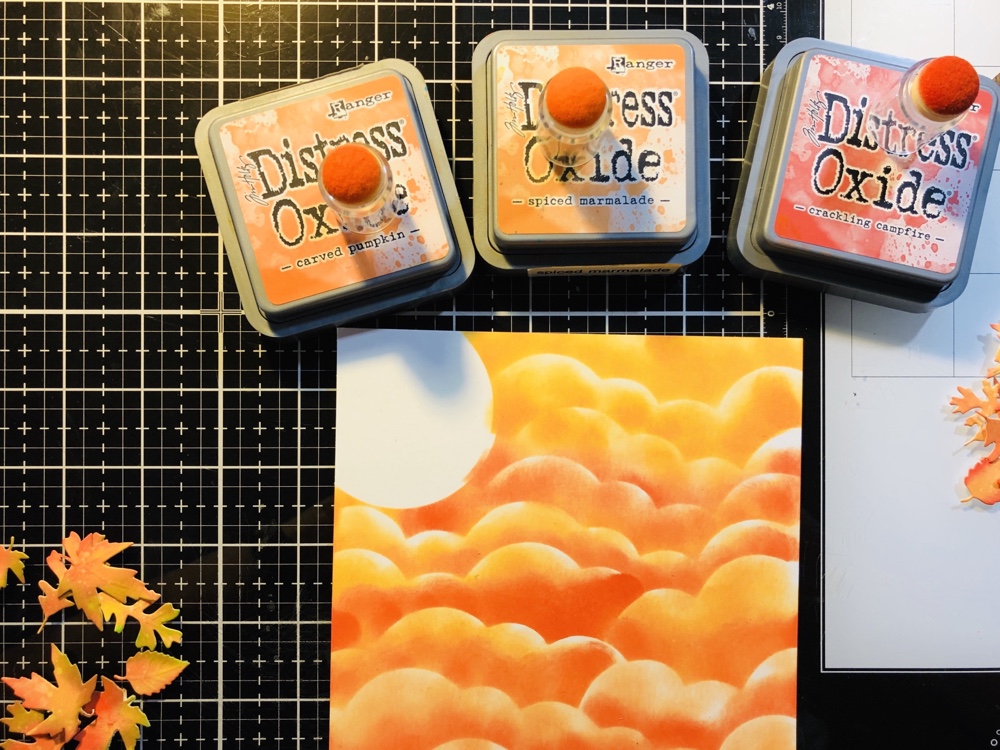
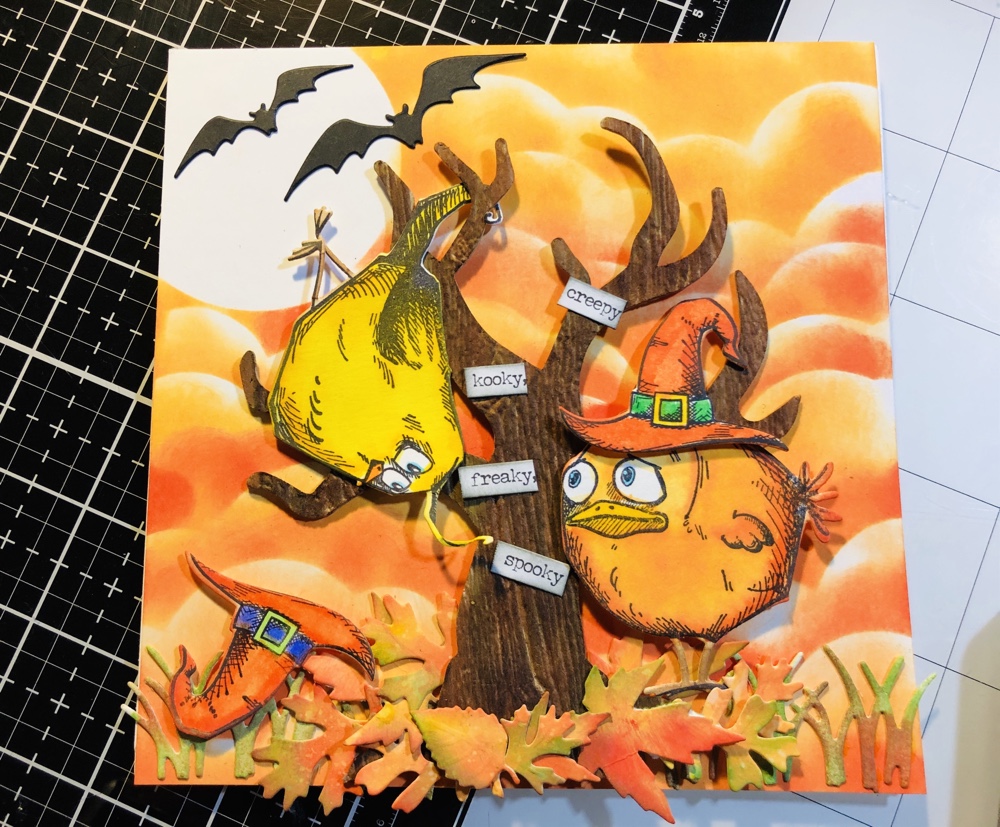
Hello my crafty friends! Today I wanted to work on another Halloween card. So the stamp I pick today is Tim Holtz (Bird Crazy) I only used two birds out of the stamp set. I’ll list all products down below.
I used Tim Holtz Distress Oxides carved pumpkin, spiced marmalade, crackling campfire, mustard seed, mowed lawn, vintage photo and black soot. Also used Tim Holtz distress stain vintage photo and walnut stain on tree. Plus 3-D texture fade Lumber # 662718. Background was done with just three colors carved pumpkin, spiced marmalade and Tim Holtz new Distress oxide crackling campfire.
Other products used are Tim Holtz Fall Foliage #660955, Bat Crazy #664203. Bird Crazy stamp cm237 and Bird crazy thinlits #660954, Crazy Things Stamp cms237 and Framelits #660953. TH small talk occasions too.
Thank you for checking out my blog. If you like it please follow and like my blog. Have a great day everyone.
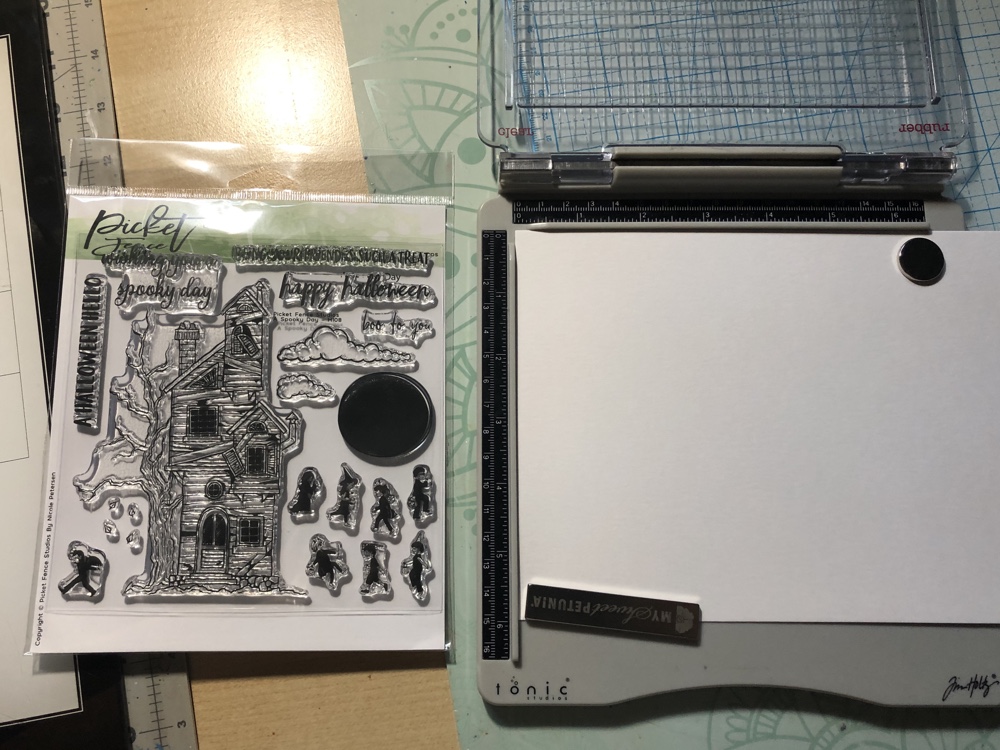
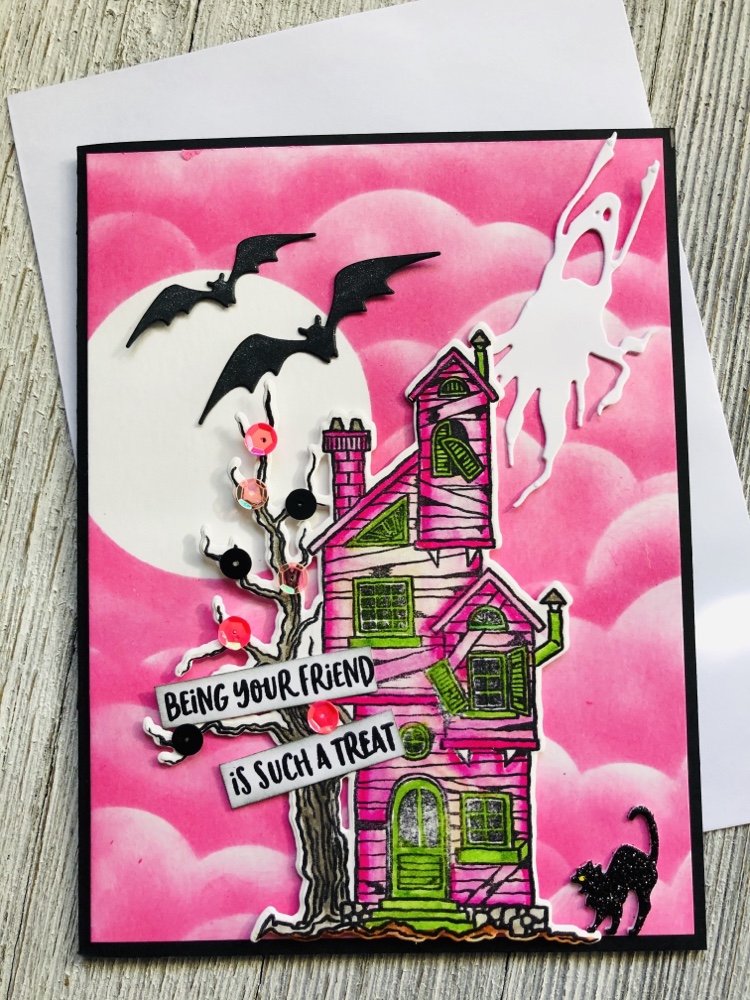
Hello my crafty friends! Hoping everyone is having a wonderful day. For the passed three days I have been working on Halloween cards. The stamp I chooses is called A Spooky Day made by Picket Fence Studios. I fell in love with it, because I saw another card made by this stamp, I’m pretty sure it was on their blog. So thank you Picket Fence for making and sharing a cute card and to the creator. I love when I get inspired by others. I did change a couple of thing and add some to the cards. I will list all products I used down bellow.
This is everything I used to make this cute card.
I stamp the house with Ranger Archival Ink Jet Black acid free permanent waterproof. The pens I used to color the house are Kuretake Zig Watercolor pens (No. 025 Pink, No. 047 may green, No. 041 light green, No. 091 light gray, No. 095 dark gray, No 060 brown and No. 010 black.) Used also a watercolor brush for blending.
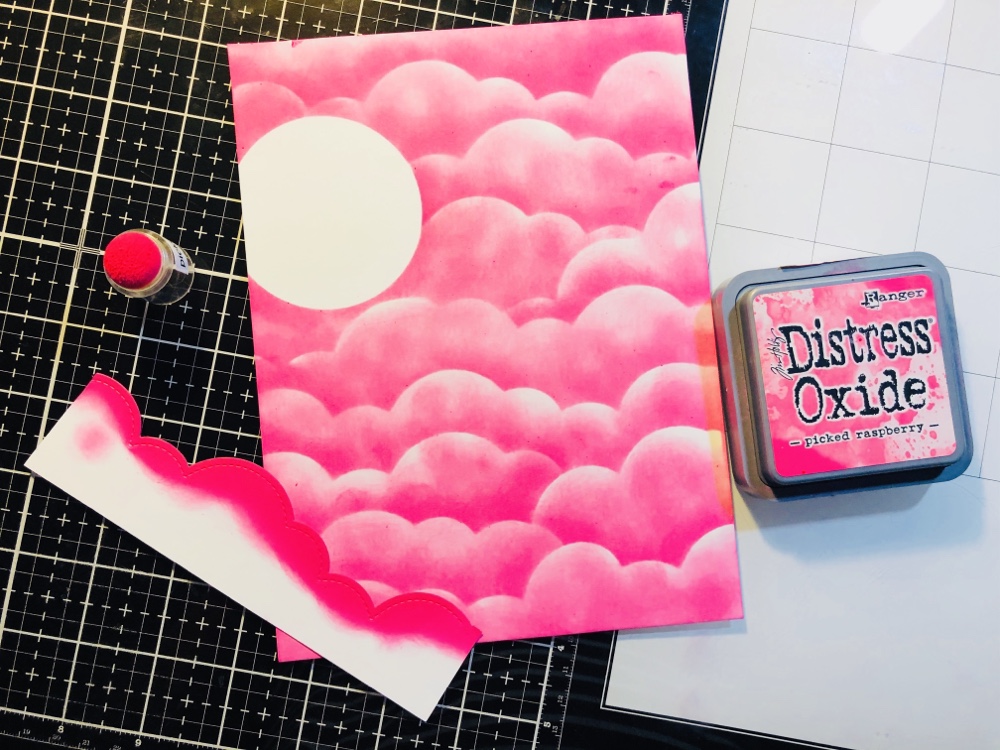
To make the background I took Sizzix Clouds stitched die and 110 white card stock and cut out and used like a stencil for my background with Tim Holtz distress oxide picked raspberry.
I also used Tim Holtz Bat crazy #664203 and Frightful things #664209 Thinlits. Bats and ghosts!
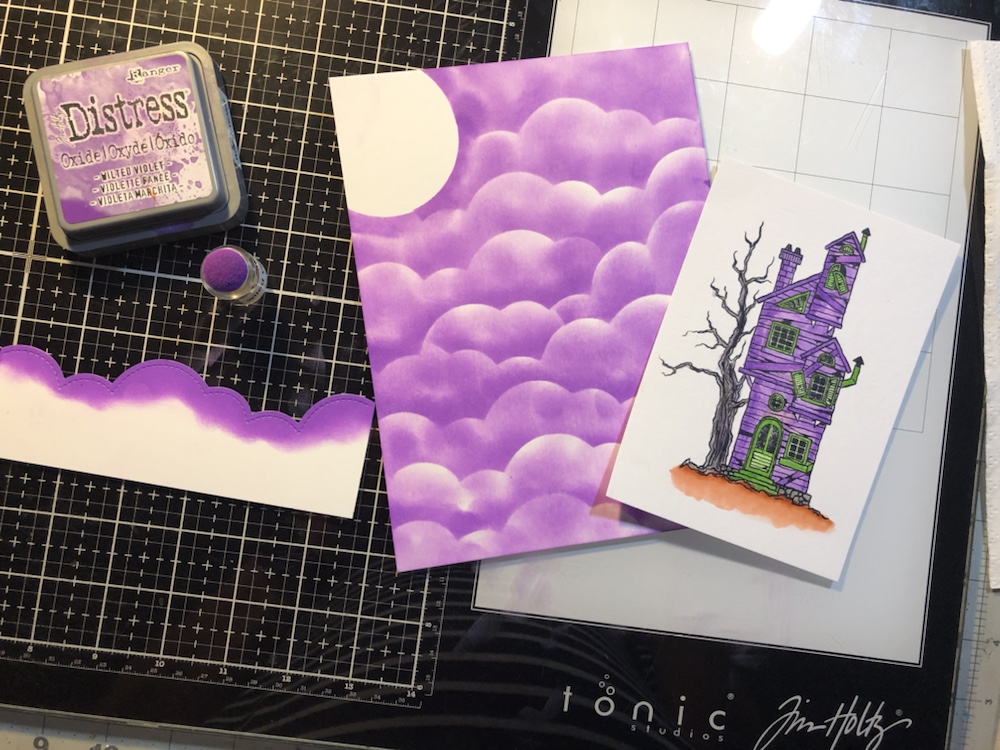
And as you can see I did the same things in purple. Background color is Tim Holtz distress oxide wiled violet and black soot to distress around the phrases. The house colors here are Kuretake zig pen (No. 083 Lilac and the same colors from the pink house.)
Remaining products I used are strathmore mixed media vellum surface 184 lb., 110 black and white card stock. I also use a clear glitter pen on the house and bats to give it a shimmer look. Sequins are pink, purple and black.
Hope you like my spooky cards and have a safe and Happy Halloween this year. Also thank you for checking out my blog.


Recent Comments